
Popular categories
Looking for a yarn?


|
||||||||||||||||
Citrus Sun |
||||||||||||||||
 |
 |
|||||||||||||||
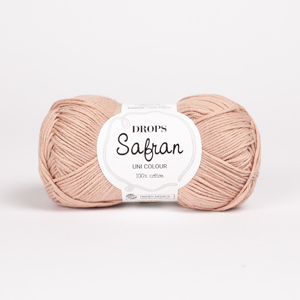
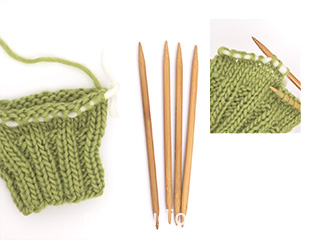
Knitted top in DROPS Safran. The piece is worked in stocking stitch, with V-neck, ribbed edges and small lace sections. Sizes S - XXXL.
DROPS 223-30 |
||||||||||||||||
|
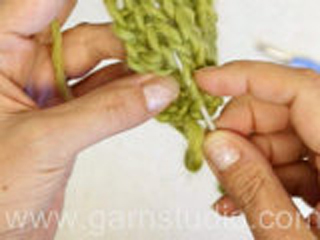
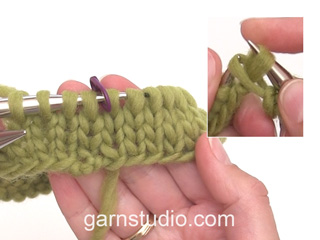
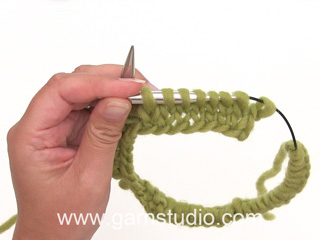
------------------------------------------------------- EXPLANATIONS FOR THE PATTERN: ------------------------------------------------------- RIDGE/GARTER STITCH (worked back and forth): Knit all rows. 1 ridge in height = Knit 2 rows. LACE-PATTERN SECTIONS: Decrease and increase at the marker threads on the front and back pieces as shown in diagrams A.1 and A.2. DECREASE TIP (for armholes): All decreases are worked from the right side! Decrease on the inside of the outermost 7-7-9-9-11-11 stitches on each side. These 7-7-9-9-11-11 stitches are worked as follows from the edge (seen from the right side): 1 edge stitch in garter stitch, * knit 1, purl 1 *, work from *-* a total of 3-3-4-4-5-5 times. DECREASING AFTER THE 7-7-9-9-11-11 STITCHES: Slip 1 stitch as if to knit, knit 1 and pass the slipped stitch over the knitted stitch (1 stitch decreased). DECREASING BEFORE THE 7-7-9-9-11-11 STITCHES: Work until there are 2 stitches left before the 7-7-9-9-11-11 edge stitches, knit 2 together (= 1 stitch decreased), work the 7-7-9-9-11-11 stitches as before. DECREASE TIP-2 (for V-neck): All decreases are worked from the right side! Decrease on the inside of the 3 outermost stitches towards the neck. These 3 stitches are worked as follows from the edge (seen from the right side): 1 edge stitch in garter stitch, knit 1, purl 1. DECREASING AFTER THE 3 STITCHES: Slip 1 stitch as if to knit, knit 1 and pass the slipped stitch over the knitted stitch (= 1 stitch decreased). DECREASING BEFORE THE 3 STITCHES: Work until there are 2 stitches left before the 3 edge stitches, knit 2 together (= 1 stitch decreased), work the 3 stitches as before. ------------------------------------------------------- START THE PIECE HERE: ------------------------------------------------------- TOP – SHORT OVERVIEW OF THE PIECE: The body is worked in the round with circular needle, bottom up as far as the armholes. Then the front and back pieces are finished separately, back and forth with circular needle. The straps are sewn onto the back piece. BODY: Cast on 200-220-240-260-288-316 stitches with circular needle size 3 mm and Safran. Change to circular needle size 2.5 mm and work rib in the round (= knit 1, purl 1) for 2 cm. Change back to circular needle size 3 mm and work the first round as follows: Work 10-10-14-14-16-16 stitches in rib (starting with knit 1), 79-89-93-103-111-125 stitches in stocking stitch, 21-21-27-27-33-33 stitches in rib (starting with purl 1), 79-89-93-103-111-125 stitches in stocking stitch, 11-11-13-13-17-17 stitches in rib (starting with purl 1). Continue with stocking stitch and rib in the sides. REMEMBER THE KNITTING TENSION! When the piece measures 4 cm in all sizes, insert 4 marker threads as described below; these threads are used when working the lace-pattern sections. Count 10-10-14-14-16-16 ribbed stitches, 17-21-21-25-28-34 stocking stitches, insert 1 marker thread, count 45-47-51-53-55-57 stocking stitches (= mid-front), insert 1 marker thread, count 17-21-21-25-28-34 stocking stitches, 21-21-27-27-33-33 ribbed stitches, 17-21-21-25-28-34 stocking stitches, insert 1 marker thread, count 45-47-51-53-55-57 stocking stitches (= mid-back) and insert 1 marker thread. There are 17-21-21-25-28-34 stocking stitches and 11-11-13-13-17-17 ribbed stitches left after the last thread. Allow the threads to follow your work onwards. Continue with stocking stitch and rib as before – in addition, decrease for LACE-PATTERN SECTIONS – read description above, by working A.1 over each marker thread (thread sits in the middle of A.1) = 8 stitches decreased on the round. Repeat A.1 a total of 4 times in height = 168-188-208-228-256-284 stitches. Continue as before, without further decreases, until the piece measures 14-14-14-16-16-16 cm. Now increase for LACE-PATTERN SECTIONS – read description above, by working A.2 over each marker thread (thread sits in the middle of A.2) = 8 stitches increased on the round. Repeat A.2 a total of 4 times in height = 200-220-240-260-288-316 stitches. Continue as before, without further increases, until the piece measures 30-31-32-33-33-34 cm. Now cast off for the armholes and divide for the front and back pieces as follows: Cast off 3-3-5-5-5-5 stitches, work 7-7-9-9-11-11 ribbed stitches as before, work 36-41-43-48-52-59 stitches in stocking stitch, purl 1, knit 1, 1 garter stitch, knit 2 twisted together (= 1 stitch decreased mid-front), knit 1, purl 1, work 36-41-43-48-52-59 stitches in stocking stitch, 7-7-9-9-11-11 ribbed stitches, cast off 7-7-9-9-11-11 stitches for the armhole, work 7-7-9-9-11-11 ribbed stitches, 79-89-93-103-111-125 stitches in stocking stitch, 7-7-9-9-11-11 ribbed stitches and cast off the last 4-4-4-4-6-6 stitches for the armhole. Cut the strand. The front and back pieces are finished separately. LEFT FRONT PIECE (when garment is worn): = 46-51-55-60-66-73 stitches. Start mid-front from the wrong side and pick up 1 stitch in the decreased stitch and knit this loop together with the first stitch on the left needle (this is to avoid a «jump» at the bottom of the V-neck), purl 1, knit 1, then purl until there are 7-7-9-9-11-11 stitches left before the armhole, work rib as before over the next 6-6-8-8-10-10 stitches and finish with 1 edge stitch in garter stitch. Continue back and forth like this, with 1 edge stitch in garter stitch and 6-6-8-8-10-10 ribbed stitches towards the armhole, stocking stitch, 2 ribbed stitches and 1 edge stitch in garter stitch towards the neck. AT THE SAME TIME, on the first row from the right side, start to decrease for the armhole and V-neck as follows: ARMHOLE – read DECREASE TIP-1: Decrease 1 stitch every 2nd row (each row from the right side) a total of 10-14-14-19-23-27 times. V-NECK – read DECREASE TIP-2: Decrease 1 stitch every 2nd row (each row from the right side) a total of 25-26-26-26-26-27 times. After the last decrease there are 11-11-15-15-17-19 stitches left on the shoulder. Now work rib back and forth over all stitches with 1 edge stitch in garter stitch on each side until the piece measures 51-53-55-57-59-61 cm (front piece measures approx. 3 cm more than the measurement in the sketch because the strap will be sewn to the back piece). Cast off. RIGHT FRONT PIECE (when garment is worn): = 46-51-55-60-66-73 stitches. Start at the armhole from the wrong side, work 1 edge stitch in garter stitch, rib as before over the next 6-6-8-8-10-10 stitches, purl until there are 3 stitches left before the neck, knit 1, purl 1 and finish with 1 edge stitch in garter stitch. Continue back and forth like this. AT THE SAME TIME on the first row from the right side start to decrease for the V-neck and the armhole as follows: V-NECK – read DECREASE TIP-2: Decrease 1 stitch every 2nd row (each row from the right side) a total of 25-26-26-26-26-27 times. ARMHOLE – read DECREASE TIP-1: Decrease 1 stitch every 2nd row (each row from the right side) a total of 10-14-14-19-23-27 times. After the last decrease there are 11-11-15-15-17-19 stitches left on the shoulder. Now work rib back and forth over all stitches with 1 edge stitch in garter stitch on each side until the piece measures 51-53-55-57-59-61 cm. Cast off. BACK PIECE: = 93-103-111-121-133-147 stitches. Start at one armhole from the wrong side and work 1 edge stitch in garter stitch, rib as before over the next 6-6-8-8-10-10 stitches, purl until there are 7-7-9-9-11-11 stitches left on the row, rib as before over the next 6-6-8-8-10-10 stitches and finish with 1 edge stitch in garter stitch. Continue back and forth like this AT THE SAME TIME on the first row from the right side begin to decrease for the armholes – read DECREASE TIP-1. Decrease 1 stitch on each side every 2nd row (each row from the right side) a total of 10-14-14-19-23-27 times on each side = 73-75-83-83-87-93 stitches. Continue back and forth with stocking stitch, 6-6-8-8-10-10 ribbed stitches and 1 edge stitch in garter stitch on each side until the piece measures 43-45-47-49-51-53 cm. Now work rib back and forth over all stitches with 1 edge stitch in garter stitch on each side for 2 cm. Then cast off all stitches with garter stitch over garter stitch, knit over knit and purl over purl. The back piece is approx. 3 cm less than the given length in the sketch. ASSEMBLY: Sew the straps to each side of the back piece so the stitches match. |
||||||||||||||||
Diagram explanations |
||||||||||||||||
|
||||||||||||||||

|
||||||||||||||||

|
||||||||||||||||
|
Have you made this or any other of our designs? Tag your pictures in social media with #dropsdesign so we can see them! Do you need help with this pattern?You'll find tutorial videos, a Comments/Questions area and more by visiting the pattern on garnstudio.com. © 1982-2024 DROPS Design A/S. We reserve all rights. This document, including all its sub-sections, has copyrights. Read more about what you can do with our patterns at the bottom of each pattern on our site. |
||||||||||||||||


With over 40 years in knitting and crochet design, DROPS Design offers one of the most extensive collections of free patterns on the internet - translated to 17 languages. As of today we count 304 catalogues and 11422 patterns - 11422 of which are translated into English (UK/cm).
We work hard to bring you the best knitting and crochet have to offer, inspiration and advice as well as great quality yarns at incredible prices! Would you like to use our patterns for other than personal use? You can read what you are allowed to do in the Copyright text at the bottom of all our patterns. Happy crafting!
Comments / Questions (23)
Zijn er ook patronen die met een gewone breinaald (niet rondbreinaald) gebreid worden, en wel met naalden nr 2,5 / 3?
03.06.2024 - 14:05DROPS Design answered:
Dag Nicky,
Veel patronen worden met de rondbreinaalden gebreid, maar er zijn ook patronen die met rechte naalden worden gebreid. Dit zijn vaak de wat oudere patronen. Voor de naalddikte kun je filteren op de bijpassende stekenverhouding.
Verder hebben we een instructie gemaakt om een patroon aan te passen om op rechte naalden te breien. Deze vind je hier. Deze instructie is niet voor alle patronen geschikt, maar misschien kun je hier toch wat mee.
03.06.2024 - 20:29Hej Hur stickar jag insnitten?
11.04.2024 - 15:05DROPS Design answered:
Hei Monica. Det felles og økes til innsnitt ved merketrådene på forstykket og bakstykket slik diagram A.1 og A.2 viser. Se diagrammene og les forklaringene over diagrammene. mvh DROPS Deign
15.04.2024 - 10:43Hi! I am a bit stuck. How do I insert the marker threads? I see in the lesson "how to use a MT between 2 sts" that before and after each MT is an increase. Or I just insert a plain sts markers and carry them along the diagrams. I don;t know how to proceed. Thanks in advance
07.03.2024 - 17:14DROPS Design answered:
Dear Corina, a marker thread is usually used when you also using markers, to differentiate where you need to measure from and where you need to make decreases/ increases. You just put a longer piece of leftover thread between the stitches (ideally in contrasting colors to what you are knitting with) and every few rows put it from one side to the other, kind of weaving it. If you do this regurarly, it helps track your row-numbers too. After finishing, you can easily take it out. I hope this helps. Happy Knitting.
07.03.2024 - 22:30Strikker denne toppen i str. M. Skal begynne å felle til innsnitt. Skjønner ikke helt hvor jeg skal begynne å felle de første 8 maskene. Omgangen starter jo midt i første vrangbord i siden. Har satt merketrådene der de skal være. Håper på raskt svar, da jeg er ivrig på å komme videre 😊
25.08.2023 - 21:35DROPS Design answered:
Hei Bodil. Du strikker halve vrangborden i den ene siden, da er det 21 masker til 1. merketråd/ 1. innsnitt. Strikk 17 masker glattstrikk, deretter strikker du etter A.1 (1. innsnitt). Nå vil merketrådene sitte midt i A.1. Strikk videre til neste merketråd, (merketrådene skal sitte midt i A.1 også til innsnitt 2, 3 og 4). På 1. omgang med innsnitt har du felt 8 ganger (2 ganger på hver side av merketrådene). mvh DROPS Design
04.09.2023 - 14:16Ik moet nu het linkervoorpand gaan breien. Ik snap niet hoe ik moet beginnen . Kun je mij meer uitleg geven?
24.06.2023 - 17:41DROPS Design answered:
Dag Anja,
Je begint midden voor en aan de verkeerde kant te breien. De steken van het achterpand en het rechter voorpand kom je verder niet aan. Eventueel zou je die ook even op een hulpdraad kunnen zetten. Je neemt eerst 1 steek op in de geminderde steek midden voor en deze brei je dan gelijk samen met de eerste steek op de linker naald. Dan volg je het patroon verder volgens de beschrijving.
25.06.2023 - 17:58Hallo, ik kom er niet helemaal uit nu ik het linker en rechter voorpand apart moet breien. Moet ik nu alle steken op een hulpdraad zetten? Of hoe kom ik van het armsgat naar de mindering in het midden van de v hals?
22.06.2023 - 21:04Jeg forstår ikke denne passage: Gentag A.1 totalt 4 gange i højden = 168-188-208-228-256-284 masker. Hvorfor er det ikke angivet i cm. fra kanten? Mvh. Louise
09.04.2023 - 11:57DROPS Design answered:
Hej Louise, målet er angivet i cm og er fra kanten :)
13.04.2023 - 15:04Buongiorno Ho avviato 200 maglie con i ferri circolari n 3 il .Però subito dice di passare con i ferri n2 ,5 x l'elastico mi sono confusa Grazie mille per la disponibilità
15.07.2022 - 09:20DROPS Design answered:
Buonasera Anna, il bordo a coste è realizzato sempre con i ferri più piccoli, poi si ritorna ai 3 mm. Buon lavoro!
16.07.2022 - 15:53Hei. Hvor kan jeg finne en størrelsetabell? Og hvilken størrelse er det på den modellen bruker?:)
16.06.2022 - 13:38DROPS Design answered:
Hej Ane, du finder en måleskitse nederst i opskriften. Her ser du hvordan du vælger størrelse og læser skitsen: Således læser du måleskitsen
17.06.2022 - 08:49Bonjour je souhaiterais savoir s il est possible de faire une encolure un peu moins profonde. Je vous remercie pour votre réponse.
13.06.2022 - 18:55DROPS Design answered:
Bonjour Mme Darchy, fort probablement, il vous suffit de commencer l'encolure plus tard, recalculez bien vos diminutions d'encolure-V pour qu'elles tombent juste pour les bretelles. Bon tricot!
14.06.2022 - 09:11