DROPS Fabel uni colour 75% Wool, 25% Polyamide |
3.00 $ /50g |
Order | |
DROPS Fabel 75% Wool, 25% Polyamide |
3.25 $ /50g |
Order | |
DROPS Fabel long print 75% Wool, 25% Polyamide |
3.50 $ /50g |
Order |
Clicking the ORDER button will redirect you to Wool Warehouse Direct Ltd website
The yarn cost is calculated from the pattern’s smallest size and the yarn’s cheapest product type. Looking for an even better price? You might find it on the DROPS Deals!
-------------------------------------------------------
Alternative Yarn – See how to change yarns here
Yarn Groups A to F – Use the same pattern and change the yarn here
Yarn usage using an alternative yarn – Use our yarn converter here
-------------------------------------------------------
DROPS Fabel uni colour 75% Wool, 25% Polyamide 3.00 $ /50g Order |
|
DROPS Fabel print 75% Wool, 25% Polyamide 3.25 $ /50g Order |
|
DROPS Fabel long print 75% Wool, 25% Polyamide 3.50 $ /50g Order |
Clicking the ORDER button will redirect you to Wool Warehouse Direct Ltd website
The yarn cost is calculated from the pattern’s smallest size and the yarn’s cheapest product type. Looking for an even better price? You might find it on the DROPS Deals!
This pattern has been corrected. Click here to see the correction/s.
All measurements in charts are in cm.
= off-white | |
= dark gray | |
= gray | |
= light gray/green |
Each of our patterns has specific tutorial videos to help you.
These step-by-step tutorials might also help you:
Why is the knitting/crochet tension so important?
Knitting tension is what determines the final measurements of your work, and is usually measured per 10 x 10 cm. It is provided like so: number of stitches in width x number of rows in height - eg: 19 stitches x 26 rows = 10 x 10 cm.
The knitting tension is very individual; some people knit/crochet loosely while others work tightly. You adjust the knitting tension with the needle size, which is why the suggested needle size only serve as a guide! You need to adjust this (up or down) to ensure that YOUR knitting tension matches the knitting tension provided in the pattern. If you work with a different knitting tension than provided you will have a different yarn consumption, and your work will have different measurements than what the pattern suggests.
The knitting tension also determines which yarns can replace each other. As long as you achieve the same knitting tension you can replace one yarn with another.
See DROPS lesson: How to measure your tension/gauge
See DROPS video: How to make a gauge tension swatch
How do I know how many balls of yarn I need?
The required amount of yarn is provided in grams, eg: 450 g. To calculate how many balls you’ll need you first need to know how many grams are in 1 ball (25g, 50g or 100g). This information is available if you click on the individual yarn quality on our pages. Divide the amount required with the amount of each ball. For example, if each ball is 50g (the most common amount), the calculation will be as follows: 450 / 50 = 9 balls.
Can I use a different yarn than what the pattern suggests?
The important thing when changing from one yarn to another is that the knitting/crochet tension remains the same. This is so that the measurements of the finished piece will be the same as on the sketch provided. It is easier to achieve the same knitting tension using yarns from the same yarn group. It is also possible to work with multiple strands of a thinner yarn to achieve the knitting tension of a thicker one. Please try our yarn converter. We recommend you to always work a test swatch.
Please NOTE: when changing yarn the garment might have a different look and feel to the garment in the photo, due to individual properties and qualities of each yarn.
See DROPS lesson: Can I use a different yarn than the one mentioned in the pattern?
What are the yarn groups?
All our yarns are categorised into yarn groups (from A to F) according to thickness and knitting tension – group A contains the thinnest yarns and group F the thickest. This makes it easier for you to find alternative yarns to our patterns, should you wish to switch yarn. All yarns within the same group have a similar knitting tension and can easily replace each other. However, different yarn qualities have different structures and properties which will give the finished work a unique look and feel.
How do I use the yarn converter?
At the top of all our patterns you’ll find a link to our yarn converter, which is a helpful tool should you wish to use a different yarn than suggested. By filling in the yarn quality you wish to replace, the amount (in your size) and number of strands, the converter will present good alternative yarns with the same knitting tension. Additionally it will tell you how much you’ll require in the new qualities and whether you’ll need to work with multiple strands. Most skeins are 50g (some are 25g or 100g).
If the pattern is worked with multiple colours, every colour will have to be converted separately. Similarly, if the pattern is worked with several strands of different yarns (for example 1 strand Alpaca and 1 strand Kid-Silk) you will have to find alternatives for each, individually.
Why do you show discontinued yarns in the patterns?
Since different yarns have different qualities and textures we have chosen to keep the original yarn in our patterns. However, you can easily find options among our available qualities by using our yarn converter, or simply pick a yarn from the same yarn group.
It is possible that some retailers still have discontinued yarns in stock, or that someone has a few skeins at home that they would like to find patterns for.
The yarn converter will provide both alternative yarn as well as required amount in the new quality.
What size should I knit?
If you think it's hard to decide what size to make, it can be a good idea to measure a garment you own already and like the size of. Then you can pick the size by comparing those measures with the ones available in the pattern's size chart.
You'll find the size chart at the bottom of the pattern.
See DROPS lesson: How to read size chart
Why do I get the wrong knitting tension with the suggested needle size?
The needle size provided in the pattern serves only as a guide, the important thing is to follow the knitting tension. And since knitting tension is very individual, you will have to adjust the needle size to ensure that YOUR tension is the same as in the pattern – maybe you’ll have to adjust 1, or even 2 needle sizes, up or down to achieve the correct tension. For this, we recommend that you work test swatches.
Should you work with a different knitting tension than the one provided, the measurements of the finished garment might deviate from the measurement sketch.
See DROPS lesson: How to measure your tension/gauge
See DROPS video: How to make a gauge tension swatch
Why is the pattern worked top-down?
Working a garment top-down provides more flexibility and room for personal adjustment. For example it is easier to try the garment on while working, as well as making adjustments to length of yoke and shoulder caps.
The instructions are carefully explaining every step, in the correct order. Diagrams are adjusted to the knitting direction and are worked as usual.
How do I work according to a knitting diagram?
The diagram depicts all rows/rounds, and every stitch seen from the right side. It is read from bottom to top, from right to left. 1 square = 1 stitch.
When working back and forth, every other row is worked from the right side and every other row is worked from the wrong side. When working from the wrong side, the diagram will have to be worked reversed: from left to right, knit stitches are purled, purl stitches are knit etc.
When working in the round every round is worked from the right side and the diagram are worked from right to left on all rounds.
See DROPS lesson: How to read knitting diagrams
How do I work according to a crochet diagram?
The diagram depicts all rows/rounds, and every stitch seen from the right side. It is worked from bottom to top, from right to left.
When working back and forth every other row is worked from the right side: from right to left and every other row is worked from the wrong side: from left to right.
When working in the round, every row in the diagram are worked from the right side, from right to left.
When working a circular diagram you start in the middle and work your way outwards, counter clockwise, row by row.
The rows usually start with a given number of chain stitches (equivalent to the height of the following stitch), this will either be depicted in the diagram or explained in the pattern.
See DROPS lesson: How to read crochet diagrams
How do I work several diagrams simultaneously on the same row/round?
Instructions for working several diagrams after each other on the same row/round, will often be written like so: “work A.1, A.2, A.3 a total of 0-0-2-3-4 times". This means you work A.1 once, then A.2 is worked once, and A.3 is repeated (in width) the number of times provided for your size – in this case like so: S = 0 times, M = 0 times, L=2 times, XL= 3 times and XXL = 4 times.
The diagrams are worked as usual: begin with the first row in A.1, then work the first row in A.2 etc.
See DROPS lesson: How to read knitting diagrams
See DROPS lesson: How to read crochet diagrams
Why are the sleeves shorter in larger sizes?
The total width of the garment (from wrist-to-wrist) will be larger in the larger sizes, despite the actual sleeves being shorter. The larger sizes have longer sleeve caps and wider shoulders, so there will be a good fit in all sizes.
Where on the garment is the length measured?
The measurement sketch/schematic drawing provides information regarding the full length of the garment. If it’s a jumper or a jacket the length is measured from the highest point on the shoulder (usually closest to the neckline), and straight down to the bottom of the garment. It is NOT measured from the tip of shoulder. Similarly, the length of yoke is measured from the highest point on the shoulder and down to where yoke is split into body and sleeves.
See DROPS lesson: How to read a schematic drawing
What is a repeat?
Diagrams are often repeated on the round or in height. 1 repeat is the diagram the way it appears in the pattern. If it says to work 5 repeats of A.1 in the round, then you work A.1 a total of 5 times after/next to each other in the round. If it says to work 2 repeats of A.1 vertically/in height you work the entire diagram once, then begin again at the start and work the entire diagram one more time.
Why does the piece start with more chain stitches than it’s worked with?
Chain stitches are slightly narrower than other stitches and to avoid working the cast-on edge too tight, we simply chain more stitches to begin with. The stitch count will be adjusted on the following row to fit the pattern and measurement sketch.
Why increase before the rib edge when the piece is worked top-down?
The rib edge is more elastic and will contract slightly compared to, for example, stocking stitch. By increasing before the rib edge, you avoid a visible difference in width between the rib edge and the rest of the body.
Why increase in the cast-off edge?
It’s very easy to cast off too tightly, and by making yarn overs while casting off (and simultaneously casting these off) you avoid a too tight cast off edge.
See DROPS video: How to bind off with yarn overs (yo)
How do I increase/decrease on every 3rd and 4th row/round alternately?
To achieve an even increase (or decrease) you can increase on, for example: every 3rd and 4th row alternately, like so: work 2 rows and increase on the 3rd row, work 3 rows and increase on the 4th. Repeat this until the increase is complete.
See DROPS lesson: Increase or decrease 1 st on every 3rd and 4th row alternately
How can I work a jacket in the round instead of back and forth?
Should you prefer to work in the round instead of back and forth, you may of course adjust the pattern. You’ll need to add steeks mid-front (usually 5 stitches), and follow the instructions. When you would normally turn and work from the wrong side, simply work across the steek and continue in the round. At the end you’ll cut the piece open, pick up stitches to work bands, and cover the cut edges.
See DROPS video: How to knit steeks and cut open
Can I work a jumper back and forth instead of in the round?
Should you prefer to work back and forth instead of in the round, you may of course adjust the pattern so you work the pieces separately and then assemble them at the end. Divide the stitches for the body in 2, add 1 edge stitch in each side (for sewing) and work the front and back pieces separately.
See DROPS lesson: Can I adapt a pattern for circular needles into straight needles?
Why is the pattern slightly different than what I see in the photo?
Pattern repeats can vary slightly in the different sizes, in order to get the correct proportions. If you’re not working the exact same size as the garment in the photo, yours might deviate slightly. This has been carefully developed and adjusted so that the complete impression of the garment is the same in all sizes.
Make sure to follow instructions and diagrams for your size!
How do I make a women’s size garment into a men’s size one?
If you have found a pattern you like which is available in women’s size it’s not very difficult to convert it to men’s size. The biggest difference will be the length of sleeves and body. Start working on the women size that you think would fit across the chest. The additional length will be worked right before you cast off for the armhole/sleeve cap. If the pattern is worked top-down you can add the length right after the armhole or before the first decrease on sleeve.
Regarding additional yarn amount, this will depend on how much length you add, but it is better with a skein too many than too few.
How do I prevent a hairy garment from shedding?
All yarns will have excess fibres (from production) that might come off as lint or shedding. Brushed yarns (ie hairier yarns) have more of these loose, excess fibres, causing more shedding.
Shedding also depends on what is worn under or over the garment, and whether this pulls at the yarn fibres. It’s therefore not possible to guarantee that there will be no shedding
Below are some tips on how to get the best result when working with hairier yarns:
1. When the garment is finished (before you wash it) shake it vigorously so the looser hairs come off. NOTE: do NOT use a lint roller, brush or any method that pulls at the yarn.
2. Place the garment in a plastic bag and put it in your freezer - the temperature will cause the fibres to become less attached to each other, and excess fibres will come off easier.
3. Leave in the freezer for a few hours before taking it out and shaking it again.
4. Wash the garment according to the instructions on the yarn label.
Why does my garment pill?
Pilling is a natural process that happens to even the most exclusive of fibers. It's a natural sign of wear and tear that is hard to avoid, and that is most visible in high friction areas of your garment like a sweater's arms and cuffs.
You can make your garment look as new by removing the pilling, using a fabric comb or a pill/lint remover.
Stella Alpina |
|||||||||||||
|
|
||||||||||||
DROPS dress in ”Alpaca” and ”Fabel” with star pattern border. Size S - XXL.
DROPS 110-3 |
|||||||||||||
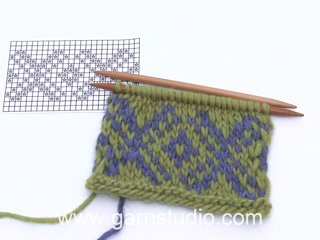
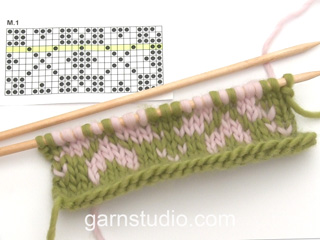
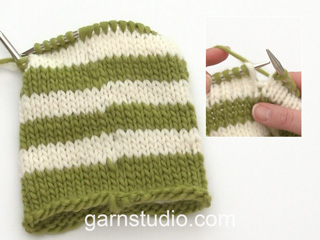
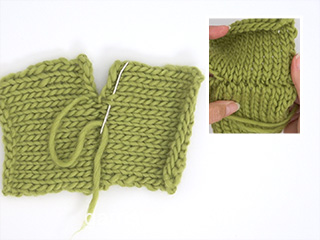
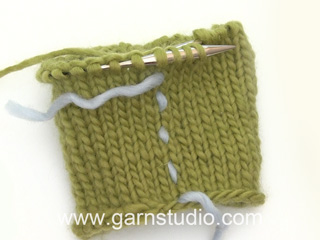
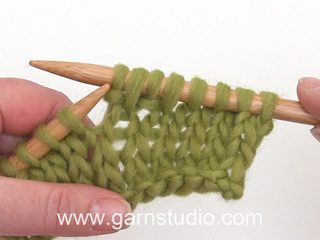
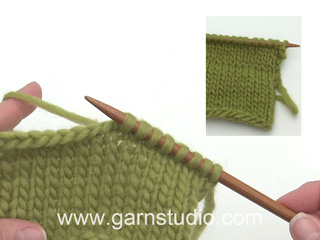
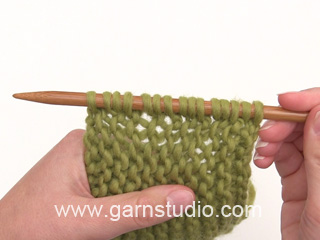
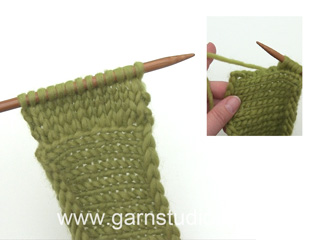
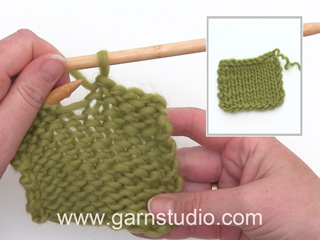
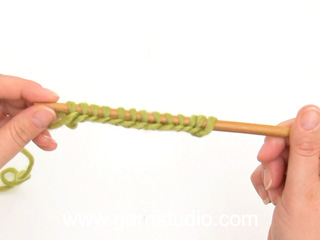
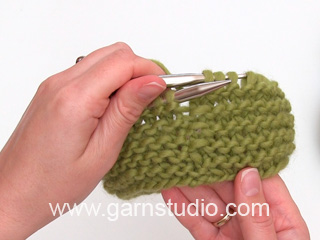
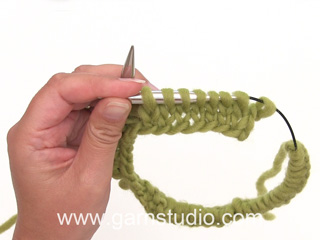
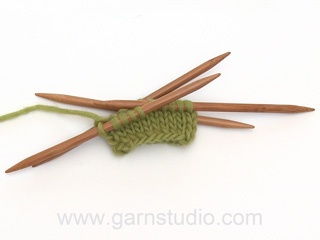
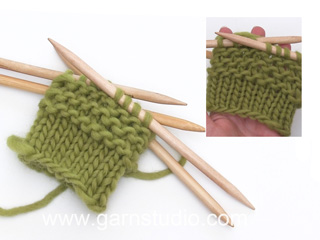
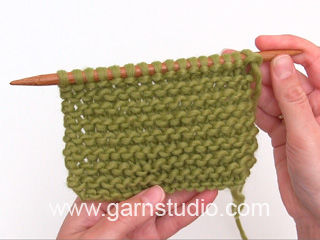
Measurement tip: Measure piece when lying flat. Garter st, back and forth on needle: K all rows. Garter st, in the round: K 1 round, P 1 round. Shortened rows: To shape the skirt work shortened rows as follows: 2 rows garter st on all sts, * 1 row garter st on 25 sts only, turn piece, tighten thread and work return row, 4 rows garter st on all sts, 1 row garter st on 50 sts only, turn piece, tighten thread and work return row, 4 rows garter st on all sts *, repeat from *-*. I.e. 1 repeat = 12 rows at bottom and 8 rows at top. Pattern: See diagram M.1, the entire pattern is worked in stockinette st with 2 threads Alpaca. SKIRT Worked from side to side in garter st from mid back to mid back. Worked back and forth on circular needle. Loosely cast on 75 sts (for all sizes) on circular needle size 6 mm [US 10] with 1 thread Fabel and 1 thread dark gray Alpaca. Insert 1 Marking Thread (MT) after 25 sts and 1 MT after 50 sts and let the MT follow the piece as you go along. Work garter st with shortened rows – see above. Continue like this until piece measures 36-40-44-48-52 cm [14 ¼"-15¾"-17¼"-19"-20½"] at the top, piece measures approx 54-60-66-72-78 cm [21¼"-23⅝"-26"-28⅜"-30¾"] at the other side towards the bottom edge – see Measurement tip! Insert 1 MT in piece (= mid front) and continue as before until piece on this side of MT = piece on the other side of MT. Piece now measures 72-80-88-96-104 cm [28⅜"-31½"-34⅝"-37¾"-41"] at the top and 108-120-132-144-156 cm [47¼"-52"-56½"-61¼"] along bottom edge. Bind off very loosely. Sew skirt tog mid back, edge to edge from RS to avoid a chunky seam. Yoke: Worked in 2 threads Alpaca. Pick up 130-144-158-172-188 sts with dark gray Alpaca on circular needle size 4.5 mm [US 7] along the top of skirt - make sure the skirt seam sits mid back, beg picking up sts at one side and continue all the way round! Now measure piece from here! P 1 round, 2 rows garter st with gray and 2 rows garter st with light gray/green. Change to off-white, K 1 round, at the same time inc evenly to 144-162-180-198-216 sts. Insert 1 MT each side as follows: Size S: Insert MT in middle of st at side so that there are 71 sts on front and back piece + 1 st each side. Size M: Insert MT between 2 sts at side so that there are 81 sts on front and back piece. Size L: Insert MT in middle of st at side so that there are 89 sts on front and back piece + 1 st each side. Size XL: Insert MT between 2 sts at side so that there are 99 sts on front and back piece. Size XXL: Insert MT in middle of st at side so that there are 107 sts on front and back piece + 1 st each side. All sizes: Work M.1 – make sure that st marked with an arrow sits mid front. After M.1 work 2 rows garter st with light gray/green, 2 rows garter st with gray and 2 rows garter st in dark gray. Continue in stockinette st and dark gray. When yoke measures 10-10-11-11-12 cm [4"-4"-4⅜"-4⅜"-4¾"] bind off 5-6-7-8-9 sts each side for armhole = 67-75-83-91-99 sts on front and back piece. Now complete each piece separately. Front piece: = 67-75-83-91-99 sts. Continue in stockinette st, at the same time bind off to shape the armhole each side at the beg of every row: 3 sts 0-0-1-1-1 time, 2 sts 0-1-1-2-3 rimes and 1 st 2-3-3-4-5 times = 63-65-67-69-71 sts. When piece measures 22-23-24-25-27 cm [8¾"-9"-9½"-9¾"-10⅝"] slip the middle 15-17-17-19-19 sts on a stitch holder for neck and complete each shoulder separately. Bind off to shape the neckline at the beg of every row towards mid front: 3 sts 1 time, 2 sts 1 time and 1 st 3 times = 16-16-17-17-18 sts left on each shoulder. Bind off when piece measures 29-30-32-33-35 cm [11⅜"-11¾"-12½"-13"-13¾"]. The whole dress now measures approx 83-84-86-87-89 cm [32¾"-33"-33⅞"-34¼"-35"] . Back piece: = 67-75-83-91-99 sts. Bind off for armhole as described for front piece = 63-65-67-69-71 sts. When piece measures 27-28-30-31-33 cm [10⅝"-11"-11¾"-12¼"-13"], bind off the middle 27-29-29-31-31 sts for neck and complete each shoulder separately. On next row bind off 2 sts on neckline = 16-16-17-17-18 sts left on each shoulder. Bind off when piece measures 29-30-32-33-35 cm [11⅜"-11¾"-12½"-13"-13¾"]. Sleeves: Worked in the round on double pointed needles. Cast on 40-42-44-46-48 sts on needle size 4.5 mm [US 7] with 2 threads dark gray Alpaca. Work 6 rounds garter st and continue in stockinette st. At the same time when piece measures 10 cm [4"] inc 2 sts mid under arm on every 3.5-3.5-3-2.5-2 cm [1¼"-1¼"-1⅛"-⅞"-¾"] a total of 11-11-12-14-16 times = 62-64-68-74-80 sts. When piece measures 49-48-47-46-45 cm [19¼"-19"-18½"-18"-17¾"] (less on larger sizes because of longer sleeve cap) bind off 6 sts mid under arm for armhole and complete piece back and forth on needle. Bind off to shape the armhole each side at the beg of every row: 2 sts 3 times, 1 st 2-3-4-5-6 times, and then 2 sts each side until piece measures 56 cm [22"], now bind off 3 sts each side 1 time and bind off remaining sts. Sleeve measures approx 57 cm [22½"]. Assembly: Sew shoulder seams. Neckline: Pick up approx 75 to 85 sts (includes sts on stitch holder mid front) on small circular needle size 4.5 mm [US 7] with 1 thread dark gray Alpaca + 1 thread Fabel. P 1 round, K 1 round, P 1 round and bind off in K sts. Set in sleeves. |
|||||||||||||
Diagram explanations |
|||||||||||||
|
|||||||||||||
Have you made this or any other of our designs? Tag your pictures in social media with #dropsdesign so we can see them! Do you need help with this pattern?You'll find tutorial videos, a Comments/Questions area and more by visiting the pattern on garnstudio.com. © 1982-2024 DROPS Design A/S. We reserve all rights. This document, including all its sub-sections, has copyrights. Read more about what you can do with our patterns at the bottom of each pattern on our site. |
With over 40 years in knitting and crochet design, DROPS Design offers one of the most extensive collections of free patterns on the internet - translated to 17 languages. As of today we count 304 catalogs and 11422 patterns - 11417 of which are translated into English (US/in).
We work hard to bring you the best knitting and crochet have to offer, inspiration and advice as well as great quality yarns at incredible prices! Would you like to use our patterns for other than personal use? You can read what you are allowed to do in the Copyright text at the bottom of all our patterns. Happy crafting!
Comments / Questions (79)
Emilie wrote:
Ved forstykke: “strik indtil arbejdet måler 23 cm” er dette inkl det mønstrede stykke, altså hele bærestykket eller efter mønsterets slut?
03.01.2022 - 14:03Emilie wrote:
Hvad betyder “Strik (130) m op”? Skal disse bare slås op alm på pind, eller skal de slås op i den allerede strikkede nederdel?
20.12.2021 - 20:20DROPS Design answered:
Hej Emilie, De skal strikkes op i den strikkede nederdel :)
21.12.2021 - 08:09Michela wrote:
Buongiorno. Lo sprone è lavorato tutto in due capi alpaca, anche il motivo centrale? Dei colori grigio chiaro, verde e panna però, seguendo le indicazioni del modello, ho acquistato solo 50 g a colore e quindi ho solo 1 gomitolo per colore: se lo uso in due capi, basterà? Il colore Fabel (3 gomitoli da 50 g) l'ho finito per la gonna e non ne ho più per il bordo dello scollo! Le quantità di lana sono corrette? Sto lavorando una misura M. Grazie per la risposta. Cordiali saluti
24.02.2021 - 22:24DROPS Design answered:
Buonasera Michela, le istruzioni sono corrette: il suo campione corrisponde a quello indicato? Buon lavoro!
25.02.2021 - 20:06Solveig wrote:
Hvordan finder jeg ud af, hvilken str kjolen skal strikkes i? Jeg synes ikke, jeg kan se en guide?
21.11.2020 - 11:08DROPS Design answered:
Hej solveig, således læser du måleskitsen nederst i opskrifter for at vælge størrelse: Således læser du måleskitsen
23.11.2020 - 15:42Elin Sandane wrote:
Sett 1 merke i arb (= midt foran). Strikk videre på samme måte til det er strikket like mange pinner på hver side av merke midt foran. Arb måler nå totalt 72-80-88-96-104 cm øverst og 108-120-132-144-156 cm nederst, fell svært løst av. Jeg forstår ikke helt hva jeg skal gjøre her, kan du hjelpe meg?
04.12.2018 - 17:39DROPS Design answered:
Hei Elin. Når arbeidet måler 36-40-44-48-52 cm i den ene siden og 54-60-66-72-78 cm i den andre siden har du strikket halve skjørtet. Du setter et merke i arbeidet her, som markerer midt foran. Så fortsetter du med forkortede pinner som før til du har strikket like langt som før du satte merket. Altså du strikker til arbeidet måler totalt 72-80-88-96-104 cm øverst og 108-120-132-144-156 cm nederst. Så feller du av og syr sammen oppleggskanten og avfellingskanten (= midt bak). God fornøyelse.
05.12.2018 - 08:09Jozefien De Bruijn wrote:
Ik had mijn vraag bij de opmerkingen geplaatst, dus even opnieuw: Model 140-30 heb ik al gemaakt, superfijn om te dragen, en wil nu dit model gaan breien. Echter met een enkele draad Fabel. De maat van de naalden en het aantal steken zal verschillen. Kan ik alles simpelweg met twee vermenigvuldigen ? Of hoe zou ik dat anders moeten aanpassen ?
08.11.2017 - 10:53DROPS Design answered:
Hallo Jozefien, Het beste is om eerst een proeflapje te maken en op basis van de stekenverhouding die daar uit komt, uit te rekenen hoeveel je op moet zetten, hoeveel je moet meerderen/minderen etc. Je kunt niet zomaar alles keer 2 doen, maar je moet het even opnieuw uitrekenen.
09.11.2017 - 10:05Jozefien De Bruijn wrote:
De jurk nr 140-30 heb ik al gemaakt, echt superfijn om te dragen ! Nu zou ik dit model ook willen maken, maar dan van een enkele draad Fabel. Het aantal steken en de maat van de naald zullen anders zijn dan in de beschrijving. Kan ik alles gewoon met twee vermenigvuldigen ? Of hoe moet ik dat anders berekenen ?
08.11.2017 - 10:48LAPALUS wrote:
Très beau modèle - taille parfaitement. J'ai pris T.M pour un 38 merci pour vos explications gratuites Christiane
13.02.2016 - 17:49Anu wrote:
Thank you .Checked for an update on my question as soon as I came back from work.For a newbie to short rows this explanation was easy to understand .I am off to a flying start!!!.
22.06.2015 - 16:46Anu wrote:
Thx for your reply ,but am still confused on short rows - work on 25 st ,turn ,tighten thread and knit on the same 25 sts again( this is a short row). then work on 50sts,turn,tighten and work on the same 50 sts again(short row) .My quesstion - I have CO 75 st - but have worked on 50 sts only .So,once the short rows are done I will knit on all 75 sts? What happens to the remaning 25 sts
21.06.2015 - 12:18DROPS Design answered:
Dear Anu, repeat the short rows from *-* as in pattern: *2 rows garter st on 25 sts only, 4 rows garter st on all sts (= 75 sts), 2 rows garter st on 50 sts only, 4 rows garter st on all sts (=75 sts)*, repeat from *-*. I.e. 1 repeat = 12 rows at bottom (= beg on rows from RS) and 8 rows at top. Happy knitting!
22.06.2015 - 10:34