
Popular categories
Looking for a yarn?


|
|
Destiny |
|
 |
 |
Knitted jacket and bag/tote bag with crocheted flower pattern in DROPS Paris.
DROPS 77-8 |
|
|
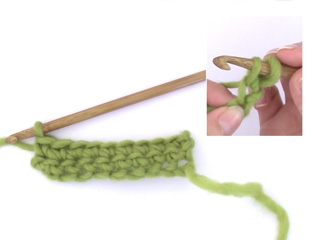
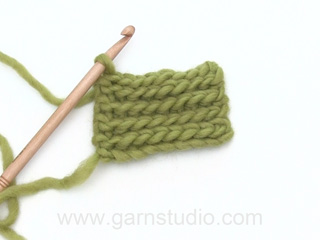
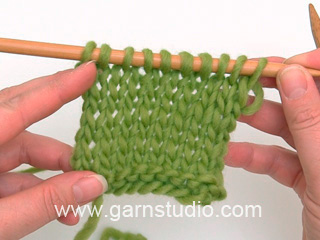
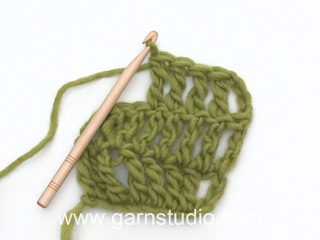
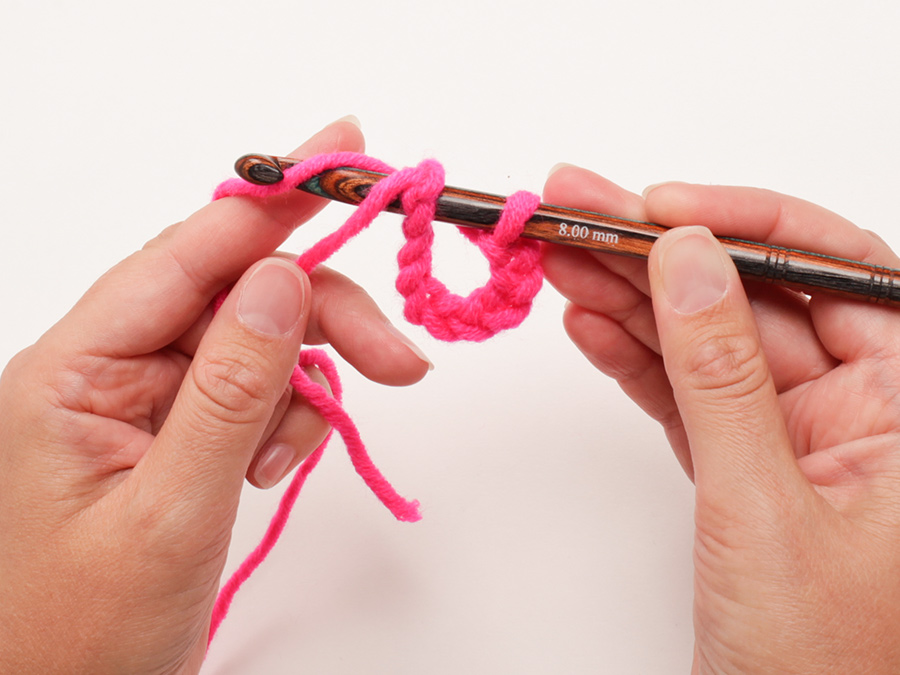
CARDIGAN: Gauge: 17 sts x 22 rows = 10 x 10 cm on larger needles in stockinette st. Knitting tip: Since the pattern is complicated and many things happen at the same time, it is recommended that you mark the numbers for the size you are making before knitting. Garter st, when knitting flat: Knit all sts, all rows. Buttonband: The 5 buttonband sts are knit in garter st throughout to make sure that there is a neat edge. Knitting tips (for neckband): All decs are made from right side. Dec 1 st inside 5 (or 25) edge sts knit in garter st as follows: After the edge st: Slip 1 st as if to knit, K 1, psso. Before the edge st: K 2 tog. Crocheted blossom: 1 square = 12 x 12 cm. Ch 8 and join together into a ring with 1 sl st. Round 1: ch 3 (= 1 dc), * ch 2, 1 dc in next st *, repeat from * - * a total of 7 times and end with ch 2, 1 sl st in ch 3 at beginning of row (= 8 dc). Round 2: ch 4, 3 tr in 1st ch-loop, ch 2, * 4 tr in next ch-loop, ch 2 *, repeat from * - * a total of 7 times, finish with 1 sl st in ch 4 at beginning of row. Round 3: * 4 tr tog (the first tron the row is ch 4) - the last loop on hook is not worked for each tr, then when all tr have been worked, yo, pull yarn through all loops on hook (crochet 1 tr in each tr from previous row), ch 6, 1 dc in the ch 2 from previous row, ch 6 *, repeat from * - * a total of 8 times, finish with 1 sl st in first tr-group. Round 4: Slip to the center of first ch-loop, ch 1, 1 sc in ch-loop, * ch 5, 1 sc in the next ch-loop, ch 5, 1 dc in the next ch-loop, ch 10, 1 dc in the next ch-loop (= corner), ch 5, 1 sc in the next ch-loop *, repeat from * - * a total of 3 times, then ch 5, 1 sc in the next ch-loop, ch 5, 1 dc in the next ch-loop, ch 10, 1 dc in the next ch-loop (= corner), ch 5, finish with 1 sl st in the 1st sc at beginning of row. Back: Read the entire Back section before knitting: Cast on 86-92-100-106-112 sts on smaller needles and knit garter st for 5-6-7-7-8 cm - adjust so that the next row is a right side row. Knit the next 8 rows as follows: K 1 row (right side row), P 1 row, K 3 rows, P 1 row, K 2 rows. Change to larger needles and stockinette st. Side dec/inc: At the same time when the piece measures 8-9-10-10-11 cm dec 1 st at each side every 3-3.5-3.5-5-5 cm a total of 8-7-7-6-6 times. When the piece measures 33-36-39-41-43 cm inc 1 st at each side every 4-4-5-5-5 cm a total of 4-4-3-3-3 times. Opening for squares: At the same time when the piece measures 17-18-20-21-23 cm P 1 row (seen from the right side) over the center 22 sts. On the next row bind off the center 20 sts (the crocheted squares will be sewn in here) and knit each side separately. Put sts on one side on a st holder. 1st side: Continue in stockinette st keeping 1 st at square opening edge in garter st throughout (continue to dec and inc at the side edge). When the piece measures 53-54-56-57-59 cm put sts on a st holder and knit second side. 2nd side: Put sts from st holder back on needles and knit the same as 1st side, reversing shaping. When the piece measures 53-54-56-57-59 cm cast on 20 new sts over the bound off sts and put sts from st holder back on same needle. On the next row (right side row) P over the center 22 sts - K the remaining sts. Then continue in stockinette st over all sts. Armhole: At the same time when the piece measures 52-54-56-58-60 cm bind off for armhole at each side every other row: 4 sts 1 time, 3 sts 0-0-1-1-2 times, 2 sts 1-2-2-3-3 times and 1 st 2-4-3-4-4 times = 62-62-64-66-66 sts. Neck: When the piece measures 68-71-74-77-80 cm knit 2 rows garter st over the center 24-24-26-26-26 sts. On the next row bind off the center 14-14-16-16-16 sts for the neck. On the next row dec 1 st at each neck edge - see knitting tips = 23-23-23-24-24 sts remain on each shoulder. Keep the 5 sts at each neck edge in garter st to finished measurements and the remaining sts in stockinette st. Bind off when the piece measures 71-74-77-80-83 cm. Left front: Read the entire section before knitting: Cast on 48-51-55-58-61 sts on smaller needles. Knit garter st for 5-6-7-7-8 cm - adjust so that the next row is a right side row. Keeping the 5 sts at center front edge (buttonband sts) in garter st throughout, knit the remaining sts of the next 8 rows as follows: K 1 row (right side row), P 1 row, K 3 rows, P 1 row, K 2 rows. Change to larger needles and stockinette st and put 1 marker 23-24-25-26-27 sts in from center front edge = 25-27-30-32-34 sts at side. Side dec/inc: At the same time when the piece measures 8-9-10-10-11 cm dec and inc at the side as on back. Opening for squares: At the same time when the piece measures 17-18-20-21-23 cm P 1 row (right side row) over 11 sts at each side of the marker (= 22 sts total). On the next row bind off 10 sts at each side of the marker (20 sts total) and knit each side separately. Put sts for side on a st holder.Center front part: Continue in stockinette st, keeping the 5 buttonband sts in garter st and 1 st at square opening edge in garter st throughout. When the piece measures 53-54-56-57-59 cm put sts on a st holder and knit side part. Side part: Put sts from den st holder back on needles and knit stockinette st keeping 1 st at square opening edge in garter st – dec and inc at the side edge as on the Back. When the piece measures 53-54-56-57-59 cm cast on 20 new sts over the bound off sts and put sts from center front part back on needles. On the next row (right side row) P the 20 cast-on sts + 1 st at each side of these (22 sts total), then knit stockinette st to finished measurements (keeping button band sts in garter st). Armhole: At the same time when the piece measures 52-54-56-58-60 cm bind off for armhole at the side as on Back. Collar: At the same time when the piece measures 49-52-55-58-61 cm cast on 20 new sts at the center front edge for collar. Knit the 25 sts at the center front edge in garter st - continue to knit the remaining sts in stockinette st. Neck: At the same time when the piece measures 51-54-57-60-63 cm shape the neck. Dec 1 st inside of all the garter sts (the 5 buttonband sts + the 20 collar sts) - see knitting tips - every other row 9-9-10-10-10 times, then every 4 rows 4 times = 43-43-43-44-44 sts remain. When the piece measures 71-74-77-80-83 cm bind off the 23-23-23-24-24 shoulder sts. Collar: The collar is sewn together at center back. Continue in garter st over the 20 collar sts as follows: * 2 rows garter st over all sts, 2 rows garter st over only the outermost 7 sts (at the center front) *, repeat from * - * until the collar measures approx. 4.5-4.5-5.5-5.5-5.5 cm or to fit to center back neck. Put sts on a st holder and knit Right Front. Right front: Cast on and knit the same as the Left Front, reversing all shaping. Make buttonholes along buttonband. 1 buttonhole = K tog the 3rd and 4th sts from center front edge, then yo. Make buttonholes when the piece measures: Size S: 17, 25, 33, 41 and 49 cm. Size M: 17, 24, 31, 38, 45 and 52 cm. Size L: 17, 25, 33, 40, 48 and 55 cm. Size XL: 18, 26, 34, 42, 50 and 58 cm. Size XXL: 18, 27, 36, 44, 53 and 61 cm. Sleeve: Cast on 41-43-45-47-49 sts on smaller needles. Knit garter st for 8 cm. The next row is the right side. Knit the next 8 rows as follows: K 1 row, P 1 row, K 3 rows, P 1 row, K 2 rows. Change to larger needles and stockinette st. At the same time when the piece measures 11 cm inc 1 st at each side every 4-3.5-3.5-3-2.5 cm a total of 9-10-10-11-12 times = 59-63-65-69-73 sts. When sleeve measures 47-46-45-43-43 cm bind off for sleeve cap at each side every other row: 3 sts 1 time, 2 sts 3-2-2-2-2 times and 1 st 2-5-6-9-9 times, then bind off 2 sts at each side until the piece measures 55-56-56-56-57 cm, then bind off 3 sts at each side 1 time. The piece measures approx. 56-57-57-57-58 cm, bind off the remaining sts. Assembly: Sew shoulder seams. Weave the collar together at center back. Sew the collar to neckband on back with seam on right side so it will not show when collar is folded out. Inset squares: Crochet 9 squares - see instructions above. Sew into 3 strips of 3 squares each - sew edge to edge with small sts. Then sew 1 strip into each front and 1 strip into back in the square openings - sew with small sts edge to edge with the garter st edge st. Sew in sleeves. Sew sleeve and side seams using edge sts as a seam allowance. Sew on buttons. PURSE: Sizes: Width: approx. 36 cm. Height: approx. 37 cm. Materials: Garnstudio PARIS 100% cotton, 50 g/75 m./82 yards 550 gr nr 17, natural. Alternate yarns: see list for the cardigan. DROPS 4 mm [US 6] needles, or size needed to obtain correct gauge. DROPS 3.5 mm [US ] crochet hook, or size needed to obtain correct gauge. Gauge: 19 sts wide in garter st = 10 cm. Garter st, when knitting flat: Knit all sts, all rows. Front side: Cast on 70 sts and knit garter st until the piece measures 37 cm, bind off. Back side: Knit the same as the front side. Assembly: Sew front and back sides together using edge sts as seam allowance. Sew the bottom edge. Shoulder strap: Cast on 11 sts and knit garter st for approx. 80 cm, bind off. Sew ends at each side on the purse. Crocheted panels: 1 square = approx. 12 x 12 cm. Crochet 18 squares - see instructions under the cardigan. Sew into 2 panels of 3 squares x 3 squares - sew with small sts in ch-loops. The panels will measure 36 x 36 cm each. Crochet 1 row sc around each edge of panels. Sew one panel to front of the purse – place below 4 rows of garter st at top of purse – and sew the other to back. Sew with small sts in sc row. |
|

|
|
|
Have you made this or any other of our designs? Tag your pictures in social media with #dropsdesign so we can see them! Do you need help with this pattern?You'll find tutorial videos, a Comments/Questions area and more by visiting the pattern on garnstudio.com. © 1982-2024 DROPS Design A/S. We reserve all rights. This document, including all its sub-sections, has copyrights. Read more about what you can do with our patterns at the bottom of each pattern on our site. |
|


With over 40 years in knitting and crochet design, DROPS Design offers one of the most extensive collections of free patterns on the internet - translated to 17 languages. As of today we count 304 catalogs and 11422 patterns - 11417 of which are translated into English (US/in).
We work hard to bring you the best knitting and crochet have to offer, inspiration and advice as well as great quality yarns at incredible prices! Would you like to use our patterns for other than personal use? You can read what you are allowed to do in the Copyright text at the bottom of all our patterns. Happy crafting!
Comments / Questions (12)
Thank you. I need further help. Collar cast on 20 extra stitches. Work. These 20 plus 5 which is 25 stitches in ridge. Then pattern at end of neckline states to cast off shoulder stitches. Does this include the 5 ridge sts from the button band?
05.05.2024 - 23:22DROPS Design answered:
Hi Mary, You cast off, leaving 20 collar stitches on the needle (which are continued in garter stitch). The collar is then worked until it reaches behind the neck and will be sewn together with the other collar at the back of the neck when you assemble the piece. Happy knitting!
06.05.2024 - 06:40Question about the collar in 77-8. Are the 5 ridge sts from the front button band carried up onto the collar or are they cast off at the shoulders?
05.05.2024 - 15:03DROPS Design answered:
Dear Mary, after doing the armhole, you cast on 20 new stotches at the mid-front, and then (after finishing the decreases for the neckline),, you continue knitting the collar on the 20 stitches that were cast on. Happy Knitting!
05.05.2024 - 21:25Hi. I'd like some help interpreting the instructions for the collar in pattern 77-8.What is meant by "collar measures cm on the inside towards the neck".?
01.05.2024 - 21:18DROPS Design answered:
Dear Mary, you should measure the collar on the size that is toward the body/neck, where it will be sewn on. That side should be shorter than the outer side. Happy Crafting!
02.05.2024 - 06:27In the "NOTE" in the second last sentence of the "ARMHOLES" description, the pattern states that "5 ridge sts in each side towards neck are continued until finished length". There doesn't appear to be a description of what a ridge st is. There are ridge rows. Please explain what the above instruction means. Do you have a photo please? Thank you.
27.03.2024 - 18:28DROPS Design answered:
Dear Mary, ridges are the horizontal lines knitting with garter stitch makes. If you knit it back and forth then two rows og knit stitches make up one ridge, if you knit it on the round, then a round of knit stitches and a round of purl stitches make up one ridge. Happy Knitting!
27.03.2024 - 22:19What is a ddc? I have looked for this abbreviation and I can’t find it. Can you point me in the direction of the instructions for I?
20.08.2023 - 04:15DROPS Design answered:
Hi Chris, ddc means double double crochet - you are right that this is mistake in transaltion, proper US term is treble crochet. Thanks for letting us know, we'll fix it. Happy crocheting and knitting!
20.08.2023 - 13:41Serait il possible d avoir les explications en français svp ? Merci
21.04.2022 - 13:42DROPS Design answered:
Bonjour Mme Neubourg, pour changer la langue, cliquez sur le lien sous la photo et sélectionnez "français". Bon tricot!
21.04.2022 - 16:36Hola, he hecho la flor de ganchillo con aguja 3.5 y me sale la medida de 15x15, e cambiado a aguja 2.5 y me sale casi de 14x14, no consigo la medida de 12x12 con la aguja de 3.5 que ponéis en las instrucciones, si intento con aguja más pequeña de 2.5 ya sería difícil trabajar el hilo Paris. Solución??? Gracias
23.01.2020 - 12:49DROPS Design answered:
Hola Lola. No hay casi diferencia entre las muestras que has hecho con el ganchillo de 3,5 mm y 2,5 mm. Tienes que conseguir apretar más los puntos, la estructura del tejido de los cuadrados de las flores es más cerrada que, por ejemplo, en unos cuadrados para mantas.
26.01.2020 - 21:16Hallo,das die Blumen zusammengenäht und angenäht werden ist mir klar.Doch muss ich bei der Jacke die Blumen auch vorher mit festen Maschen umhäkeln?
12.11.2019 - 10:55DROPS Design answered:
Liebe Ilka, nein, der Streifen aus 3 Blumenkaros wird nicht mit festen Maschen umhäkelt, sondern ohne Umhäkelung in die Jacke eingenäht. Gutes Gelingen weiterhin!
13.11.2019 - 09:19Hallo,bei der Tasche steht,dass man die Blumen mit Kettmaschen umhäkeln soll.Macht man das bei der Jacke auch?Davon steht nämlich nichts in der Anleitung. Umhäkel ich jede "Blume" einzeln mit festen Maschen und Nähe sie dann zusammen oder erste,wenn ich sie zusammengenäht habe?
11.11.2019 - 18:47DROPS Design answered:
Liebe Ilka, die Blumen bei der Jacke sind zusammengenäht - siehe Blumenkaros. Viel Spaß beim stricken!
12.11.2019 - 08:15Was bedeutet die Abkürzung Ndl
13.05.2018 - 19:58DROPS Design answered:
Liebe Elke, Ndl = Reihen
13.05.2018 - 21:24