
Popular categories
Looking for a yarn?


|
|||||||||||||||||||||||||
Jaqueline |
|||||||||||||||||||||||||
 |
 |
||||||||||||||||||||||||
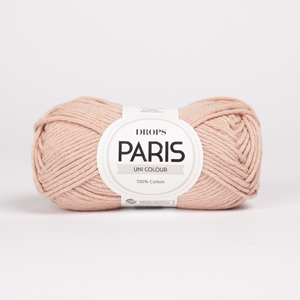
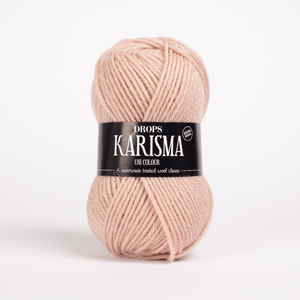
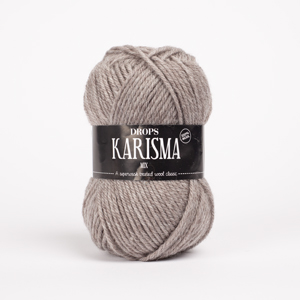
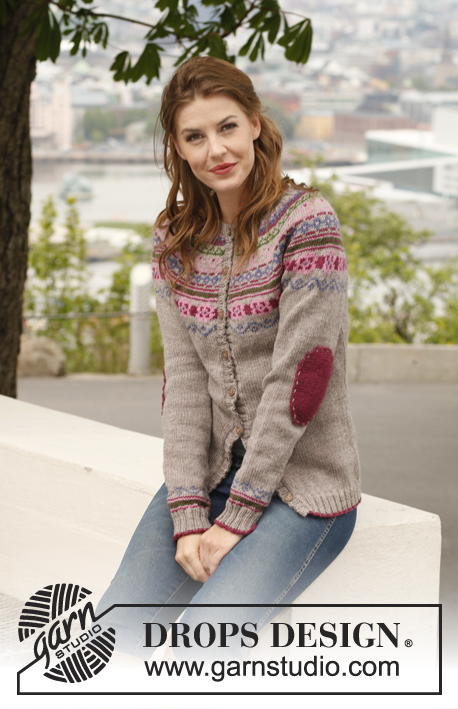
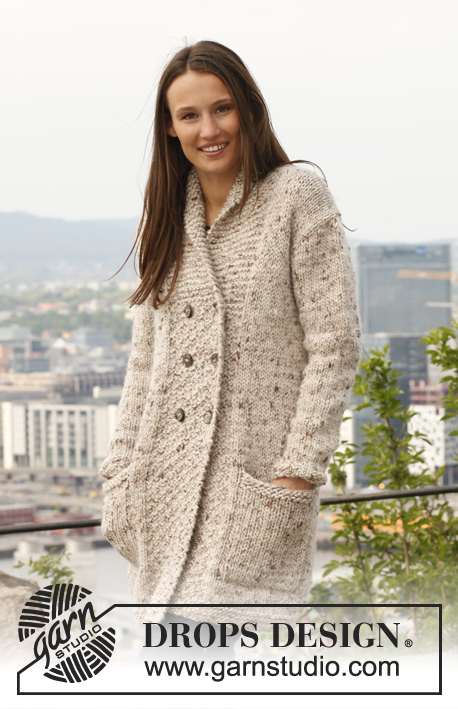
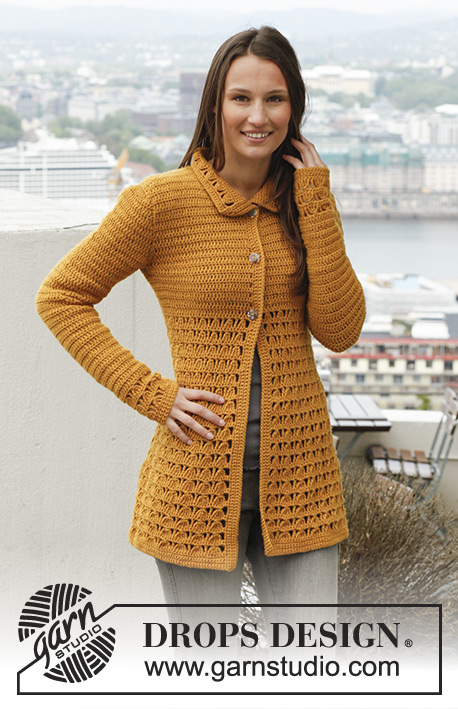
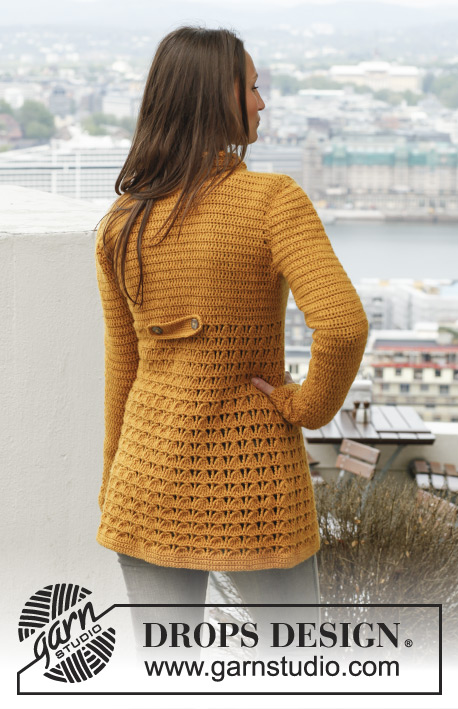
Crochet DROPS jacket with lace pattern in ”Karisma”. Size: S - XXXL.
DROPS 143-12 |
|||||||||||||||||||||||||
|
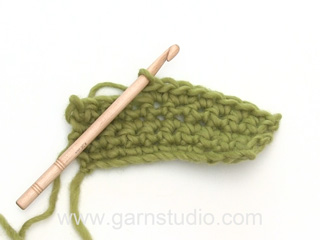
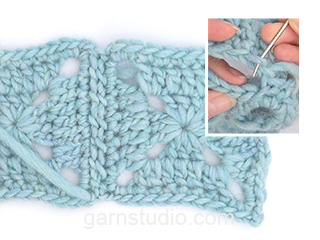
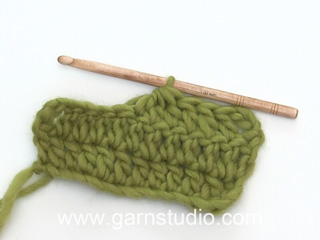
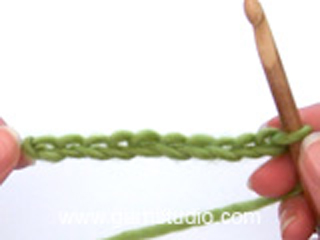
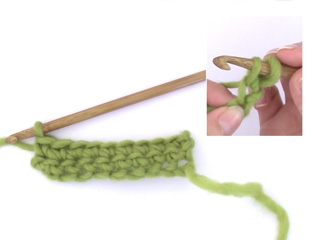
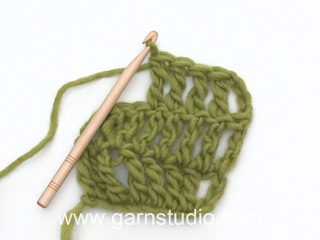
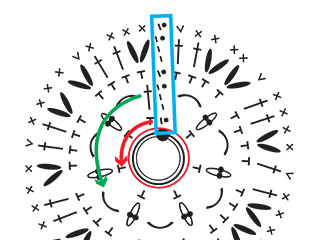
SC ROW: Beg every sc row with 1 ch (not counted as 1st sc), work 1 sc in every st the entire row, turn. PATTERN A.1 (divisible by 6 + 1): ROW 1 (= RS): Ch 4 (= 1 tr) in 1st sc, continue as follows – also see 1st row in diagram A.1: * ch 2, 1 bobble with 5 tr, ch 2, 1 tr in next sc *, repeat from *-* the entire row, turn piece. ROW 2 (= WS): ch 1, 3 sc in 1st ch-space, 1 sc in next bobble, 2 sc in next ch-space, continue as follows – also see 2nd row in diagram A.1: * 1 sc in next tr, 2 sc in next ch-space, 1 sc in next bobble, 2 sc in next ch-space *, repeat from *-* the entire row, finish with 1 sc more in last ch-space on row (= same no of sc as before). PATTERN A.2 (divisible by 5 + 1): ROW 1 (= RS): Ch 4 (= 1 tr) in 1st sc, continue as follows – also see 1st row in diagram A.2: * ch 2, work 1 bobble with 4 tr, ch 2, 1 tr in next sc *, repeat from *-* the entire row, turn. ROW 2 (= WS): ch 1, 3 sc in 1st ch-space, skip 1st bobble, 2 sc in next ch-space, continue as follows – also see 2nd row in diagram A.2: * 1 sc in next tr, 2 sc in next ch-space, skip next bobble, 2 sc in next ch-space *, repeat from *-* the entire row, finish row with 1 sc more last ch-space on row (= same no of sc as before). PATTERN A.3 (divisible by 4 + 1): ROW 1 (= RS): Ch 4 (= 1 tr) in 1st sc, continue as follows – also see 1st row in diagram A.3: * ch 1, work 1 bobble with 3 tr, ch 1, 1 tr in next sc *, repeat from *-* the entire row, turn. ROW 2 (= WS): ch 1, 2 sc in 1st ch-space, 1 sc in next bobble, 1 sc in next ch-space, continue as follows – also see 2nd row in diagram A.3: * 1 sc in next tr, 1 sc in next ch-space, 1 sc in next bobble, 1 sc in next ch-space *, repeat from *-* the entire row, finish with 1 sc more in last ch-space on row (= same no of sc as before). INCREASE TIP: Inc 1 st by working 2 sts in the same st. DC ROW: Work all dc rows from RS. Beg every dc row with 3 ch (= 1st dc), skip 1st sc from previous row, work 1 dc in every sc the entire row, turn. PATTERN A.4: ROW 1 (= RS): Work 1 dc row. ROW 2 (= WS): Work 1 sc row. DECREASE TIP - DC: Crochet 2 dc tog as follows: Work 1 dc in sc below but wait with last pull through (= 2 sts on hook), work 1 dc in next sc but on last pull through, pull thread through all sts on hook = 1 dc dec. Dec 3 dc at the beg or end of row by working the first 6 or last 6 dc tog 2 by 2. Dec 2 dc at the beg or end of row by working the first 4 or last 4 dc tog 2 by 2. Dec 1 dc at the beg or end of row by working the first 2 or last 2 dc tog. DECREASE TIP - SC: Insert hook in st below and pull thread through, insert hook in next st and pull thread through, make 1 YO and pull thread through all 3 loops on hook = 1 st dec. WORK IN THE ROUND IN A CIRCLE: After last sc on round do not finish with 1 sl st but continue on to next round with 1 sc in first sc on previous round. -------------------------------------------------------- BODY: Worked back and forth from mid front. Ch 188-200-218-242-266-290 LOOSELY with Karisma on hook size 4.5 mm/US 7, turn and work 1 sc in 2nd ch from hook, then 1 sc in every ch the entire row = 187-199-217-241-265-289 sc, turn piece (1st row = WS). Work 4 SC ROWS - read explanation above = a total of 5 sc rows, piece measures approx. 2½ cm / ⅞". Then work PATTERN A.1 - read explanation above = 31-33-36-40-44-48 repetitions + 1 tr. When 2ND ROW has been worked, there are 187-199-217-241-265-289 sc on row. REMEMBER THE CROCHET GAUGE! Work A.1 a total of 6-6-7-7-8-8 times vertically - but work last sc row from WS as follows: ch 1, 3 sc in 1st ch-space, skip 1st bobble, 2 sc in next ch-space, * 1 sc in next tr, 2 sc in next ch-space, skip next bobble, 2 sc in next ch-space *, repeat from *-* the entire row but finish with 3 sc in last ch-space = 156-166-181-201-221-241 sc, turn. Then work PATTERN A.2 - read explanation above. When 2ND ROW has been worked, there are 156-166-181-201-221-241 sc on row. Work A.2 a total of 6 times vertically - but work last sc row from WS as follows: ch 1, 2 sc in 1st ch-space, 1 sc in next bobble, 1 sc in next ch-space, * 1 sc in next tr, 1 sc in next ch-space, 1 sc in next bobble, 1 sc in next ch-space *, repeat from *-* the entire row, but finish with 2 sc in last ch-space = 125-133-145-161-177-193 sc. Then work PATTERN A.3 - read explanation above. When 2ND ROW has been worked, there are 125-133-145-161-177-193 sc on row. Work A.3 a total of 6 times vertically - but on last sc row from WS inc 10-12-14-16-18-20 sc evenly - READ INCREASE TIP = 135-145-159-177-195-213 sc, piece now measures approx. 48-48-50½-50½-53-53 cm / 19"-19"-20"-20"-21"-21". Continue to work PATTERN A.4 1 time - read explanation above - AT THE SAME TIME on sc row from WS inc 9-11-13-11-13-15 sts evenly = 144-156-172-188-208-228 sc. Work A.4 a total of 6-7-7-8-8-9 times vertically (last row = sc row from WS), piece now measures approx. 58-60-62-63-66-68 cm / 22¾"-23½"-24½"-24¾"-26"-26¾". Do not cut the thread. Insert 1 marker 36-39-43-47-52-57 sc in from each side on last sc row (= 72-78-86-94-104-114 sc between markers on back piece). RIGHT FRONT PIECE: = 36-39-43-47-52-57 sc. Continue with A.4 - AT THE SAME TIME dec for armholes on next row from RS as follows: Work dc until 3 sc remain before marker = 33-36-40-44-49-54 dc, turn (= skip 3 sts before marker) and work 1 sc row from WS. READ ALL OF THE FOLLOWING 2 SECTIONS BEFORE CONTINUING. Then dec for armhole at the end of every row from RS - READ DECREASE TIP - dc - as follows: Dec 3 dc 0-0-1-1-1-2 times, 2 dc 1-1-1-3-4-5 times, and 1 dc 1-3-3-2-3-1 time. AT THE SAME TIME when A.4 has been worked a total of 5-6-6-6-6-6 times vertically (counted from marker in last sc row before armhole dec), dec for neck on next dc row from RS as follows: Cut the thread, ch 3 (= 1 dc) in the 7th-7th-8th-8th-9th-9th sc from mid front (= skip 6-6-7-7-8-8 dc from mid front), work dc - AT THE SAME TIME continue armhole dec at the end of row if it is not done, turn and work 1 sc row from WS. Then dec at beg of every row from RS as follows: Dec 2 dc 2 times and 1 dc 2 times. When all dec are done, 18-19-19-20-21-23 sts remain for shoulder. Work A.4 a total of 11-12-13-13-14-14 times vertically (counted from marker in last sc row before armhole dec), piece measures approx. 76-80-84-86-89-91 cm / 30"-31½"-33"-34"-35"-35¾" (finish with 1 sc row), cut and fasten the thread. LEFT FRONT PIECE: = 36-39-43-47-52-57 sc. Continue with A.4 - AT THE SAME TIME dec for armholes on next row from RS as follows: Skip the first 3 sc from marker in the side, work 3 ch (= 1 dc) in next sc (= 4th sc from marker), work dc the entire row = 33-36-40-44-49-54 dc, turn and work 1 sc row from WS. READ ALL OF THE FOLLOWING 2 SECTIONS BEFORE CONTINUING. Then dec for armhole at beg of every row from RS as follows: Dec 3 dc 0-0-1-1-1-2 times, 2 dc 1-1-1-3-4-5 times, and 1 dc 1-3-3-2-3-1 time. AT THE SAME TIME when A.4 has been worked a total of 5-6-6-6-6-6 times vertically (counted from marker in last sc row before armhole dec), dec for neck on next dc row from RS as follows: Continue with armhole dec at beg of row if it is not done, work dc until 6-6-7-7-8-8 dc remain from mid front, turn and work 1 sc row from WS. Then dec at end of every row from RS as follows: Dec 2 dc 2 times and 1 dc 2 times. When all dec are done, 18-19-19-20-21-23 sts remain for shoulder. Work A.4 a total of 11-12-13-13-14-14 times vertically (counted from marker in last sc row before armhole dec), piece measures approx. 76-80-84-85-89-91 cm / 30"-31½"-33"-34"-35"-35¾" (finish with 1 sc row), cut and fasten the thread. BACK PIECE: = 72-78-86-94-104-114 sc. Continue with A.4 - AT THE SAME TIME dec for armholes on next row from RS as follows: Skip 3 sc from marker on right side of piece, work 3 ch in next sc (= 1st dc in 4th sc from marker), 1 dc in every sc until 3 sc remain from next marker = 66-72-80-88-98-108 dc, turn (= skip 3 sc in each side) and work 1 sc row from WS. Then dec for armhole at beg and end of every row from RS as follows: Dec 3 dc 0-0-1-1-1-2 times, 2 dc 1-1-1-3-4-5 times, and 1 dc 1-3-3-2-3-1 time = 60-62-64-66-70-74 sts remain. Work A.4 a total of 9-10-11-11-12-12 times vertically (counted from marker in last sc row before armhole dec). RIGHT SHOULDER: From RS work 19-20-20-21-22-24 dc, turn and work 19-20-20-21-22-24 sc from WS, turn. On next row from RS, dec 1 dc at the end of row for neck = 18-19-19-20-21-23 dc remain for shoulder. Work 1 sc row from WS = a total of 11-12-13-13-14-14 repetitions A.4 vertically (counted from marker in last sc row before armhole dec), cut and fasten the thread, piece measures approx. 76-80-84-85-89-91 cm / 30"-31½"-33"-34"-35"-35¾". LEFT SHOULDER: Now work from RS, beg from neck as follows: Count 19-20-20-21-22-24 sts in from left side and beg with 3 ch in this sc. Then work 1 dc in each of the 18-19-19-20-21-23 dc the entire row. (I.e. do not work over the middle 22-22-24-24-26-26 sts = neck.) Turn and work 1 sc in every dc, turn. On next row (= dc), dec 1 dc at the beg of row for neck = 18-19-19-20-21-23 dc. Work 1 row with sc, cut and fasten the thread, piece measures approx. 76-80-84-85-89-91 cm / 30"-31½"-33"-34"-35"-35¾". SLEEVE: Worked back and forth. Ch 37-37-42-42-47-47 LOOSELY with Karisma on hook size 4.5 mm/US 7, turn and work 1 sc in 2nd ch from hook, then 1 sc in every ch the entire row = 36-36-41-41-46-46 sc, turn (1st row = WS). Work 4 more sc rows = a total of 5 sc rows, piece measures approx. 2½ cm / ⅞". Then work PATTERN A.2 = 7-7-8-8-9-9 repetitions + 1 tr. When 2ND ROW has been worked, there are 36-36-41-41-46-46 sc on row. Work A.2 a total of 3 times vertically - but on last sc row from WS inc 0-4-2-4-6-8 sc evenly = 36-40-43-45-52-54 sc (piece now measures approx. 10 cm / 4"). Then work A.4 until finished measurements - AT THE SAME TIME inc 1 dc in the outermost sc in each side on 1st dc row - READ INCREASE TIP = 2 dc inc. Repeat inc in each side on every other dc row (i.e. every 4th row) 8-8-8-8-7-7 more times = 54-58-61-63-68-70 sts (= 9-9-9-9-8-8 times). Continue until A.4 has been worked a total of 21-21-20-20-19-19 times vertically (last row = sc row from WS), piece measures approx. 45-45-43½-43½-42-42 cm / 17¾"-17¾"-17"-17"-16½"-16½" (shorter measurements in the larger sizes because of longer sleeve cap and wider shoulders). Then dec for sleeve cap on next dc row from RS as follows: Sl sts until 4th sc, ch 3 in same sc (= 1st dc), 1 dc in every sc until 3 sc remain on row = 48-52-55-57-62-64 dc, turn and work 1 sc row from WS. Continue dec for sleeve cap in each side on every row from RS as follows: Dec 3 dc 1-2-2-2-2-2 times, 2 dc 2-2-2-3-4-4 times, 1 dc 1-0-1-1-1-1 time, 2 dc 2-2-2-1-1-1 time. On next row from RS, dec 3 dc in each side of piece = 18-18-19-21-22-24 sts remain. On next row from WS, dec 3 sc in each side of piece - READ DECREASE TIP - SC = 12-12-13-15-16-18 sc remain, cut and fasten the thread. The piece now measures approx. 57 cm / 22½" in all sizes. Work another sleeve the same way. ASSEMBLY: Sew shoulder seams in outermost sts with fine stitches. Sew in sleeves, sew sleeve seams tog. COLLAR: Work from RS approx. 80 - 100 sc along the entire neck edge (beg at the top of right front piece). Then work 1 sc row from WS while AT THE SAME TIME adjusting no of sts to 80-82-84-88-92-94 sc. Work 4 more sc rows = a total of 6 sc rows. On next row inc 3 sc evenly on row = 83-85-87-91-95-97 sc. Continue with sc rows until a total of 11 sc rows have been worked. On next sc row, inc 3-6-4-5-6-4 sc evenly = 86-91-91-96-101-101 sc. Then work A.2 (= 17-18-18-19-20-20 repetitions + 1 tr) 1 time vertically. Work 2 more sc rows, cut and fasten the thread, collar measures approx. 9 cm / 3½". FRONT BAND: Work from RS approx. 130 - 150 sc along the entire edge mid front on right front piece (incl short side of collar). Then work 1 sc row from WS while AT THE SAME TIME adjusting no of sts to 128-134-138-140-144-148 sc. On next row from RS work as follows: Work sc until 80-84-84-84-88-90 sc remain on row, * ch 2, skip 2 sc, work 13-14-16-17-17-18 sc *, repeat from *-* 1 more time, ch 2, skip 2 sc, work 12 sc, ch 2, skip 2 sc, work the last 2 sc on row = 4 buttonholes, turn. Then work 2 more sc rows (work 2 sc in every ch-space), cut and fasten the thread = 5 sc rows in total. Work band the same way mid front along left front piece but without buttonholes. Sew on 4 buttons on to left band. FLAP: Worked in the round. Ch 19 LOOSELY with Karisma on hook size 4.5 mm/US 7, turn and work 3 sc in 2nd ch from hook, then 1 sc in every ch until 1 ch remains on row, work 3 sc in last ch, turn piece and continue to work 1 sc in every ch on the other side of ch row - READ WORK IN THE ROUND IN A CIRCLE! On next round work 1 sc in every sc but in each short side inc 1 sc (by working 2 sc in same sc) in each of the middle 3 sc (= 3 inc sts in each short side). Continue in the round with inc in each short side the same way until flap measures approx. 14-14-15-15-16-16 cm / 5½"-5½"-6"-6"-6¼"-6¼" in width, work 1 sl st in next sc, cut and fasten the thread. Place flap in the middle of back piece where pattern A.3 goes over to A.4. Sew on 1 button on each side through both layers. |
|||||||||||||||||||||||||
Diagram explanations |
|||||||||||||||||||||||||
|
|||||||||||||||||||||||||

|
|||||||||||||||||||||||||
|
Have you made this or any other of our designs? Tag your pictures in social media with #dropsdesign so we can see them! Do you need help with this pattern?You'll find tutorial videos, a Comments/Questions area and more by visiting the pattern on garnstudio.com. © 1982-2024 DROPS Design A/S. We reserve all rights. This document, including all its sub-sections, has copyrights. Read more about what you can do with our patterns at the bottom of each pattern on our site. |
|||||||||||||||||||||||||


With over 40 years in knitting and crochet design, DROPS Design offers one of the most extensive collections of free patterns on the internet - translated to 17 languages. As of today we count 304 catalogs and 11422 patterns - 11417 of which are translated into English (US/in).
We work hard to bring you the best knitting and crochet have to offer, inspiration and advice as well as great quality yarns at incredible prices! Would you like to use our patterns for other than personal use? You can read what you are allowed to do in the Copyright text at the bottom of all our patterns. Happy crafting!
Comments / Questions (106)
Buongiorno. Ho appena comprato 1.5 kg di filato Flora da lavorare con il n. 3 e vorrei realizzare il modello 143/12 che però è realizzato con il filato Karisma. da lavorare con il n. 4,5 Quale filo posso unire al Flora per avere lo spessore necessario a realizzare questo modello? Io ho il colore verde. Grazie
22.08.2023 - 17:00DROPS Design answered:
Buonasera Marina, non ci sono dei filati che si abbinano a Flora per ottenere lo spessore del gruppo filati B. Per un'assistenza così personalizzata può rivolgersi al suo rivenditore DROPS di fiducia. Buon lavoro!
22.08.2023 - 22:27Bonjour, j'ai réalisé ce gilet en taille S pour ma fille. J'aimerais faire ce même gilet pour ma petite fille en taille 6 ou 7 ans. Auriez vous les explications ? Je vous remercie infiniment pour votre réponse.
11.05.2023 - 11:51DROPS Design answered:
Bonjour Mme Marsille Schérer, ce modèle n'est malheureusement pas disponible en version enfant; retrouvez ici toutes les vestes ou tous les gilets ou boléros enfant au crochet; en espérant que l'un d'eux puisse vous inspirer. Bon crochet!
11.05.2023 - 16:37Hej! Jag skulle vilja virka koftan, Jaqueline by DROPS Design i ett bomullsgarn. Vilket bomullsgarn rekommenderar ni? Evy
26.02.2023 - 20:23DROPS Design answered:
Hej Evy, Prøv vores garnkalkulator. Vælg DROPS Karisma, vælg antal gram i din størrelse og vælg 1 tråd så får du garnåtgången frem i bla DROPS Muskat, DROPS Cotton Light, DROPS Cotton Merino :)
28.02.2023 - 14:47Hej! Jag undrar om mouchen stängs med en lm och att jag sedan ska virka 2 lm och dubbelstolpen i A1? Alltså en mouch inkl 1 lm sen 2 lm 1 dstp 2 lm?
24.02.2023 - 16:23DROPS Design answered:
Hei Lotta. Se vårt svar tidligere idag. mvh DROPS Design
28.02.2023 - 20:18Hej! Jag undrar om mouchen stängs med en lm och att jag sedan ska virka 2 lm och dubbelstolpen i A1? Alltså en mouch inkl 1 lm sen 2 lm 1 dstp 2 lm?
22.02.2023 - 11:25DROPS Design answered:
Hei Lotta. Nei, du hekler slik det står i diagrambeskrivelsen for dette ikonet, deretter hekler du 2 luftmasker og 1 dobbeltstav. mvh DROPS Design
28.02.2023 - 19:40Buenas tardes, me gustaría saber cuántas vuelta hago con los cinco puntos altos en la misma, delos cuatro pa en la misma cadena y de los 3 pa en la misma, etc del abrigo color mostaza se le gradecer eternamente gracias x por su atención.
15.08.2021 - 23:41DROPS Design answered:
Hola Delyen, el tamaño de las motas (A.1, A.2, A.3) depende de la talla. El número de repeticiones en la fila y el número de filas depende de la talla, por lo que sin saber la talla no podemos concretarlo. Por ejemplo, A.1 (la mota de 5 pa) para la talla S se repite 5 veces en vertical., e.t.c.
16.08.2021 - 18:43Hola buenas tardes me gustaría que nos brinde en video el tutorial ya que me es difícil entender soy principiante, del abro color moztasa
15.08.2021 - 23:37DROPS Design answered:
Hola Delyen, no hacemos vídeos personalizados, pero puedes encontrar bajo el patrón aquellos vídeos que puedan servirte de ayuda para realizar la labor.
16.08.2021 - 18:37Hola buenas noches soy nueva y todavia no entiendo muy bien los patrones me gustaria mas un tutorial, esta precioso el sueter mostaza o especificar un poco mas como se hacen los puntos del saco parte alta y baja y son piezas separadas gracias
08.02.2021 - 01:45DROPS Design answered:
Hola Soco! La chaqueta se trabaja de abajo hacia arriba empezando por el CUERPO hasta las sisas, luego trabajará diferentes piezas por separado. Luego, las mangas se trabajarán y coserán. Terminar con cuello, bandas y solapa. Buen trabajo!
11.02.2021 - 08:08Hello! I'm working on this pattern and I have two questions about the right front instructions. 1. When it says to decrease 3dc 0 times, does that mean I work one row of dc with a decrease? 2. For the neck shaping, it says to chain 3 in the 7th sc from center front, but it's not clear to me what center front is referring to. Thank you!
25.01.2021 - 22:46DROPS Design answered:
Hi Anika, When it says increase x 0, it means that in your size you do not need to increase. The centre front is the edge of the front piece, so the 7th sc from the centre front is the 7th sc from the band-edge. Happy crocheting!
26.01.2021 - 07:33Ik zie in de opmerkingen en vragen dat er wordt verwezen naar het telpatroon. Waar kan ik dat vinden?
24.10.2020 - 14:37DROPS Design answered:
Dag Klaartje,
Het telpatroon staat helemaal onderaan de beschrijving en dan onder de matentekening (beetje verstopt onder de mouw :))
25.10.2020 - 19:09