
Popular categories
Looking for a yarn?


|
||||||||||||||||||||||||||||
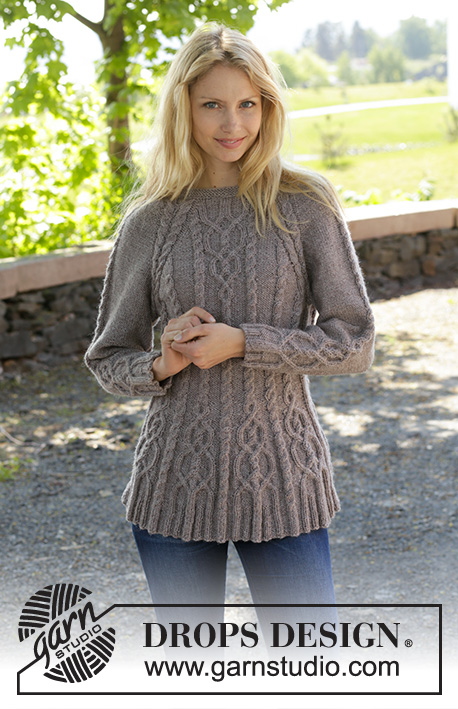
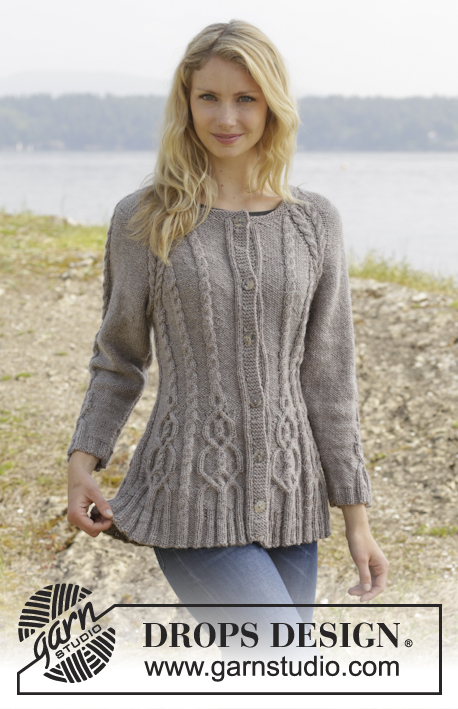
Alana Cardigan |
||||||||||||||||||||||||||||
 |
 |
|||||||||||||||||||||||||||
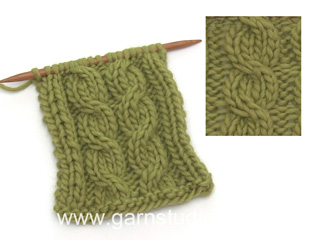
Knitted DROPS jacket with cables and raglan, worked top down in ”Karisma”. Size S-XXL
DROPS 156-4 |
||||||||||||||||||||||||||||
|
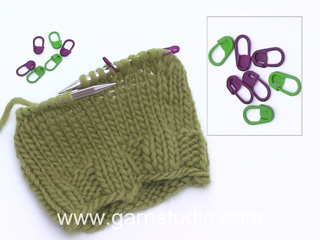
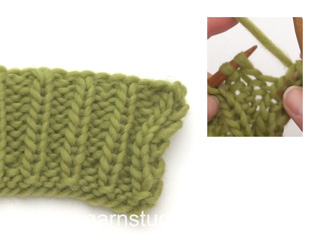
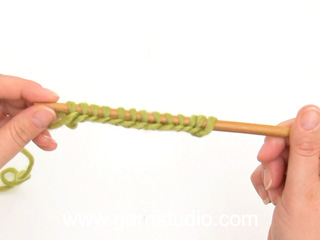
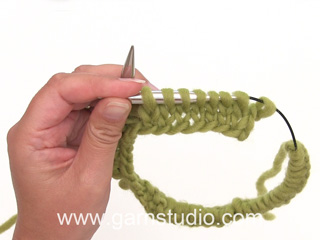
GARTER ST (back and forth on needle): K all rows. 1 ridge = K2 rows. PATTERN: See diagrams A.1 - A.5. The diagrams show all rows in pattern seen from RS. RAGLAN: Inc on each side of raglan sts (A.1/A.2, marker, A.2/A.1) by making 1 YO = 8 inc on row. On next row work YOs twisted to avoid holes. Then work the new sts P on sleeves (seen from RS), and on front and back piece work the new sts in to pattern as explained below. DECREASE TIP (applies to sleeves): Dec on each side of marker as follows: Work until 3 sts remain before marker, P 2 tog, P 2, P 2 tog = 2 sts dec. INCREASE TIP: All inc are done from RS. Inc 1 st by making a YO. On next row K YOs twisted, i.e. work in the back loop of st instead of front to avoid holes. P the new sts (seen from RS). KNITTING TIP: For every 10th row work short rows over the 5 sts in garter st in bands as follows (beg from RS): K 5 band sts, turn piece, tighten yarn and K back, turn piece and work as before over all sts, turn piece, K 5 band sts in garter st, turn piece, tighten yarn and K back. That way the ridges in band will not contract as much. BUTTONHOLES: Dec for buttonholes on right band. 1 buttonhole = K tog third and fourth st from edge and make 1 YO. Dec for buttonholes when piece measures: SIZE S: 2, 12, 22, 32, 42 and 52 cm / 3/4",4 3/4",8 3/4",12½",16½",20½" SIZE M: 2, 12, 22, 32, 42 and 52 cm / 3/4",4 3/4",8 3/4",12½",16½",20½" SIZE L: 2, 11, 20, 29, 38, 47 and 56 cm / 3/4",4½",8",11½",15",18½",22'' SIZE XL: 2, 11, 20, 29, 38, 47 and 56 cm / 3/4",4½",8",11½",15",18½",22'' SIZE XXL: 2, 11, 20, 29, 38, 47, 56 and 65 cm / 3/4",4½",8",11½",15",18½",22'',25½ ---------------------------------------------------------- JACKET: Worked back and forth, top down on circular needle to make room for all the sts. YOKE: Cast on 108-108-113-113-117 sts on circular needle size 4 mm / US 6 with Karisma. Work 3 ridges in GARTER ST - see explanation above. K next row AT THE SAME TIME inc 24-24-23-23-27 sts evenly = 132-132-136-136-144 sts. Remember BUTTONHOLES - see explanation above. Now work as follows from RS: 5 sts in garter st, P 1, K 2 (= band), P 12-12-13-13-15, A.1, insert 1st marker, A.2, P 2, A.2, P 2, A.1, insert 2nd marker, A.2, P 0-0-1-1-3, A.3, P 0-0-1-1-3, A.1, insert 3rd marker, A.2, P 2, A.2, P 2, A.1, insert 4th marker, A.2, P 12-12-13-13-15, K 2, P 1, 5 sts in garter st (= band) – READ KNITTING TIP! READ ALL OF THE FOLLOWING SECTION BEFORE CONTINUING! REMEMBER THE GAUGE! On next row from RS beg inc for RAGLAN – see explanation above, AT THE SAME TIME work pattern as follows: RAGLAN: Repeat inc every row 0-2-10-20-20 times in total. Then inc on every other row (i.e. on every row from RS) 23-32-30-26-27 times and in every 3rd row 6-0-0-0-0 times = 364-404-456-504-520 sts. PATTERN: Work pattern on body as follows (P the inc sts on sleeves): Work the first 6 sts inc in A.2, then P next 8-9-7-8-8 inc sts, work the next 6 inc sts in A.2, P the next 8-9-7-8-8 inc sts. NOTE: (Size M-L-XL-XXL): When A.3 has been worked 1 time vertically, continue with A.2 over cable and P (seen from RS) the remaining sts from A.3 until start of body. S/M: Then inc as before on sleeve and inc inside A.1/A.2 (i.e. between A.1 and A.2, towards marker for raglan) on front and back piece 1-4 more times. P the new sts. L/XL/XXL: Continue with A.2 over the next 6 inc sts, P the next 7-8-8 inc sts, then inc as before on sleeve and inc inside A.1/A.2 (i.e. between A.1 and A.2, towards marker for raglan) on front and back piece 1-4-5 more times. P the last 1-4-5 inc sts. Piece now measures 27-28-29-30-31 cm / 10½"-11"-11½"-11 3/4"-12 1/4" from shoulder. Now work as follows from WS: Work 55-60-67-73-76 sts (= right front piece), slip the next 80-90-102-114-116 sts on a stitch holder for sleeve, cast on 12 new sts under sleeve, insert a blue marker in the middle of these new sts (= side), work the next 94-104-118-130-136 m (= back piece), slip the next 80-90-102-114-116 sts on a stitch holder for sleeve, cast on 12 new sts under sleeve, insert a blue marker in the middle of these new sts (= side), work the remaining 55-60-67-73-76 sts (= left front piece). There are now 228-248-276-300-312 sts on needle. NOW MEASURE THE PIECE FROM HERE. BODY: There are now 106-116-130-142-148 sts for back piece and 61-66-73-79-82 sts for each front piece. Then continue pattern as follows from RS: S/M: 5 sts in garter st, P 1, K 2 (= band), P 12-12, A.2, insert a marker, P 8-9, A.2, insert a marker, P 8-9, A.1, P 7-7, A.2 0-1 time in width, P 7-7, A.2, P 8-9, insert a marker, A.2, P 8-9, insert a marker, A.2, P 9-9, A.2, P 9-9, A.2, insert a marker, P 8-9, A.2, insert a marker, P 8-9, A.1, P 7-7, A.2 0-1 time in width, P 7-7, A.2, P 8-9, insert a marker, A.2, P 8-9, insert a marker, A.2, P 12-12, K 2, P 1, 5 sts in garter st. L/XL/XXL: 5 sts in garter st, P 1, K 2 (= band), P 13-14-15, A.2, insert a marker, P 7-8-8, A.2, insert a marker, P 7-8-8, A.2, insert a marker, P 7-8-8, A.1, P 4-6-5, A.2 1-1-2 times in width, P 4-6-5, A.2, P 7-8-8, insert a marker, A.2, P 7-8-8, insert a marker, A.2, P 7-8-8, insert a marker, A.2, P 10-11-12, A.2, P 10-11-12, A.2, insert a marker, P 7-8-8, A.2, insert a marker, P 7-8-8, A.2, insert a marker, P 7-8-8, A.1, P 4-6-5, A.2 1-1-2 times in width, P 4-6-5, A.2, P 7-8-8, insert a marker, A.2, P 7-8-8, insert a marker, A.2, P 7-8-8, insert a marker, A.2, P 13-14-15, K 2, P 1, 5 sts in garter st. READ THE NEXT 2 SECTIONS BEFORE CONTINUING! Now dec and inc at the same time as follows: DECREASE: Dec differently as follows: Dec 1 st by P 2 tog towards the bands mid front, repeat dec every 1½-1½-1½-2-2 cm / ½"-½"-½"-3/4"-3/4" 5-5-4-4-5 more times. AT THE SAME TIME dec 1 st on each side of the middle cable on back piece. Repeat dec every 2-2-1½-1½-1½ cm / 3/4"-3/4"-½"-½"-½" 3-3-4-4-6 more times. AT THE SAME TIME dec 1 st towards cable in every P section with marker in (= 8-8-12-12-12-12 markers). Repeat dec every 3-2½-5-4-4 cm / 1 1/8"-7/8"-2"-1½"-1½" 2-3-1-2-2 more times. INCREASE (towards the sides): When piece measures 3 cm / 1'', inc along the cable towards the sleeve (i.e. cable from raglan) in P section towards the sides – READ INCREASE TIP! Inc 4 sts on row. Repeat inc every 1½-1½-2½-1½-1 cm / ½"-½"-7/8"-½"-3/8" 3-4-2-4-10 more times. When all dec and inc are done, 200-216-244-264-294 sts remain. When piece measures 11-12-12-13-14 cm / 4½"-4 3/4"-4 3/4"-5"-5½", work pattern as follows: 5 sts in garter st, P 1, K 2 (= band), P 2-2-4-4-5, A.5, A.4, A.5, A.4 0-0-1-1-1 time, P 7-8-6-11-15, A.2 0-1-1-1-2 times in width, P 7-8-6-11-15, A.4 0-0-1-1-1 time in width, * A.5, A.4 *, repeat from *-* 2-2-3-3-3 more times in width, A.5 1-1-0-0-0 times in width, P 7-8-6-11-15, A.2 0-1-1-1-2 times in width, P 7-8-6-11-15, A.4 0-0-1-1-1 time in width, A.5, A.4, A.5, P 2-2-4-4-5, K 2, P 1, 5 sts in garter st (= band). NOTE: Adjust the first cable in A.4 and A.5 to get a nice transition between diagrams. Continue with pattern and inc according to diagram. When A.4 and A.5 have been worked vertically and piece measures approx. 33-34-34-35-35 cm / 13"-13½"-13½"-13 3/4"-13 3/4", there are 316-332-376-396-426 sts on needle. Insert a marker here. NOW MEASURE THE PIECE FROM HERE. Now work rib inside 8 band sts in each side of piece as follows: S/M: * Work K over K and P over P until 7-11 sts remain before the blue marker in the side, P 2, K 2, P 3-4 *, repeat from *-* 1 more time and continue with K over K and P over P until band sts. L/XL/XXL: * Work K over K and P over P until 8-14-21 sts remain before the blue marker in the side, K 2-2-2, P 3-4-3, K 0-2-2, P 0-3-3, K 0-0-2, P 0-0-3 *, repeat from *-* 1 more time and continue with K over K and P over P until band sts. When rib has been worked for 2 cm / 3/4'' from marker, inc by making 1 YO before first P st in every P section. READ INCREASE TIP! When rib has been worked for 5-5-6-6-6 cm / 2"-2"-2½"-2½"-2½", bind off with K over K and P over P. SLEEVES: Slip the 80-90-102-114-116 sts from stitch holder back on circular needle. Work 1 row over all sts and cast on 12 new sts at the end of row = 92-102-114-126-128 sts. Insert a marker in the middle of the new sts (i.e. 6 sts on each side of marker). NOW MEASURE THE PIECE FROM HERE. Then work sleeve in the round on circular needle/double pointed needles. Continue the middle cable on sleeve as before but work P over cables in raglan. On 2nd round beg dec on each side of marker - READ DECREASE TIP. Repeat dec every other round 6 more times = 78-88-100-112-114 sts. Then dec 1 st on each side of marker every 2-1½-1-1-1 cm / 3/4"-½"-3/8"-3/8"-3/8" 13-17-22-27-27 times = 52-54-56-58-60 sts. AT THE SAME TIME when piece measures 15 cm / 6'', work A.5 over cable in the middle of sleeve - adjust the first cable in A.5 to get a nice transition between diagrams. NOTE: Do not inc in A.5 on sleeve, i.e. do not work YOs in diagram. When A.5 is finished and sleeve measures 37 cm / 14½'', work rib as follows from marker at beg of round: P 0-0-1-2-3, K 1-2-2-2-2, P 3, K 2. P 3, K 2, P 2, continue rib as on last row in A.5 (= 26 sts), P 2, K 2, P 3, K 2, P 3, K 1-2-2-2-2, P 0-0-1-2-3. Continue like this for 3 cm / 1'', bind off with K over K and P over P. ASSEMBLY: Sew the holes under the sleeves. Sew the buttons on to left band. |
||||||||||||||||||||||||||||
Diagram explanations |
||||||||||||||||||||||||||||
|
||||||||||||||||||||||||||||

|
||||||||||||||||||||||||||||

|
||||||||||||||||||||||||||||

|
||||||||||||||||||||||||||||
|
Have you made this or any other of our designs? Tag your pictures in social media with #dropsdesign so we can see them! Do you need help with this pattern?You'll find tutorial videos, a Comments/Questions area and more by visiting the pattern on garnstudio.com. © 1982-2024 DROPS Design A/S. We reserve all rights. This document, including all its sub-sections, has copyrights. Read more about what you can do with our patterns at the bottom of each pattern on our site. |
||||||||||||||||||||||||||||


With over 40 years in knitting and crochet design, DROPS Design offers one of the most extensive collections of free patterns on the internet - translated to 17 languages. As of today we count 304 catalogs and 11422 patterns - 11417 of which are translated into English (US/in).
We work hard to bring you the best knitting and crochet have to offer, inspiration and advice as well as great quality yarns at incredible prices! Would you like to use our patterns for other than personal use? You can read what you are allowed to do in the Copyright text at the bottom of all our patterns. Happy crafting!
Comments / Questions (162)
Ich habe bereits viele von ihren Designs nachgestrickt und alle sind super gelungen. Die Jacke 156-4 soll von oben nach unten gestrickt werden.Die Anleitung dazu ist mir jedoch viel zu kompliziert. Gibt es eine passende Anleitung welche man einfacher nachstricken kann.. Mit der jetzigen Anleitung schaffe ich es leider nicht. Für eine zeitnahe Rückmeldung bin ich Ihnen sehr dankbar
12.04.2024 - 01:48DROPS Design answered:
Liebe Frau Herren, hier finden Sie alle unsere Jacken, die von oben nach unten gestrickt sind; gerne können Sie auch diese Anleitungen filtern. Viel Spaß beim Stricken!
12.04.2024 - 08:31Voilà ce que je ne comprends pas après beaucoup de réflexion : il faut faire des augmentations envers au niveau des manches, d'accord mais en début de travail est est plus que difficile de visualiser où sont les manches sur la globalité du travail.
03.10.2023 - 20:16DROPS Design answered:
Bonjour Elise, vous augmentez pour les devants, le dos et les manches pour le raglan mais tricotez ces augmentations différemment, celles des devants et du dos vont se tricoter en point fantaisie progressivement, celles des manches vont se tricoter uniquement en jersey envers. On place des marqueurs au début pour mieux se repérer, n'hésitez pas à en placer d'autres si vous êtes plus à l'aise ainsi. Bon tricot!
04.10.2023 - 07:55Hallo, I find the instructions particularly complex and not understandable, and so did 2 different knitting 'teachers' I asked. Is there any chance to receive help individually online? Thank you Milena
22.07.2023 - 22:42DROPS Design answered:
Dear Milena, if you have any specific questions you can ask them here and we will answer as best as possible. You can also try the DROPS Workshop Facebook group, where other knitters will be able to give you feedback on your work and help or advise you when in doubt. Happy knitting!
23.07.2023 - 19:41Yoke: whichever size you are knitting, the instructions are missing 20 stitches. 132-132-136-136-144 after inc, but only 112-112-116-116-124 are in directions. How/Where are the remaining 20 stitches placed? In looking at the pictures, I would guess that over the sleeves should be A.2, P 7, A.2, P 7, A.1 instead of A.2 , P 2, A.2, P 2, A.1. Please clarify.
01.10.2022 - 04:11DROPS Design answered:
Dear Dawn, the instructions are correct. For example, for size S: 5 sts in garter st, P1, K2, P12, A.1 (=6), insert 1st marker, A.2 (=6), P2, A2 (=6), P2, A.1 (=6), insert 2nd marker, A.2 (=6), P0, A.3 (=24), P0, A.1 (=6), insert 3rd marker, A.2 (=6), P2, A.2 (=6), P2, A.1 (=6), insert 4th marker, A.2 (=6), P12, K2, P1, 5 sts in garter st. In total, it adds up to 132 stitches. Happy knitting!
03.10.2022 - 01:13Hello, I just asked a similar question yesterday, however I don't want to mess up so close to the end...this was a poorly done pattern but I like the sweater. I have been knitting almost 60 years. I am at the final increase in the rib before cast off. I am looking at 58 increases ...I am knitting an XL. I am pretty sure that I followed the pattern correctly. Is this too many?
30.09.2022 - 19:45DROPS Design answered:
Dear Mrs Resnick, as long as you increase in every purl section before casting off, it should work; the increasing in the purl sections will allow enough width without getting a too wider edge. Happy knitting!
03.10.2022 - 08:16I don't understand the last increase before casting off stitches....how many'purlsections' are there? how many stitches constitute a purl section? In other words...how many inctmreases should there be for the rib?
30.09.2022 - 06:00DROPS Design answered:
Dear Mrs Resnick, increase 1 stitch in every section worked with purled stitch whatever the number of sts there are and either purled stichtes from rib or from pattern. The number of stitches increased will depend on your size, simply increase 1 purl stitch every time you purl between knitted stitches. Happy knitting!
30.09.2022 - 08:24Kan man byta ut karisma mot lima? lika mycket garn i så fall?
15.09.2022 - 12:10DROPS Design answered:
Hej Katarina, ja det kan du, testa vår garn-konverterare; välj Karisma, välj antal g i din storlek och välj 1 tråd så ser du hur mycket du skall ha i DROPS Lima :)
15.09.2022 - 15:18What is the best way to increase on every row to get a smooth edge?
30.04.2022 - 21:40DROPS Design answered:
Dear Glenda, you can increase in an edge stitch (before or after it, depending on the side you are working on). If there is a big hole after a YO, you can pick up the horizontal thread between two stitches and work it twisted. Happy knitting!
30.04.2022 - 22:30I am looking at this pattern. Is it me or do the gauge and the completed inches for each size does not add up? For example, if I take the stitch count at the separation for the sleeves (assuming this is around the bust size) for the XXL size says I will have 312 stitches. Assuming I have the correct gauge of 21 stitches= 4 inches. that means that there are 5.25 stitches per inch. 312/ 5.25= 59.5 inches. What am I missing to get the 47.5 inches that the pattern says at the top?
28.04.2022 - 07:32DROPS Design answered:
Dear Mrs Thorson, the tension of 21 sts = 4" is measured when working stocking stitch, but you will need more stitches to work cables. Should your tension be right and if you keep this tension when working, then you will have the correct finished measurements. Happy knitting!
28.04.2022 - 11:56On the yoke it says inc every row 20 times (for raglan) then incr every other row 26 times...it also says that all Inc are done on the right side so are the incr's done on every RS row then every other RS row?
26.04.2022 - 06:25DROPS Design answered:
Hi Glenda, You increase to raglan first on every row (both right and wrong side) x 20, then every other row (each row from the right side ) for the remaining increases. Happy knitting!
26.04.2022 - 06:55