
Popular categories
Looking for a yarn?


|
|||||||||||||||||||||||||||||||
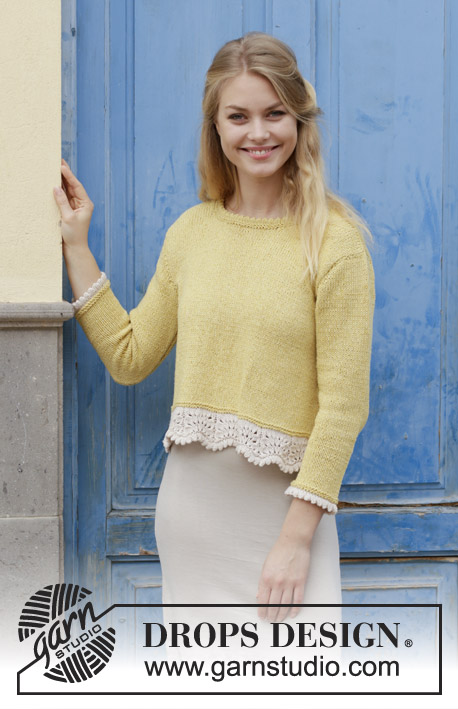
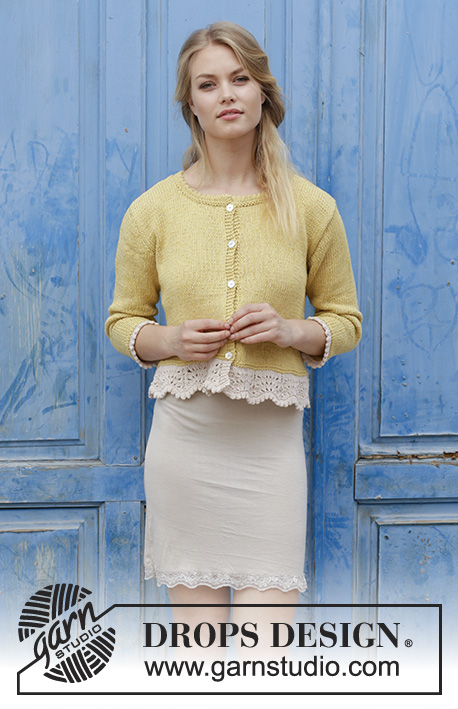
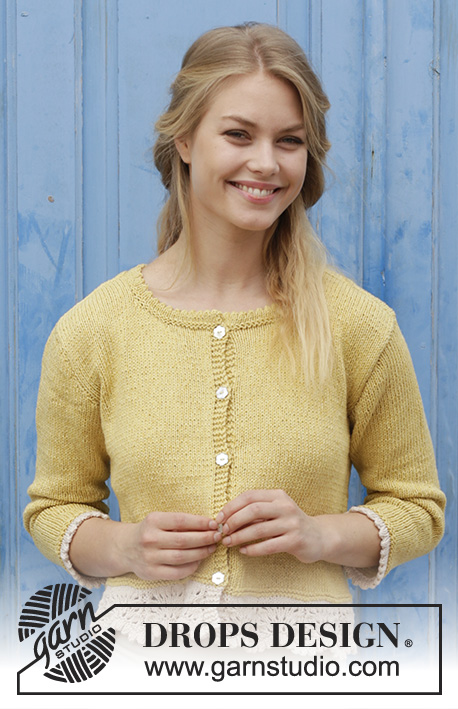
Adele Cardigan |
|||||||||||||||||||||||||||||||
 |
 |
||||||||||||||||||||||||||||||
Knitted jacket with edge in wave pattern and vent in the sides. Size S-XXXL. Piece is knitted in DROPS Belle.
DROPS 187-13 |
|||||||||||||||||||||||||||||||
|
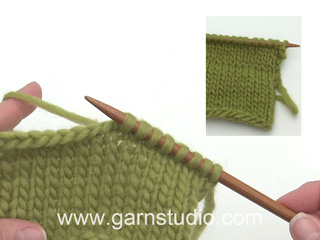
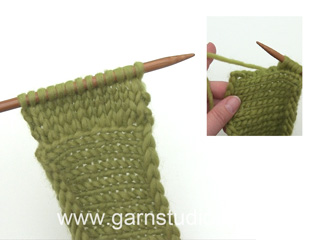
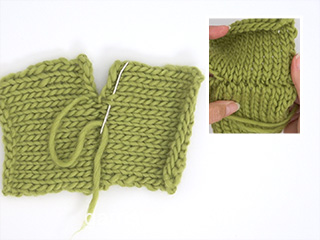
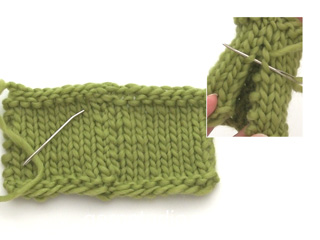
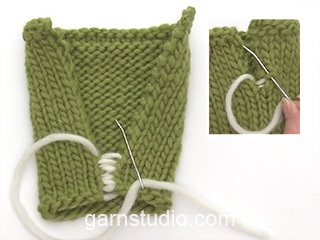
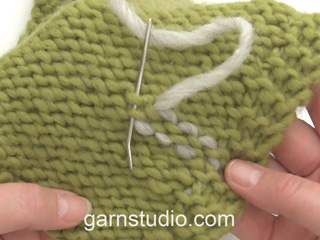
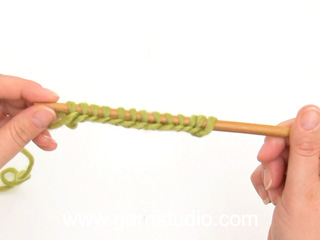
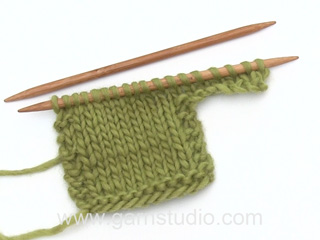
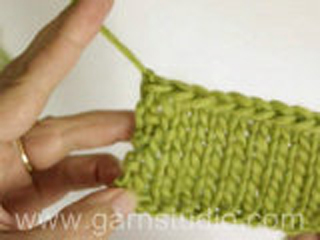
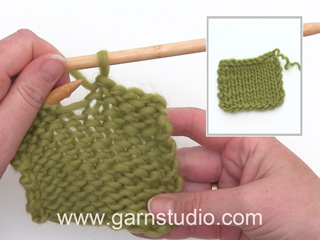
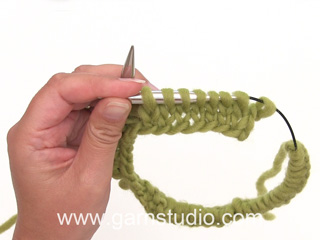
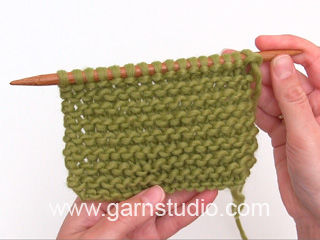
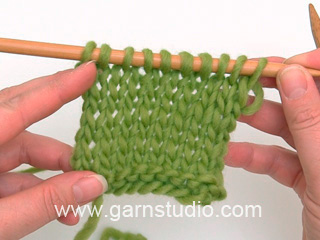
INFORMATION FOR PATTERN: GARTER STITCH (back and forth): 1 ridge = knit 2 rows. PATTERN: See diagrams A.1 to A.4. Choose diagram for your size. Diagrams show all rows in pattern seen from the right side. NOTE! First row in diagrams is worked from wrong side! DECREASE TIP-1: To calculate how to decrease evenly, use the total number of stitches on row (e.g. 122 stitches) and divide stitches by number of decreases to be done (e.g. 20) = 6.1. In this example work approx. every 5th and 6th stitch together. DECREASE TIP-2: All decreases are done from the right side. Decrease as follows after 1 edge stitch in garter stitch: Slip 1 stitch knitwise, knit 1, pass slipped stitch over stitch worked. Decrease as follows before 1 edge stitch in garter stitch: Work until 3 stitches remain, knit 2 together, 1 edge stitch in garter stitch. INCREASE TIP: All increases are done from right side. Increase 1 stitch inside 1 edge stitch in garter stitch in each side by making a yarn over. On next row purl yarn overs twisted to avoid holes. Then work the new stitches in stockinette stitch. BUTTONHOLES: Decrease for buttonholes on right band. 1 BUTTONHOLE = knit third and fourth stitch from edge together and make 1 yarn over. On next row knit yarn over = hole. Measure from the marker thread after the edge in wave pattern + 2 ridges at the bottom on right front piece and make buttonholes when pieces measures: S: 1, 8, 15, 22 and 29 cm M: 1, 9, 16, 23 and 30 cm L: 1, 9, 17, 25 and 32 cm XL: 1, 10, 18, 26 and 34 cm XXL: 1, 10, 19, 27 and 35 cm XXXL: 1, 10, 19, 28 and 37 cm ---------------------------------------------------------- JACKET: Worked back and forth on circular needle, bottom up. Work first an edge in wave pattern with light beige. Then switch to dandelion and work 2 ridges before continuing in stockinette stitch. Work sleeves back and forth on circular needle. BACK PIECE: Cast on 121-121-137-137-153-169 stitches with light beige on circular needle size 4 mm / US 6. Work first row from wrong side as follows: A.1 (= 5 stitches), A.2 – choose diagram for your size (= 8 repetition of 14-14-16-16-18-20 stitches), A.3 (= 4 stitches). On the last 2 rows in A.1-A.3 cast on 1 new stitch at the end of row (marks vent) = 122-122-138-138-154-170 stitches. When A.1 to A.3 have been worked, switch to dandelion. Knit 1 row from right side while decreasing 20-12-18-8-12-16 stitches evenly - read DECREASE TIP-1 = 102-110-120-130-142-154 stitches. Knit 1 row from wrong side, knit 1 row from right side and knit 1 row from wrong side. Insert a marker thread here. NOW MEASURE PIECE FROM HERE! REMEMBER THE GAUGE! Now work in stockinette stitch with 1 edge stitch in GARTER STITCH - see explanation above, in each side, AT THE SAME TIME when piece measures 0-1-2-3-4-5 cm / "-⅜"-¾"-1⅛"-1 ½"-1⅞" decrease 1 stitch in each side – read DECREASE TIP-2. Decrease like this approx. every 4 cm / 1½" 4 times in total = 94-102-112-122-134-146 stitches. When piece measures 21-22-23-24-25-26 cm / 8¼"-8¾"-9"-9½"-9¾"-10¼", bind off stitches in each side for armholes as follows: bind off 3 stitches 1-2-2-3-4-5 times, 2 stitches 1-1-2-3-4-5 times and 1 stitch 1-1-3-2-2-2 times = 82-84-86-88-90-92 stitches. Continue in stockinette stitch with 1 edge stitch in garter stitch in each side. When piece measures 35-37-39-41-43-45 cm / 13¾"-14½"-15¼"-16⅛"-17"-17¾", bind off the middle 40-40-42-42-44-44 stitches for neck and finish each shoulder separately. Then bind off 1 stitch on next row from neck =20-21-21-22-22-23 stitches for shoulder. Continue until piece measures 38-40-42-44-46-48 cm / 15"-15¾"-16½"-17¼"-18"-19" (46-48-50-52-54-56 cm / 18"-19"-19¾"-20½"-21¼"-22" in total from shoulder and down). Bind off. Make sure that the bind off is not to tight! Work the other shoulder the same way. RIGHT FRONT PIECE: Cast on 65-65-73-73-81-89 stitches on circular needle size 4 mm / US 6 with light beige. Work first row from wrong side as follows: Work A.1 (= 5 stitches), A.2 – choose diagram for your size (= 4 repetition of 14-14-16-16-18-20 stitches), A.3 (= 4 stitches). On next to last row in diagrams cast on 1 new stitch at the end of row from right side (= marks vent in the side) = 65-65-73-73-81-89 stitches. When A.1 to A.3 have been worked, switch to dandelion. Knit 1 row from right side while decreasing 10-6-9-4-6-7 stitches evenly = 55-59-64-69-75-82 stitches. Knit 1 row from wrong side, knit 1 row from right side and knit 1 row from wrong side. Insert a marker thread here. NOW MEASURE PIECE FROM HERE! Now work as follows from right side - remember BUTTONHOLES: 4 band stitches in garter stitch (= towards mid front), stockinette stitch until 1 stitch remains, 1 edge stitch in garter stitch (= towards the side), AT THE SAME TIME when piece measures 0-1-2-3-4-5 cm / "-⅜"-¾"-1⅛"-1 ½"-1⅞" decrease 1 stitch in the side. Decrease like this approx. every 4 cm / 1½" 4 times in total = 51-55-60-65-71-78 stitches. When piece measures 21-22-23-24-25-26 cm / 8¼"-8¾"-9"-9½"-9¾"-10¼", bind off stitches in the side for armhole as follows: bind off 3 stitches 1-2-2-3-4-5 times, 2 stitches 1-1-2-3-4-5 times and 1 stitch 1-1-3-2-2-2 times = 45-46-47-48-49-51 stitches. Continue in stockinette stitch, 1 edge stitch in garter stitch towards the side and 4 band stitch in garter stitch towards mid front. When piece measures 30-32-33-35-36-38 cm / 11 ¾"-12 ½"-13"-13 ¾"-14⅛"-14⅞", work as follows from right side: Work the first 17-17-18-18-19-20 stitches before slipping them on a stitch holder for neck. Continue in stockinette stitch and 1 edge stitch in garter stitch and bind off at beginning of every row from neck as follows: bind off 2 stitches 3 times and 1 stitch 2 times = 20-21-21-22-22-23 stitches remain. Continue until piece measures 38-40-42-44-46-48 cm / 15"-15¾"-16½"-17¼"-18"-19" (46-48-50-52-54-56 cm / 18"-19"-19¾"-20½"-21¼"-22" in total from shoulder and down). Bind off. Make sure that the bind off is not to tight! LEFT FRONT PIECE: Do not decrease for buttonholes on left front piece. Cast on 65-65-73-73-81-89 stitches on circular needle size 4 mm / US 6 with light beige. Work first row from wrong side as follows: Work A.1 (= 5 stitches), A.2 – choose diagram for your size (= 4 repetition of 14-14-16-16-18-20 stitches), A.3 (= 4 stitches). On last row in diagrams cast on 1 new stitch at the end of row from wrong side (= marks vent in the side) = 65-65-73-73-81-89 stitches. When A.1 to A.3 have been worked, switch to dandelion. Knit 1 row from right side while decreasing 10-6-9-4-6-7 stitches evenly = 55-59-64-69-75-82 stitches. Knit 1 row from wrong side, knit 1 row from right side and knit 1 row from wrong side. Insert a marker thread here. NOW MEASURE PIECE FROM HERE! Now work as follows from right side: 1 edge stitch in garter stitch (= towards the side), stockinette stitch until 4 stitches remain, 4 band stitches in garter stitch (= towards mid front), AT THE SAME TIME when piece measures 0-1-2-3-4-5 cm / "-⅜"-¾"-1⅛"-1 ½"-1⅞" decrease 1 stitch in the side. Decrease like this approx. every 4 cm / 1½" 4 times in total = 51-55-60-65-71-78 stitches. When piece measures 21-22-23-24-25-26 cm / 8¼"-8¾"-9"-9½"-9¾"-10¼", bind off stitches in the side for armhole as follows: bind off 3 stitches 1-2-2-3-4-5 times, 2 stitches 1-1-2-3-4-5 times and 1 stitch 1-1-3-2-2-2 times = 45-46-47-48-49-51 stitches. Continue in stockinette stitch, 1 edge stitch in garter stitch towards the side and 4 band stitch in garter stitch towards mid front. When piece measures 30-32-33-35-36-38 cm / 11 ¾"-12 ½"-13"-13 ¾"-14⅛"-14⅞", work as follows from wrong side: Work the first 17-17-18-18-19-20 stitches before slipping them on a stitch holder for neck. Continue in stockinette stitch and 1 edge stitch in garter stitch and bind off at beginning of every row from neck as follows: bind off 2 stitches 3 times and 1 stitch 2 times = 20-21-21-22-22-23 stitches remain. Continue until piece measures 38-40-42-44-46-48 cm / 15"-15¾"-16½"-17¼"-18"-19" (46-48-50-52-54-56 cm / 18"-19"-19¾"-20½"-21¼"-22" in total from shoulder and down). Adjust according to right front piece. Bind off. Make sure that the bind off is not to tight! SLEEVE: Worked back and forth on circular needle, bottom up. Cast on 44-46-48-50-52-54 stitches on circular needle size 4 mm / US 6 with light beige. Work pattern as follows: 1 edge stitch in garter stitch, A.4 - NOTE: first row in diagram is from wrong side and is purled from wrong side, 1 edge stitch in garter stitch. On row after working together with cast-on edge (= row with arrow in diagram) switch to dandelion. Insert a marker thread here. NOW MEASURE PIECE FROM HERE! Now work in stockinette stitch with 1 edge stitch in garter stitch in each side. When piece measures 8-5-5-4-4-3 cm / 3⅛"-1⅞"-1⅞"-1 ½"-1 ½"-1⅛", increase 1 stitch in each side – read INCREASE TIP! Increase like this every 6th row 11-12-7-6-0-0 times and every 4th row 0-0-7-9-17-18 times = 66-70-76-80-86-90 stitches. When sleeve measures 33-33-32-32-31-31 cm / 13"-13"-12½"-12½"-12¼"-12¼" (shorter measurements in the larger sizes because of longer sleeve cap and wider shoulders), bind off for sleeve cap at beginning of every row in each side as follows: bind off 4 stitch 1 time, 3 stitches 1 time, 2 stitches until sleeve measures 40-41-41-42-42-43 cm / 15¾"-16⅛"-16⅛"-16½"-16½"-17", bind off 3 stitches 1 time and cast of the remaining stitches. Sleeve measures approx. 44-45-45-46-46-47 cm / 17 ¼"-17⅝"-17⅝"-18"-18"-18 ½" including edge at the bottom of sleeve. Work another sleeve. ASSEMBLY: Sew shoulders with grafting/kitchener stitches inside bind-off edge. Sew sleeves in body. Sew seam under sleeves and continue the seam down along the side down to stitch cast on for vent (= 8 cm / 3⅛" for vent). Sew inside 1 edge stitch in garter stitch in each side. Repeat in the other side. Sew the buttons on to left band. NECK EDGE: Begin from right side and knit up 108-108-114-114-120-120 stitches (including stitches from stitch holder on front pieces) with dandelion and circular needle size 4. Knit 1 row from wrong side, knit 1 row from right side and knit 1 row from wrong side. Then work as follows: ROW 1 (= right side): 1 edge stitch in garter stitch, knit until 1 stitch remains, 1 edge stitch in garter stitch. ROW 2 (= wrong side): 1 edge stitch in garter stitch, A.4 until 1 stitch remains, 1 edge stitch in garter stitch. Continue like this until 7th row in diagram has been worked. Then purl 1 row from wrong side with 1 edge stitch in garter stitch in each side. Bind off by knitting but for every 4th stitch make 1 yarn over. Bind off yarn over as stitch. NOTE! Avoid a tight bind off edge, the folding edge will tip outwards when assembled if too tight. Fold at eyelet row in A.4 so that hem is on the inside of garment. Sew bind-off edge in the top ridge. Make sure that to avoid a tight seam. |
|||||||||||||||||||||||||||||||
Diagram explanations |
|||||||||||||||||||||||||||||||
|
|||||||||||||||||||||||||||||||

|
|||||||||||||||||||||||||||||||

|
|||||||||||||||||||||||||||||||

|
|||||||||||||||||||||||||||||||
|
Have you made this or any other of our designs? Tag your pictures in social media with #dropsdesign so we can see them! Do you need help with this pattern?You'll find tutorial videos, a Comments/Questions area and more by visiting the pattern on garnstudio.com. © 1982-2024 DROPS Design A/S. We reserve all rights. This document, including all its sub-sections, has copyrights. Read more about what you can do with our patterns at the bottom of each pattern on our site. |
|||||||||||||||||||||||||||||||


With over 40 years in knitting and crochet design, DROPS Design offers one of the most extensive collections of free patterns on the internet - translated to 17 languages. As of today we count 304 catalogs and 11422 patterns - 11417 of which are translated into English (US/in).
We work hard to bring you the best knitting and crochet have to offer, inspiration and advice as well as great quality yarns at incredible prices! Would you like to use our patterns for other than personal use? You can read what you are allowed to do in the Copyright text at the bottom of all our patterns. Happy crafting!
Comments / Questions (10)
Olá! Com respeito, comento um erro em português: o modelo se tricota de baixo para cima e não ao contrário como diz nas instruções ;)
24.02.2022 - 10:43I don't get what I have to do in the * (Star) Line - Line 8. "Den Rand an der Lochreihe (= 4. Reihe/Runde des Diagramms) zur Rückseite der Arbeit klappen." I really don't understand what I have to do here in the first sentence. Can anybody help?
22.12.2020 - 22:26DROPS Design answered:
Dear Giuseppina, this video (with text in german, but just feel free to edit the language if necessary) is showing how to work this row with the star. Happy knitting!
23.12.2020 - 07:06Finished this lovely cardi today, and was a joy to knit, looks very pretty,. Took a lot of undoing to get the pattern correct, but worth the work as looks lovely. A good yarn to knit with.
25.05.2019 - 11:25Ik lees " kant dan af voor de mouwkop op het begin van iedere naald aan elke kant als volgt: Kant 1 keer 4 steken af, 1 keer 3 steken, en dan steeds 2 steken". Moet ik bij de 1e naald 4 steken afkanten en bij de 2e 3 steken, of moet ik bij de 1e en 2e naald 4 steken afkanten en bij de 3e en 4e 3 steken?
19.04.2019 - 20:41DROPS Design answered:
Dag Kee,
Je kant bij de eerste naald 4 steken af, dan keer je het werk en kant je weer 4 steken af aan het begin van de teruggaande naald. Daarna kant je 3 steken af op zowel de heen- als teruggaande naald, enzovoort.
21.04.2019 - 17:08Vad menas med lejongap i detta mönster?
30.10.2018 - 07:59DROPS Design answered:
Hei Annika. Det er garnet i den gule fargen. Jeg ser at dette fargenavnet egentlig skulle vært maskros på svensk (Fargenummer 4) - vi skal få rettet dette i oppskriften. Men det referer altså til det gule garnet. God fornøyelse
30.10.2018 - 09:14Hej! Hur mäter man längden på arbetet. Om man ska tex sticka till 32 cm. Och då får jag olika mått nästan varje gång. Ska arbetet ligga plant eller ska den hänga?
06.06.2018 - 20:38DROPS Design answered:
Arbetet mäts då det ligger plant. Det är viktigt att man inte sträcker arb då det mäts.
07.06.2018 - 14:27Hei! Jeg trenger hjelp ang ermet. Det står øk hver 6. og hver 4. pinne. Skal jeg da øke først hver 6. pinne 7 ganger (størrelse L) også hver 4. pinne 7 ganger etter det? Eller skal det gjøres samtidig så det blir ca annenhver pinne?
03.05.2018 - 00:36DROPS Design answered:
Hei Mari. Det skal gjøres etter hverandre. Altså: du skal øke på hver 6 pinne 7 ganger, og når du er ferdig med det skal det økes på hver 4 pinne 7 ganger. God fornøyelse.
23.05.2018 - 12:00Hej!\r\nNu när jag har stickat fram till där man mäter stickfastheten. Så blir det 19m×25v på 10×10cm på st 3.5. Måste jag göra om allt med st 3? Mvh/Terese
28.04.2018 - 11:27Bij het rechtervoorpand moet je voor maat L 73 steken opzetten met beige. Na iedere naald moet je aan het einde van de naald aan de goede kant, 1 steek meerderen. Zodra je met boterbloem verder gaat, minder je 9 steken en heb je 64 steken op je naald.... waar zijn dan de steken gebleven die je gemeerdert hebt ? Volgens mij klopt er iets niet ?
26.04.2018 - 16:24DROPS Design answered:
Dag Nancy, Er stond een fout in het patroon. Er moet staan 'een na laastste naald' in plaats van 'de volgende tot laatste naald'. Het is nu gecorrigeerd.
04.06.2018 - 06:28I need some advice reading the pattern charts please! On the right side of the knitting do I read the chart from right to left and on the wrong side from left to right?\r\nThnak you!
27.03.2018 - 17:41DROPS Design answered:
Dear Ann, yes correct, and start reading diagram starting on the bottom corner on the right side. Happy knitting!
28.03.2018 - 15:13