
Popular categories
Looking for a yarn?


|
||||||||||
Idun Jacket |
||||||||||
 |
 |
|||||||||
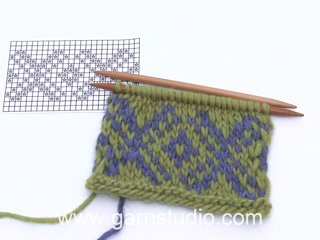
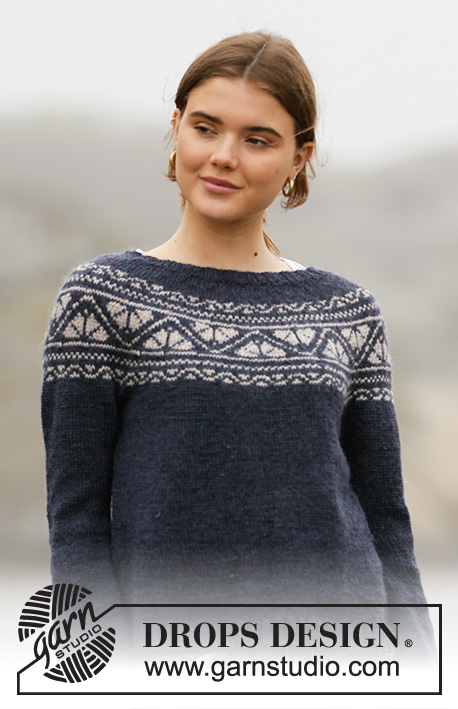
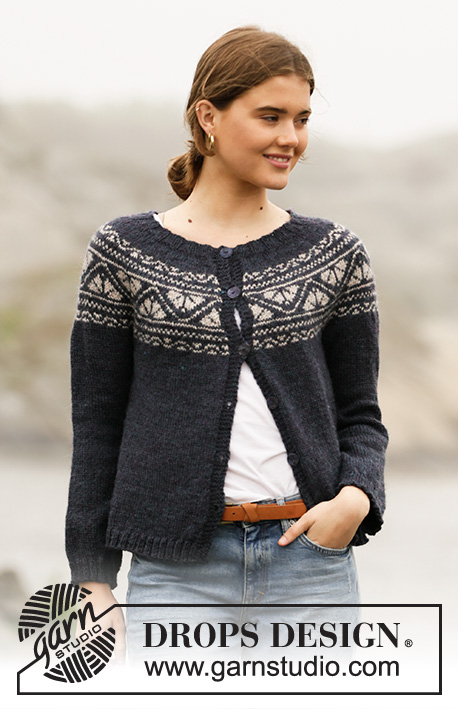
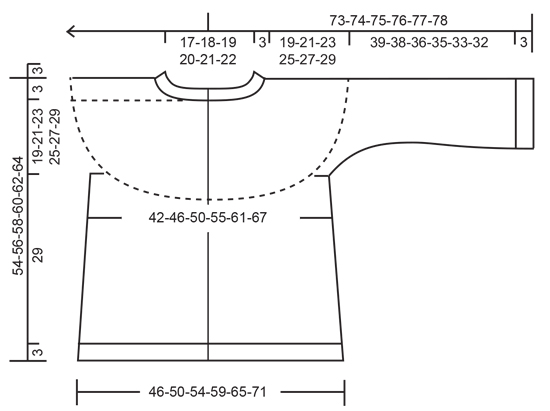
Knitted jacket in DROPS Karisma. The piece is worked top down with round yoke and Nordic pattern on the yoke. Sizes S - XXXL.
DROPS 206-3 |
||||||||||
|
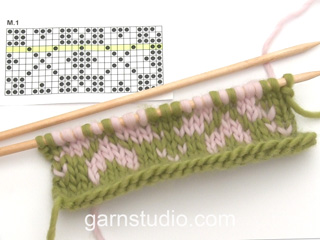
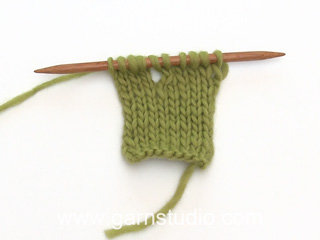
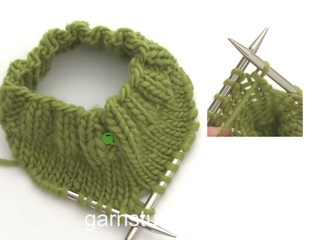
------------------------------------------------------- EXPLANATIONS FOR THE PATTERN: ------------------------------------------------------- RIDGE/GARTER STITCH (worked back and forth): Knit all rows. 1 ridge in height = Knit 2 rows. ELEVATION (back of neck): To make the jacket slightly higher at the back of the neck you can work an elevation as described here. Skip this section if you do not want an elevation. Insert 1 marker in the middle of the row (in S and XL insert the marker in the middle stitch, in M, L, XXL and XXXL insert the marker between the 2 middle stitches on the row). Start from the right side with petrol cerise and knit 13-14-15-15-16-17 stitches past the marker, turn, tighten strand and purl 27-28-30-31-32-34 stitches back. Turn, tighten strand and knit 40-42-45-46-48-51 stitches, turn, tighten strand and purl 53-56-60-61-64-68 stitches back. Turn, tighten strand and knit to end of row, work 1 row from wrong side (band worked in garter stitch). Then work YOKE as described in the text. PATTERN: See diagram A.1. Choose diagram for your size. The whole pattern is worked in stockinette stitch. KNITTING TIP: To avoid the knitting gauge becoming tighter when working pattern, it is important that the strands at the back are not tight. You can use a larger size needle when working pattern if this is a problem. INCREASE TIP-1 (evenly spaced): To work out how to increase evenly, count the total number of stitches on the needle (e.g. 104 stitches), minus the bands (e.g. 10 stitches) and divide the remaining stitches by the number of increases to be made (e.g. 31) = 3. In this example, increase by making 1 yarn over after each 3rd stitch. Do not increase on the bands. On the next row work the yarn overs twisted to avoid holes. INCREASE TIP-2 (for sides of body and mid under sleeves): All increases are worked from the right side! Work until there are 2 stitches left before the marker thread, make 1 yarn over, knit 4 (marker thread sits in the middle of these 4 stitches), make 1 yarn over (= 2 stitches increased at the marker thread and 4 stitches increased on the row). On the body the yarn overs are purled twisted on the next row (wrong side) to avoid holes. On the sleeves they are knitted twisted on the next round to avoid holes. Then the new stitches are worked in stockinette stitch. DECREASE TIP (mid under sleeve): Work until there are 3 stitches left before the marker thread, knit 2 together, knit 2 (marker thread sits between these 2 stitches), slip 1 stitch as if to knit, knit 1 and pass the slipped stitch over the knitted stitch (= 2 stitches decreased). BUTTONHOLE: Work buttonholes on the right band (when the garment is worn). Work from the right side when there are 3 stitches left on the row as follows: Make 1 yarn over, knit 2 together and knit 1. On the next row (wrong side), knit the yarn over to leave a hole. The first buttonhole is worked when the rib on the neck measures approx. 1½-2 cm = ½"-¾". Then work the other 5-5-6-6-7-7 buttonholes with approx. 9-9-8-8-7½-7½ cm = 3½"-3½"-3⅛"-3⅛"-2⅞"-2⅞" between each one. BINDING OFF TIP: To avoid the bind-off edge being tight you can bind off with a larger size needle or make 1 yarn over after approx. each 8th stitch at the same time as binding off (yarn overs bind off as normal stitches). ------------------------------------------------------- START THE PIECE HERE: ------------------------------------------------------- JACKET – SHORT OVERVIEW OF THE PIECE: The neck and yoke are worked back and forth from mid front with circular needle, top down. Then the yoke is divided for body and sleeves and the body continued back and forth with circular needle. The sleeves are worked in the round with short circular needle/double pointed needles, top down. NECK: Cast on 104-108-112-116-120-124 stitches (including 5 band stitches on each side towards mid front) with circular needle size 3.5 mm = US 4 and petrol cerise. Purl 1 row (= wrong side). The next row is worked as follows from the right side: 5 band stitches in GARTER STITCH – read description above, * knit 2, purl 2 *, repeat from *-* until there are 7 stitches left on the row, knit 2 and finish with 5 band stitches in garter stitch. Continue this rib for 3 cm = 1⅛" – remember the BUTTONHOLE on the right band – read description above. Knit 1 row from the right side where you increase 31-32-34-35-36-38 stitches evenly spaced – read INCREASE TIP-1 = 135-140-146-151-156-162 stitches. Insert 1 marker at the beginning of the row, after band; the yoke is measured from this marker! Change to circular needle size 4.5 mm = US 7 and purl 1 row from the wrong side (bands worked in garter stitch and yarn overs purled twisted). You can now work an ELEVATION in the back of the neck – read description above. If you do not want an elevation go straight to YOKE. YOKE: The first row is worked as follows from the right side: 5 band stitches in garter stitch, work A.1A until there are 6 stitches left on the row (the number of stitches does not fit to begin with as each repeat has 10 stitches, but this does not matter as the first rows are one-colored), work A.1B (= 1 stitch) and finish with 5 band stitches in garter stitch. Continue this pattern. Read KNITTING TIP and REMEMBER THE KNITTING GAUGE! AT THE SAME TIME on each row marked with an arrow in A.1A increase stitches evenly spaced as described below – remember INCREASE TIP-1: Arrow-1: Increase 41-43-45-47-49-55 stitches evenly spaced = 176-183-191-198-205-217 stitches. Arrow-2: Increase 25-28-30-33-36-44 stitches evenly spaced = 201-211-221-231-241-261 stitches (there is now room for 19-20-21-22-23-25 repeats of A.1 with 10 stitches). Arrow-3: Increase 22-30-40-48-54-58 stitches evenly spaced = 223-241-261-279-295-319 stitches. Arrow-4: Increase 22-30-36-44-54-56 stitches evenly spaced = 245-271-297-323-349-375 stitches (there is now room for 9-10-11-12-13-14 repeats of A.1 with 26 stitches). Arrow-5: Increase 16-20-24-28-22-26 stitches evenly spaced = 261-291-321-351-371-401 stitches (there is now room for 25-28-31-34-36-39 repeats of A.1 with 10 stitches). Arrow-6: Increase 12-14-8-6-10-12 stitches evenly spaced = 273-305-329-357-381-413 stitches. When A.1 has been completed the piece measures approx. 18-18-18-21-21-21 cm = 7"-7"-7"-8¼"-8¼"-8¼" from the marker on the neck. Continue with stockinette stitch and petrol cerise and 5 band stitches in garter stitch until the piece measures 19-21-23-25-27-29 cm = 7½"-8¼"-9"-9¾"-10⅝"-11⅜" from the marker on the neck. Now divide the yoke for body and sleeves on the next row as follows: Work 44-48-51-56-61-67 stitches in stockinette stitch and garter stitch as before (= front piece), place the next 54-62-68-72-74-78 stitches on 1 thread for sleeve, cast on 6-6-8-8-10-10 new stitches on the needle (= in side under sleeve), work 77-85-91-101-111-123 stitches in stockinette stitch as before (= back piece), place the next 54-62-68-72-74-78 stitches on 1 thread for sleeve, cast on 6-6-8-8-10-10 new stitches on the needle (= in side under sleeve) and work the remaining 44-48-51-56-61-67 stitches in stockinette stitch and garter stitch as before (= front piece). Body and sleeves are finished separately. THE PIECE IS NOW MEASURED FROM HERE! BODY: = 177-193-209-229-253-277 stitches. Insert 1 marker thread 47-51-55-60-66-72 stitches in from each side (= in sides of body). There are 83-91-99-109-121-133 stitches between marker threads on the back piece. Allow the threads to follow your work onwards; they are used when increasing in the sides. Work stockinette stitch back and forth with petrol cerise and 5 band stitches in garter stitch on each side towards mid front – remember the buttonholes on the right band. When the piece measures 6 cm = 2⅜" from the division in all sizes increase 1 stitch on each side of both marker threads – read INCREASE TIP-2 (= 4 stitches increased). Increase like this every 6 cm = 2⅜" a total of 4 times on each side = 193-209-225-245-269-293 stitches. Continue working until the piece measures 29 cm = 11⅜" from the division in all sizes (there is approx. 3 cm = 1⅛" left to finished length; you can try the jacket on and continue working to desired length). Purl 1 row from the wrong side where you increase 51-55-59-67-71-79 stitches evenly spaced (bands continued in garter stitch; do not increase on the bands) = 244-264-284-312-340-372 stitches; this increase is to avoid the rib being tight. Change to circular needle size 3.5 mm = US 4 and work the next row from the right side as follows: 5 band stitches in garter stitch, * knit 2, purl 2 *, work from *-* until there are 7 stitches left on the row, knit 2 and finish with 5 band stitches in garter stitch. Continue this rib for 3 cm = 1⅛". Bind off with garter stitch over garter stitch, knit over knit and purl over purl – read BINDING OFF TIP! The jacket measures approx. 54-56-58-60-62-64 cm = 21¼"-22"-22¾"-23⅝"-24⅜"-25¼" from the shoulder down. SLEEVE: Place the 54-62-68-72-74-78 stitches from the thread on the one side of the piece on double pointed needles/short circular needle size 4.5 mm = US 7 and knit up 1 stitch in each of the 6-6-8-8-10-10 stitches cast on under the sleeve = 60-68-76-80-84-88 stitches. Insert 1 marker thread in the middle of the 6-6-8-8-10-10 stitches under the sleeve and allow the thread to follow your work onwards; it will be used when decreasing mid under sleeve. Start the round at the marker thread and work stockinette stitch in the round with petrol cerise. When the sleeve measures 3-3-3-2-2-2 cm = 1⅛"-1⅛"-1⅛"-¾"-¾"-¾" from the division decrease 2 stitches mid under sleeve – read DECREASE TIP. Decrease like this every 4-1½-1-1-1-1 cm = 1½"-½"-⅜"-⅜"-⅜"-⅜" a total of 3-7-10-11-11-13 times = 54-54-56-58-62-62 stitches. When the sleeve measures 15-15-16-16-16-17 cm = 6"-6"-6¼"-6¼"-6¼"-6¾" from the division increase 2 stitches mid under sleeve – read INCREASE TIP-2. Increase like this every 4-4-3-3-2-2 cm = 1½"-1½"-1⅛"-1⅛"-¾"-¾" a total of 3 times = 60-60-62-64-68-68 stitches. Continue working until the sleeve measures 39-38-36-35-33-32 cm = 15¼"-15"-14¼"-13¾"-13"-12½" from the division (there is approx. 3 cm = 1⅛" left to finished length; you can try the jacket on and continue working to desired length). NOTE: shorter measurements in larger sizes due to wider neck and longer yoke. Knit 1 round where you increase 16-16-18-20-20-20 stitches evenly spaced = 76-76-80-84-88-88 stitches. Change to double pointed needles size 3.5 mm = US 4 and work rib (= knit 2 / purl 2) for 3 cm = 1⅛". Bind off loosely with knit over knit and purl over purl – remember BINDING OFF TIP! The sleeve measures approx. 42-41-39-38-36-35 cm = 16½"-16⅛"-15¼"-15"-14¼"-13¾" from the division. Work the other sleeve in the same way. ASSEMBLY: Sew buttons onto the left band. |
||||||||||
Diagram explanations |
||||||||||
|
||||||||||

|
||||||||||

|
||||||||||
|
||||||||||
|
Have you made this or any other of our designs? Tag your pictures in social media with #dropsdesign so we can see them! Do you need help with this pattern?You'll find tutorial videos, a Comments/Questions area and more by visiting the pattern on garnstudio.com. © 1982-2024 DROPS Design A/S. We reserve all rights. This document, including all its sub-sections, has copyrights. Read more about what you can do with our patterns at the bottom of each pattern on our site. |
||||||||||


With over 40 years in knitting and crochet design, DROPS Design offers one of the most extensive collections of free patterns on the internet - translated to 17 languages. As of today we count 304 catalogs and 11422 patterns - 11417 of which are translated into English (US/in).
We work hard to bring you the best knitting and crochet have to offer, inspiration and advice as well as great quality yarns at incredible prices! Would you like to use our patterns for other than personal use? You can read what you are allowed to do in the Copyright text at the bottom of all our patterns. Happy crafting!
Comments / Questions (17)
Hei, jeg synes dere har altfor mange plagg som skal strikkes ovenfra og ned. Jeg blir like skuffa hver gang, for det er trælete og tungvint.
02.02.2024 - 22:03Dankeschön, jetzt habe ich es begriffen! Noch eine Frage zur Strickschrift. ich mache das zum ersten mal. kann es sein, dass man die Hinreihe mit A 1.B beendet, die Rückreihe aber mit A1.B beginnt? ich musste schon 2 x auftrennen, weil das Mustern nicht stimmt...Gerade die erste Musterreihe, wenn ich mit der Musterfarbe abschließe (B), habe ich 2 farbige maschen, fange in Reihe 2 mit der Grundfarbe an und die 2. Masche ist das Muster, das passt nicht zur Strickschrift?
02.03.2023 - 15:28DROPS Design answered:
Liebe Frau Hammermüller, ja genau, bei den Hinreihen strikt man zuerst A.1A dann endet man mit A.1B und bei den Rückreihen beginnt man mit A.1B und dann strickt man A.1A (bein den Rückreihen liest man von links nach rechts). Mit A.1B am Ende von den Hinreihen (Anfang von den Rückreihen) wird das Muster symmetrisch sein, z.B. bei der 1. Musterreihe sind es dann 2 Maschen mit Farben eiche hell innerhalb die Blenden-Maschen. .Viel Spaß beim stricken!
02.03.2023 - 16:38Noch zur Ergänzung:-) Ist die Hinreihe ein rechte Reihe? Und die Rückreihe links? Dann wäre die Hinreihe diese, mit der man begonnen hat und wo der Wollfaden "hängt". Oder nicht?
01.03.2023 - 19:21DROPS Design answered:
Liebe Frau Hammermüller, bei diesem Modell wird die 1. Reihe eine Rückreihe (links gestrickt), die erste Hin-Reihe ist dann die nächste. Viel Spaß beim stricken!
02.03.2023 - 10:42Hallo liebes Drops-Team, wenn ich wie beschrieben die Knopflöcher am Ende einer Hin-Reihe stricke, sind die bei mir links? Habe ich einen Denkfehler?
01.03.2023 - 18:05DROPS Design answered:
Liebe Frau Hammermüller, die Jacke wird von oben nach unten gestrickt, dh die Hinreihen beginnen mit dem linken Vorderteil und enden mit dem rechten Vorderteil, so werden die Knopflöcher am Ende einer Hin-Reihe gestrickt. Viel Spaß beim stricken!
02.03.2023 - 10:36Hej jeg forstår ikke hvordan man strikker A.1B. Kan man være sikker på at garnet passer i enderne ved farveskift i mønstret?
05.11.2021 - 14:20DROPS Design answered:
Hei Hanne. Når du strikker etter diagram A.1A, skal du avslutte raden med A.1B. Da vil du begynne og starte radene likt. mvh DROPS Design
08.11.2021 - 13:56Bonjour, est-ce que le modèle sur la photo est fait avec ou sans réhausse de col? Merci
12.04.2021 - 18:08DROPS Design answered:
Bonjour Louison, la différence ne se voit pas sur la photo; c'est juste au niveau du confort, avec une réhausse, l'encolure dos sera plus haute de quelques rangs par rapport à celle des devants. Bon tricot!
13.04.2021 - 15:40Waar in het patroon moet ik beginnen met de pas? Ik heb een verhoging gebreid. Moet ik dan niet na de verhoging meteen doorgaan bij pijl 1? DROPS / 206 / 3, maat S
25.01.2021 - 10:27DROPS Design answered:
Dag Irene,
Eerst brei je de halsboord, dan de verhoging en daarna inderdaad gelijk door met de pas. Je houdt het bovenste telpatroon aan en de pijlen geven alleen aan waar je moet meerderen. Dus je begint gewoon wel aan het begin van het patroon.
29.01.2021 - 13:19Jag stickar helt enl den fasthet ni anger i mönstret men det blir mer än 21 cm, innan jag har stickat oket (med mönster) färdigt. Vad gör jag?? Rädd för att det blir för långt, innan jag delar upp i separata delar. Vad göra?? Tips, om ni har några. Som sagt stickar jag helt enl den angivna fastheten med 26 v =10 cm. Vilket bystmått har den färdiga koftan i storlek S resp M.
27.07.2020 - 21:02DROPS Design answered:
Hej Barbro, selve diagrammet går over 46 pinde = ca 18cm. Du finder tøjets mål i måleskitsen nederst i mönstret. God fornøjelse!
04.08.2020 - 12:14Ang ermer på Idun jakke. Skal man virkelig øke maskeantall nederst på ermet fra 60 til 76 m (strM)? Blir ikke vrangbord vid da? Ser ikke slik ut på bildet
14.05.2020 - 17:08DROPS Design answered:
Hei Agnes, De økt maskene betyr at ikke vrangbord blir trang. Det hører til vrangbord at den trekker stoffet sammen, slik at den blir ikke så vid som man kunne tro fra maskeantallet. God fornøyelse!
15.05.2020 - 07:26Jättefint mönster. Koftan blir snyggare om man inte ökar innan resåren i nederkant och ärmar. Tråkigt att ni inte skriver mönster i XS. Vi ser alla olika ut och det finns människor som har små storlekar som gillar stickade kläder med.
27.10.2019 - 10:27