Clicking the ORDER button will redirect you to Wool Warehouse Direct Ltd website
The yarn cost is calculated from the pattern’s smallest size and the yarn’s cheapest product type. Looking for an even better price? You might find it on the DROPS Deals!
-------------------------------------------------------
Alternative Yarn – See how to change yarns here
Yarn Groups A to F – Use the same pattern and change the yarn here
Yarn usage using an alternative yarn – Use our yarn converter here
-------------------------------------------------------
Clicking the ORDER button will redirect you to Wool Warehouse Direct Ltd website
The yarn cost is calculated from the pattern’s smallest size and the yarn’s cheapest product type. Looking for an even better price? You might find it on the DROPS Deals!
This pattern has been corrected. Click here to see the correction/s.
= chain stitch - if you work at the end of crochet hook the chain stitch will often be too tight 1 chain stitch should be just as long as 1 double crochet/treble crochet is wide. | |
= work 2 treble crochets together as follows: * Make 1 yarn over, insert hook in next stitch, get yarn, make 1 yarn over and pull yarn through the 2 first loops on hook *, repeat from *-* 2 times in total, make 1 yarn over and pull yarn through all 3 loops on hook | |
= treble crochet in stitch below | |
= treble crochet around chain stitch/chain space below | |
= this round should not be worked, it has already been worked, it only shows how next row should be worked in stitch |
Each of our patterns has specific tutorial videos to help you.
These step-by-step tutorials might also help you:
Why is the knitting/crochet tension so important?
Knitting tension is what determines the final measurements of your work, and is usually measured per 10 x 10 cm. It is provided like so: number of stitches in width x number of rows in height - eg: 19 stitches x 26 rows = 10 x 10 cm.
The knitting tension is very individual; some people knit/crochet loosely while others work tightly. You adjust the knitting tension with the needle size, which is why the suggested needle size is only meant as a guide! You need to adjust this (up or down) to ensure that YOUR knitting tension matches the knitting tension provided in the pattern. If you work with a different knitting tension than provided you will have a different yarn consumption, and your work will have different measurements than what the pattern suggests.
The knitting tension also determines which yarns can replace each other. As long as you achieve the same knitting tension you can replace one yarn with another.
See DROPS lesson: How to measure your tension/gauge
See DROPS video: How to make a gauge tension swatch
How do I know how many balls of yarn I need?
The required amount of yarn is provided in grams, eg: 450 g. To calculate how many balls you’ll need you first need to know how many grams are in 1 ball (25g, 50g or 100g). This information is available if you click on the individual yarn quality on our pages. Divide the amount required with the amount of each ball. For example, if each ball is 50g (the most common amount), the calculation will be as follows: 450 / 50 = 9 balls.
Can I use a different yarn than what the pattern suggests?
The important thing when changing from one yarn to another is that the knitting/crochet tension remains the same. This is so that the measurements of the finished piece will be the same as on the sketch provided. It is easier to achieve the same knitting tension using yarns from the same yarn group. It is also possible to work with multiple strands of a thinner yarn to achieve the knitting tension of a thicker one. Please try our yarn converter. We recommend you to always work a test swatch.
Please NOTE: when changing yarn the garment might have a different look and feel to the garment in the photo, due to individual properties and qualities of each yarn.
See DROPS lesson: Can I use a different yarn than the one mentioned in the pattern?
What are the yarn groups?
All our yarns are categorised into yarn groups (from A to F) according to thickness and knitting tension – group A contains the thinnest yarns and group F the thickest. This makes it easier for you to find alternative yarns to our patterns, should you wish to switch yarn. All yarns within the same group have a similar knitting tension and can easily replace each other. However, different yarn qualities have different structures and properties which will give the finished work a unique look and feel.
How do I use the yarn calculator?
At the top of all our patterns you’ll find a link to our yarn calculator, which is a helpful tool should you wish to use a different yarn than suggested. By filling in the yarn quality you wish to replace, the amount (in your size) and number of strands, the calculator will present good alternative yarns with the same knitting tension. Additionally it will tell you how much you’ll require in the new qualities and whether you’ll need to work with multiple strands. Most skeins are 50g (some are 25g or 100g).
If the pattern is worked with multiple colours, every colour will have to be calculated separately. Similarly, if the pattern is worked with several strands of different yarns (for example 1 strand Alpaca and 1 strand Kid-Silk) you will have to find alternatives for each, individually.
Why do you show discontinued yarns in the patterns?
Since different yarns have different qualities and textures we have chosen to keep the original yarn in our patterns. However, you can easily find options among our available qualities by using our yarn calculator, or simply pick a yarn from the same yarn group.
It is possible that some retailers still have discontinued yarns in stock, or that someone has a few skeins at home that they would like to find patterns for.
The yarn calculator will provide both alternative yarn as well as required amount in the new quality.
What size should I knit?
If you think it's hard to decide what size to make, it can be a good idea to measure a garment you own already and like the size of. Then you can pick the size by comparing those measures with the ones available in the pattern's size chart.
You'll find the size chart at the bottom of the pattern.
See DROPS lesson: How to read size chart
Why do I get the wrong knitting tension with the suggested needle size?
The needle size provided in the pattern serves only as a guide, the important thing is to follow the knitting tension. And since knitting tension is very individual, you will have to adjust the needle size to ensure that YOUR tension is the same as in the pattern – maybe you’ll have to adjust 1, or even 2 needle sizes, up or down to achieve the correct tension. For this, we recommend that you work test swatches.
Should you work with a different knitting tension than the one provided, the measurements of the finished garment might deviate from the measurement sketch.
See DROPS lesson: How to measure your tension/gauge
See DROPS video: How to make a tension/gauge swatch
Why is the pattern worked top-down?
Working a garment top-down provides more flexibility and room for personal adjustment. For example it is easier to try the garment on while working, as well as making adjustments to length of yoke and shoulder caps.
The instructions are carefully explaining every step, in the correct order. Diagrams are adjusted to the knitting direction and are worked as usual.
How do I work according to a knitting diagram?
The diagram depicts all rows/rounds, and every stitch seen from the right side. It is read from bottom to top, from right to left. 1 square = 1 stitch.
When working back and forth, every other row is worked from the right side and every other row is worked from the wrong side. When working from the wrong side, the diagram will have to be worked reversed: from left to right, knit stitches are purled, purl stitches are knit etc.
When working in the round every round is worked from the right side and the diagram are worked from right to left on all rounds.
See DROPS lesson: How to read knitting diagrams
How do I work according to a crochet diagram?
The diagram depicts all rows/rounds, and every stitch seen from the right side. It is worked from bottom to top, from right to left.
When working back and forth every other row is worked from the right side: from right to left and every other row is worked from the wrong side: from left to right.
When working in the round, every row in the diagram are worked from the right side, from right to left.
When working a circular diagram you start in the middle and work your way outwards, counter clockwise, row by row.
The rows usually start with a given number of chain stitches (equivalent to the height of the following stitch), this will either be depicted in the diagram or explained in the pattern.
See DROPS lesson: How to read crochet diagrams
How do I work several diagrams simultaneously on the same row/round?
Instructions for working several diagrams after each other on the same row/round, will often be written like so: “work A.1, A.2, A.3 a total of 0-0-2-3-4 times". This means you work A.1 once, then A.2 is worked once, and A.3 is repeated (in width) the number of times provided for your size – in this case like so: S = 0 times, M = 0 times, L=2 times, XL= 3 times and XXL = 4 times.
The diagrams are worked as usual: begin with the first row in A.1, then work the first row in A.2 etc.
See DROPS lesson: How to read knitting diagrams
See DROPS lesson: How to read crochet diagrams
Why are the sleeves shorter in larger sizes?
The total width of the garment (from wrist-to-wrist) will be larger in the larger sizes, despite the actual sleeves being shorter. The larger sizes have longer sleeve caps and wider shoulders, so there will be a good fit in all sizes.
Where on the garment is the length measured?
The measurement sketch/schematic drawing provides information regarding the full length of the garment. If it’s a jumper or a jacket the length is measured from the highest point on the shoulder closest to the neckline, and straight down to the bottom of the garment. It is NOT measured from the tip of shoulder. Similarly, the length of yoke is measured from the highest point on the shoulder and down to where yoke is split into body and sleeves.
On a jacket measures are never taken along bands, unless specifically stated. Always measure inside band stitches when measuring the length.
See DROPS lesson: How to read a schematic drawing
What is a repeat?
Diagrams are often repeated on the round or in height. 1 repeat is the diagram the way it appears in the pattern. If it says to work 5 repeats of A.1 in the round, then you work A.1 a total of 5 times after/next to each other in the round. If it says to work 2 repeats of A.1 vertically/in height you work the entire diagram once, then begin again at the start and work the entire diagram one more time.
Why does the piece start with more chain stitches than it’s worked with?
Chain stitches are slightly narrower than other stitches and to avoid working the cast-on edge too tight, we simply chain more stitches to begin with. The stitch count will be adjusted on the following row to fit the pattern and measurement sketch.
Why increase before the rib edge when the piece is worked top-down?
The rib edge is more elastic and will contract slightly compared to, for example, stocking stitch. By increasing before the rib edge, you avoid a visible difference in width between the rib edge and the rest of the body.
Why increase in the cast-off edge?
It’s very easy to cast off too tightly, and by making yarn overs while casting off (and simultaneously casting these off) you avoid a too tight cast off edge.
See DROPS video: How to bind off with yarn overs (yo)
How do I increase/decrease on every 3rd and 4th row/round alternately?
To achieve an even increase (or decrease) you can increase on, for example: every 3rd and 4th row alternately, like so: work 2 rows and increase on the 3rd row, work 3 rows and increase on the 4th. Repeat this until the increase is complete.
See DROPS lesson: Increase or decrease 1 st on every 3rd and 4th row alternately
How can I work a jacket in the round instead of back and forth?
Should you prefer to work in the round instead of back and forth, you may of course adjust the pattern. You’ll need to add steeks mid-front (usually 5 stitches), and follow the instructions. When you would normally turn and work from the wrong side, simply work across the steek and continue in the round. At the end you’ll cut the piece open, pick up stitches to work bands, and cover the cut edges.
See DROPS video: How to knit steeks and cut open
Can I work a jumper back and forth instead of in the round?
Should you prefer to work back and forth instead of in the round, you may of course adjust the pattern so you work the pieces separately and then assemble them at the end. Divide the stitches for the body in 2, add 1 edge stitch in each side (for sewing) and work the front and back pieces separately.
See DROPS lesson: Can I adapt a pattern for circular needles into straight needles?
Why is the pattern slightly different than what I see in the photo?
Pattern repeats can vary slightly in the different sizes, in order to get the correct proportions. If you’re not working the exact same size as the garment in the photo, yours might deviate slightly. This has been carefully developed and adjusted so that the complete impression of the garment is the same in all sizes.
Make sure to follow instructions and diagrams for your size!
How do I make a women’s size garment into a men’s size one?
If you have found a pattern you like which is available in women’s size it’s not very difficult to convert it to men’s size. The biggest difference will be the length of sleeves and body. Start working on the women size that you think would fit across the chest. The additional length will be worked right before you cast off for the armhole/sleeve cap. If the pattern is worked top-down you can add the length right after the armhole or before the first decrease on sleeve.
Regarding additional yarn amount, this will depend on how much length you add, but it is better with a skein too many than too few.
How do I prevent a hairy garment from shedding?
All yarns will have excess fibres (from production) that might come off as lint or shedding. Brushed yarns (ie hairier yarns) have more of these loose, excess fibres, causing more shedding.
Shedding also depends on what is worn under or over the garment, and whether this pulls at the yarn fibres. It’s therefore not possible to guarantee that there will be no shedding
Below are some tips on how to get the best result when working with hairier yarns:
1. When the garment is finished (before you wash it) shake it vigorously so the looser hairs come off. NOTE: do NOT use a lint roller, brush or any method that pulls at the yarn.
2. Place the garment in a plastic bag and put it in your freezer - the temperature will cause the fibres to become less attached to each other, and excess fibres will come off easier.
3. Leave in the freezer for a few hours before taking it out and shaking it again.
4. Wash the garment according to the instructions on the yarn label.
Why does my garment pill?
Pilling is a natural process that happens to even the most exclusive of fibers. It's a natural sign of wear and tear that is hard to avoid, and that is most visible in high friction areas of your garment like a sweater's arms and cuffs.
You can make your garment look as new by removing the pilling, using a fabric comb or a pill/lint remover.
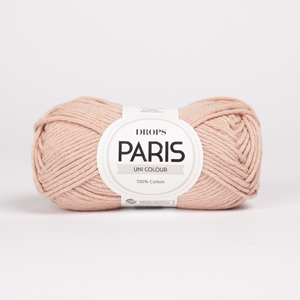
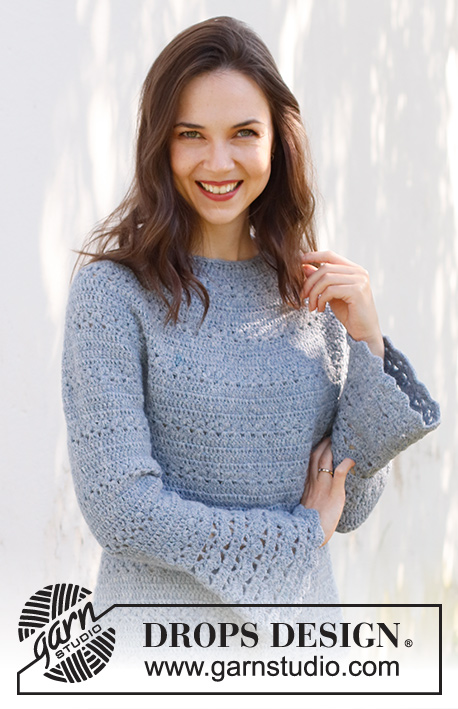
Spring Renaissance Top |
||||||||||||||||
|
|
|||||||||||||||
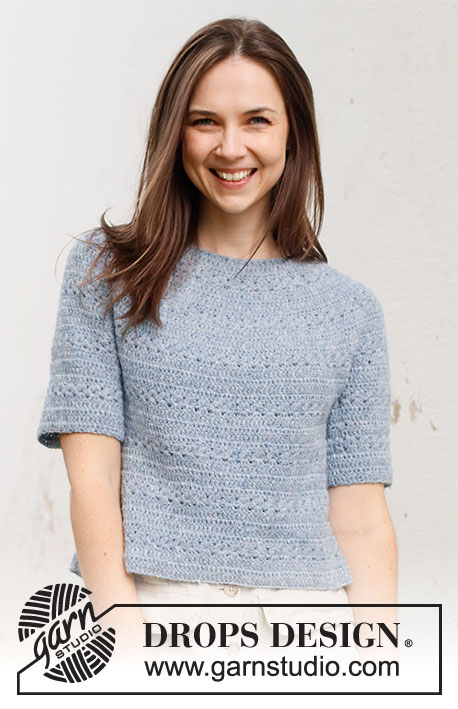
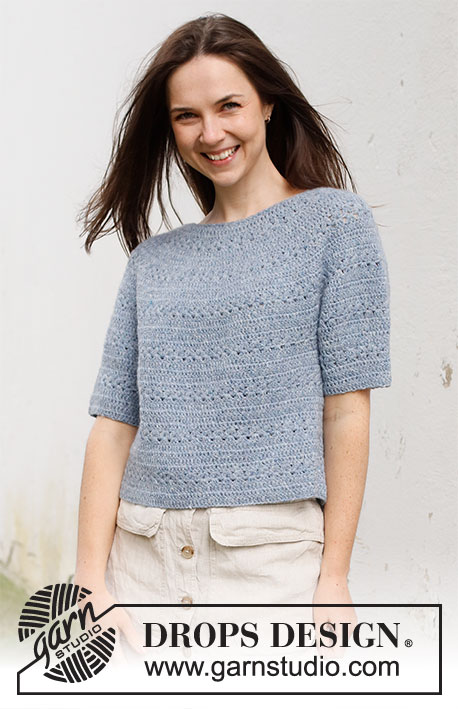
Crocheted jumper with short sleeves / t-shirt in DROPS Sky. Piece is crocheted top down with round yoke and lace pattern. Size: S - XXXL
DROPS 230-40 |
||||||||||||||||
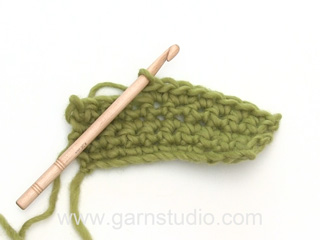
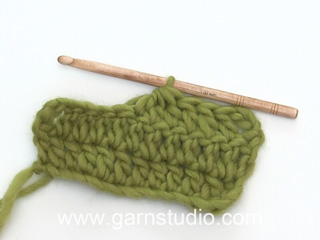
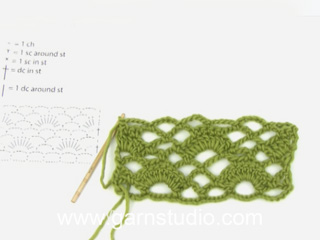
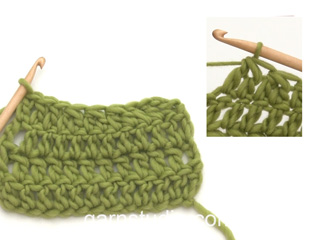
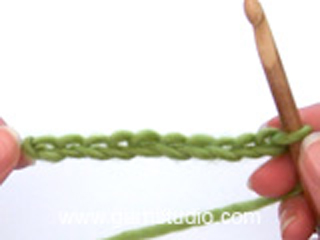
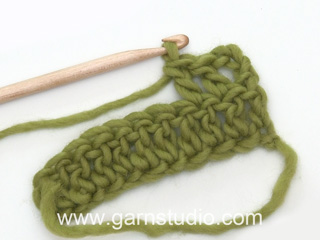
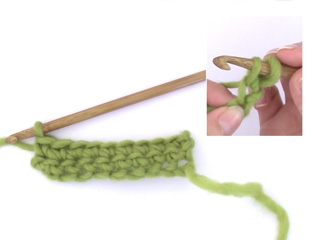
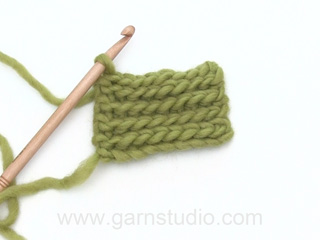
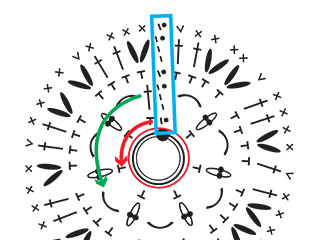
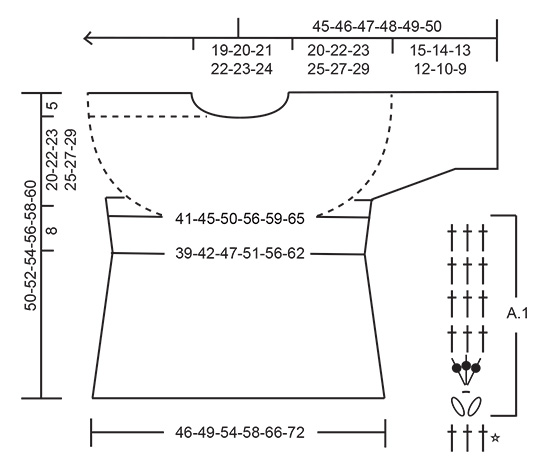
---------------------------------------------------------- EXPLANATION FOR THE PATTERN: ---------------------------------------------------------- PATTERN: See diagram A.1. CHAIN STITCHES: If you work at the end of crochet hook the chain stitch will often be too tight. 1 chain stitch should be just as long as 1 double crochet/treble crochet is wide. CROCHET INFORMATION: At beginning of every round with treble crochet work 3 chain stitches, these chain stitches do not replace first treble crochet. Finish round with 1 slip stitch in 3rd chain stitch at beginning of round. At beginning of every round with double crochet work 1 chain stitch, this chain stitch does not replace first double crochet. Finish round with 1 slip stitch in first chain stitch at beginning of round. INCREASE TIP: Increase 1 treble crochet by working 2 treble crochets in same stitch. To calculate how to increase evenly, use the total number of stitches on round (for example 108 stitches) and divide by number of increases to be done (e.g. 15 stitches) = 7.2. In this example increase by working 2 treble crochets in approx. every 7th stitch. DECREASE TIP: Work 2 treble crochets together into 1 treble crochet as follows: *Make 1 yarn over, insert hook in next stitch, get yarn, make 1 yarn over and pull yarn through the 2 first loops on hook *, repeat from *-* 2 times in total, make 1 yarn over and pull yarn through all 3 loops on hook (= 1 stitch decreased). CROCHET TIP: Turn piece for every round worked. I.e. work every other round from right side and wrong side as follows: Work first round from right side. Finish round with 1 slip stitch in 3rd chain stitch from beginning of round. Turn piece and work from wrong side of piece. Finish round with 1 slip stitch in 3rd chain stitch from beginning of round. Turn piece and work next round from right side of piece. Continue back and forth like this. ---------------------------------------------------------- START THE PIECE HERE: ---------------------------------------------------------- JUMPER - SHORT OVERVIEW OF THE PIECE: Work the neck edge and yoke in the round, top down. Now divide yoke for body and sleeves. Continue body and sleeves in the round separately. YOKE: Work 104-108-112-116-118-122 CHAIN STITCHES - read explanation above, on hook size 4 mm with DROPS Sky and form a ring with 1 slip stitch in first chain stitch worked. Turn - read CROCHET TIPS and CROCHET INFORMATION and work first round as follows: Work 1 treble crochet in every chain stitch = 104-108-112-116-118-122 treble crochets. Work 1 row with 1 treble crochet in every treble crochet and increase 13-15-11-7-17-19 treble crochets evenly – read INCREASE TIP = 117-123-123-123-135-141 stitches. Work A.1 in the round over all stitches. Continue pattern and increase like this: On every 3rd and 5th round in A.1 increase 24-27-33-33-30-33 treble crochet evenly on every round (i.e. Increase 48-54-66-66-60-66 treble crochets in total on 1 repetition vertically). Repeat A.1 vertically. REMEMBER THE CROCHET TENSION! Increase like this 5-5-5-6-7-7 times in total = 237-258-288-321-345-372 stitches. Repeat A.1 vertically until piece measures 20-22-23-25-27-29 cm, adjust so that next round is a row with only treble crochets. Now divide piece for body and sleeves as follows: Work A.1 over 64-72-81-91-97-108 stitches, skip the next 54-57-63-69-75-78 stitches for sleeve and work 9 chain stitches under sleeve, work A.1 over 65-72-81-92-98-108 stitches, skip the next 54-57-63-69-75-78 stitches for sleeve and work 9 chain stitches under sleeve. BODY: = 147-162-180-201-213-234 stitches. Continue pattern as before. Work A.1 over all stitches (i.e. work A.1 49-54-60-67-71-78 times in width). When piece measures approx. 3 cm from division, decrease 3-6-6-9-6-6 treble crochets evenly on next row with treble crochets – read DECREASE TIP = 144-156-174-192-207-228 stitches. When piece measures approx. 6 cm from division, decrease 3-6-6-9-6-6 treble crochets on next row with treble crochets = 141-150-168-183-201-222 stitches. When piece measures approx. 8 cm from division, increase 6-9-9-9-9-9 treble crochets evenly on next row with treble crochets. Increase like this approx. every 5-6-7-7-5-5 cm 4-3-3-3-4-4 times in total = 165-177-195-210-237-258 stitches. When piece measures 25-25-26-26-26-26 cm from division, adjust to finish with 1 row with treble crochets, fasten off. Jumper measures approx. 50-52-54-56-58-60 cm, measured from shoulder and down. SLEEVES: Work sleeve in the round back and round. Now work over 54-57-63-69-75-78 stitches skipped for sleeve in one side as follows: Work 1 double crochet in 5th chain stitch worked under sleeve. Work 3 chain stitches, then work A.1 over all stitches = 63-66-72-78-84-87 stitches. When piece measures approx. 2 cm, adjust so that next round is a round with treble crochets, decrease 3 treble crochets evenly. Decrease like this approx. every 3-3-3-2-2-2 cm 4-4-3-4-4-3 times in total = 51-54-63-66-72-78 stitches. When sleeve measures 15-14-13-12-10-9 cm from division, fasten off. Work the other sleeve the same way. NECK EDGE: Crochet an edge around the neck as follows: Work 1 double crochet in every stitch at the top in the neck. Cut and fasten the yarn. |
||||||||||||||||
Diagram explanations |
||||||||||||||||
|
||||||||||||||||
Have you made this or any other of our designs? Tag your pictures in social media with #dropsdesign so we can see them! Do you need help with this pattern?You'll find tutorial videos, a Comments/Questions area and more by visiting the pattern on garnstudio.com. © 1982-2024 DROPS Design A/S. We reserve all rights. This document, including all its sub-sections, has copyrights. Read more about what you can do with our patterns at the bottom of each pattern on our site. |
With over 40 years in knitting and crochet design, DROPS Design offers one of the most extensive collections of free patterns on the internet - translated to 17 languages. As of today we count 304 catalogues and 11422 patterns - 11422 of which are translated into English (UK/cm).
We work hard to bring you the best knitting and crochet have to offer, inspiration and advice as well as great quality yarns at incredible prices! Would you like to use our patterns for other than personal use? You can read what you are allowed to do in the Copyright text at the bottom of all our patterns. Happy crafting!
Comments / Questions (34)
Sofia wrote:
Jag virkar storlek M. När man virkar oket och har 123 maskor och det står virka A1, ska man öka på första A1 eller ska man virka A1 en gång först och sedan börja öka maskor?
20.12.2023 - 07:23DROPS Design answered:
Hej Sofia, første omgang hækler du uden at øke, næste omgang øker du ifølge mønsteret :)
20.12.2023 - 10:51Trish wrote:
How do I maintain my 117 stitch count when doing first row of pattern which is treble 2 together, chain 1, treble 2 together then repeat or that is how I read the chart. I have done it 3 times and end up with far too few stitches. Obviously doing something quite incorrect.
01.12.2023 - 05:45DROPS Design answered:
Dear Trish, A.1 is worked over 3 stitches, so that you will repeat A.1 a total of 39 times on the round, this means you will have 39 times (1 treble group, 1 chain, 1 treble group) on the first round. Happy crocheting!
01.12.2023 - 08:38Monica Berta wrote:
Hola, quiero alargar tanto las mangas como el cuerpo del jersey: ¿bastará con añadir un rapport a cada parte antes de cortar el hilo? Gracias por la respuesta!
22.11.2023 - 10:38DROPS Design answered:
Hola Mónica, puedes alargar el cuerpo repitiendo en vertical las últimas filas de A.1 hasta el largo deseado. Para las mangas, puedes alargar como el cuerpo o, si quieres disminuir (para que la manga tenga más forma y no sea tan ancha abajo) tienes que poner un marcapuntos en el centro bajo la manga, donde irás disminuyendo. Así, si la disminución interrumpe el patrón, esta interrupción queda oculta bajo la manga.
26.11.2023 - 23:33Siv Elisabeth Torgersen wrote:
Hei. Jeg lastet ned oppskriften ,å bestilte garn hos RITOHOBBY.NO Har ikke dette garnet på Garnius i Haugesund. Mvh Siv Elisabeth Torgersen.
24.10.2023 - 15:41Siv Elisabeth Torgersen wrote:
Garnet jeg lurte på om var mulig å få tak i, var Drops Skay uni colour. Mvh Siv Elisabeth Torgersen
23.10.2023 - 14:36DROPS Design answered:
Hej Siv, se svar nedenfor :)
24.10.2023 - 10:58Siv Elisabeth Torgersen wrote:
Hei, jeg holder på å hekle Spring RenaissanceTop. Jeg hekler str L. Jeg mangler garn, har noen omganger igjen nederst, å skal deretter hekle armer. Jeg fikk 6 nøster av colour 21 , dyelot 2758. Er det en mulighet til å få tak i to nøster til ? Mvh Siv Elisabeth Torgersen
23.10.2023 - 14:31DROPS Design answered:
Hej Siv, hvis du har prøvet at spørge i butikken hvor du købte garnet, så kan du prøve at skrive dit spørgsmål ind på DROPS Workshop på Facebook, her er der stor chance for at få fat i garnet :)
24.10.2023 - 10:57Signe wrote:
Ekstra spørgsmål: når jeg så har hæklet rk. 2 har jeg væsentlig færre masker at hækle stangmasker i i rk 3 og 5 end beskrevet i opskriften. Jeg skal derfor tage flere masker ud end beskrevet og fortsætte med at skulle tage rigtig mange masker ud på rk 3 og 5, selvom jeg er nået til at skulle hækle frem til udtagninger til ærmer. Hvad gør jeg galt?
22.08.2023 - 09:29DROPS Design answered:
Hei Signe Når du skal hekle 2.omg hekler du 3 staver i luftmasken under og da skal du ha 3 staver pr gang du hekler A.1. I f.eks str. S har du 117 masker, A.1 består av 3 masker, altså du hekler A.1 39 ganger rundt og du vil etter 1. omg ha 39 mønsterbobler (1 mønsterbobler = 1 «boble, 1 luftmaske, 1 «boble») rundt hele omgangen. Når du skal hekle 2. omg skal du hekle 3 staver i hver av de 39 luftmaskene du har på omgangen. Når du skal hekle 3. omgang skal du hekle 1 stav i hver stav = 117 staver omgangen rundt. Mvh DROPS Design
28.08.2023 - 09:36Signe wrote:
I har tidligere skrevet, at det ikke er indtagninger, når man skal hækle 2 masker sammen i rk. 1. Mit maskeantal bliver mindre, når jeg hækler rækken - hvordan kan jeg hækle 2 masker sammen, uden at det er en indtagning? Beskrivelsen siger jo, at jeg skal stikke nålen gennem næste maske og gentage - for mig er det en indtagning. Kan I hjælpe? Tak!!
20.08.2023 - 23:30DROPS Design answered:
Hei Signe. Ikke tenk intagning, men tenk mønster. Om du ser på diagram A.1 så går det over 3 masker. Når du hekler 1. omg hopper du over 1 stav og i neste stav hekler du et mønster/en liten «boble» som består av 2 staver som hekles «sammen» til 1 stav, så hekler du 1 luftmaske, deretter hekler du en liten «boble» igjen (2 staver som blir til 1 stav), i samme stav. Hopp over 1 stav. Nå har du heklet over 3 staver fra forrige omg og du har heklet 3 masker (1 «boble, 1 luftmaske, 1 «boble» = mønstret). Nå skal du gjenta dette mønstret, hopp over neste stav (du hopper over 2 staver før du hekler mønstret igjen (1 «boble, 1 luftmaske, 1 «boble»). Mvh DROPS Design
28.08.2023 - 09:35Kim wrote:
Hi. want to clarify the increase. for large, the pattern calls for 66 increases for every a1 vertical rows. if I increase 5x, it will not come up to 288. beg - 112 + 11 increase = 123 + 66 (a1 set 2) + 66 (a1 set 3) + 66 (a1 set 4) + 66(a1 set 5) = 384. or i may have misunderstood the increase instructions. pls help. thank you.
11.08.2023 - 10:45DROPS Design answered:
Dear Kim, in size L you increase a total of 5 times, 2 times in each repeat, ie work first repeat increasing for the 1st and 2nd time you work row 3 and 5, work 2nd repeat increasing for the 3rd and 4th time when you work row 3 and 5, and work 3rd repeat increasing for the 5th time when working row 3 = you have increased 5 times 33 sts = 165 sts + the previous 123 sts = 288 sts. Happy crocheting!
11.08.2023 - 15:19Kim wrote:
Hi. The pattern calls for 33 dc increase every 3rd and 5th rows of the diagram. If I start with 123 st, with 66 increase every set, it will not come up with 288. 123+66(1)+66(2)+66(3)+66(4)+66(5) = 453? Pls help. Thank you.
11.08.2023 - 09:25DROPS Design answered:
Dear Kim, but you need to increase only 5 times, so that you will increase on first repeat 2 times (66 sts), then on 2nd repeat 2 times (66 sts), and on next repeat increase just on 3rd row = 5th time in total, so that you have 123 sts + (33 sts x 5 times) = 288 sts. Happy crocheting!
11.08.2023 - 10:01