DROPS Sky
DROPS Sky
74% Alpaca, 18% Polyamide, 8% Wool
from 5.10 £ /50g
Get the yarn to make this pattern from 20.40£.

The yarn cost is calculated from the pattern’s smallest size and the yarn’s cheapest product type. Looking for an even better price? You might find it on the DROPS Deals!

DROPS SS24

Spring Renaissance Top

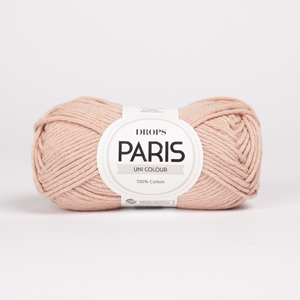
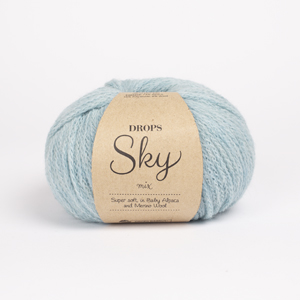
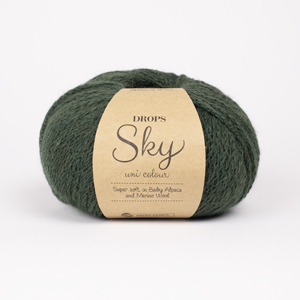
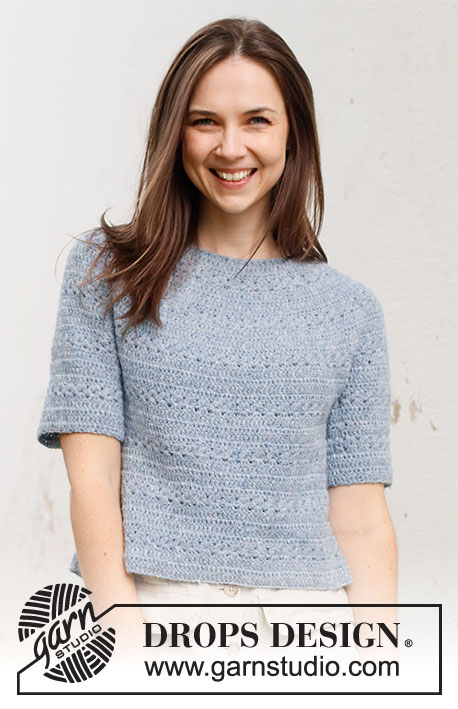
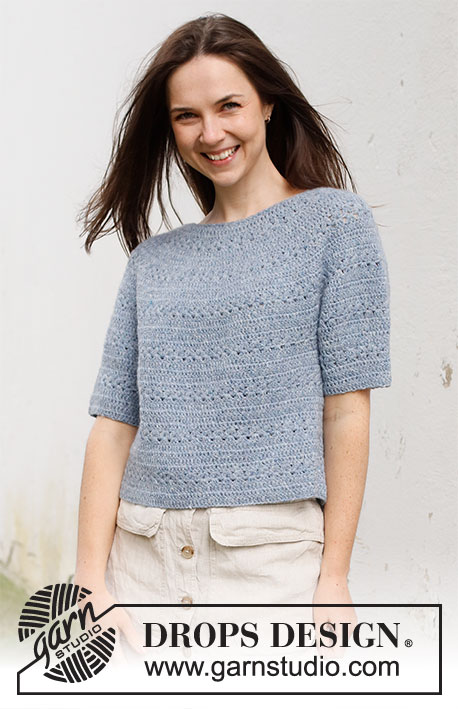
Crocheted jumper with short sleeves / t-shirt in DROPS Sky. Piece is crocheted top down with round yoke and lace pattern. Size: S - XXXL

DROPS 230-40
DROPS design: Pattern sk-166
Yarn group B
----------------------------------------------------------

SIZE:
S - M - L - XL - XXL – XXXL

MATERIALS:
DROPS SKY from Garnstudio (belongs to yarn group B)
200-250-250-300-300-350 g colour 13, light jeans blue

CROCHET HOOK:
DROPS CROCHET HOOK SIZE 4 mm.

CROCHET TENSION:
18 treble crochets in width and 9 rows vertically = 10 x 10 cm.
NOTE! Remember that hook size is only a suggestion. If you have too many stitches on 10 cm switch to larger hook. If you have too few stitches on 10 cm switch to smaller hook.

-------------------------------------------------------

Alternative Yarn – See how to change yarns here
Yarn Groups A to F – Use the same pattern and change the yarn here
Yarn usage using an alternative yarn – Use our yarn converter here

-------------------------------------------------------

DROPS Sky
DROPS Sky
74% Alpaca, 18% Polyamide, 8% Wool
from 5.10 £ /50g
Get the yarn to make this pattern from 20.40£.

The yarn cost is calculated from the pattern’s smallest size and the yarn’s cheapest product type. Looking for an even better price? You might find it on the DROPS Deals!

Pattern instructions

NOTE: This pattern is written in British English. All measurements in charts are in cm. For conversion from cm to inches - click here. There are different terms for crocheting in British and American English. If this pattern includes crochet, click for "crochet terms" here. For this pattern in American English, please click here.
----------------------------------------------------------

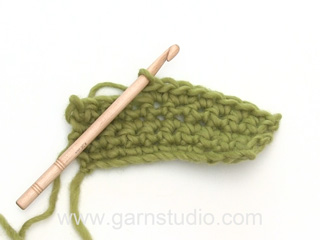
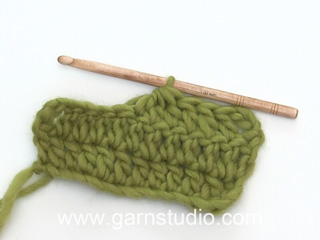
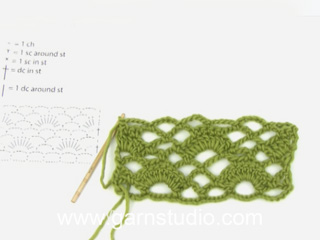
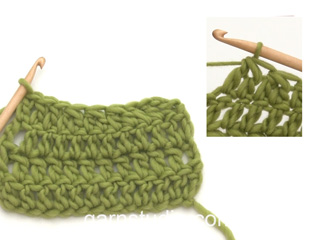
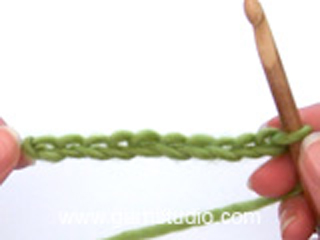
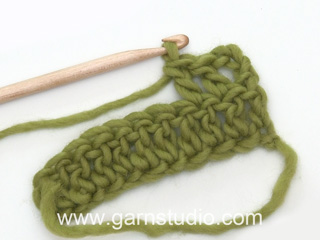
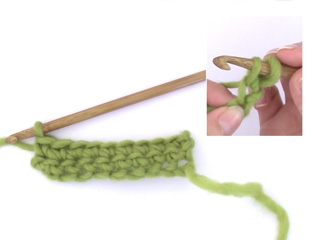
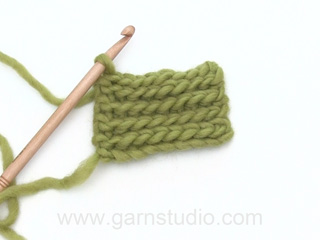
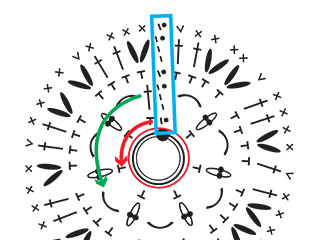
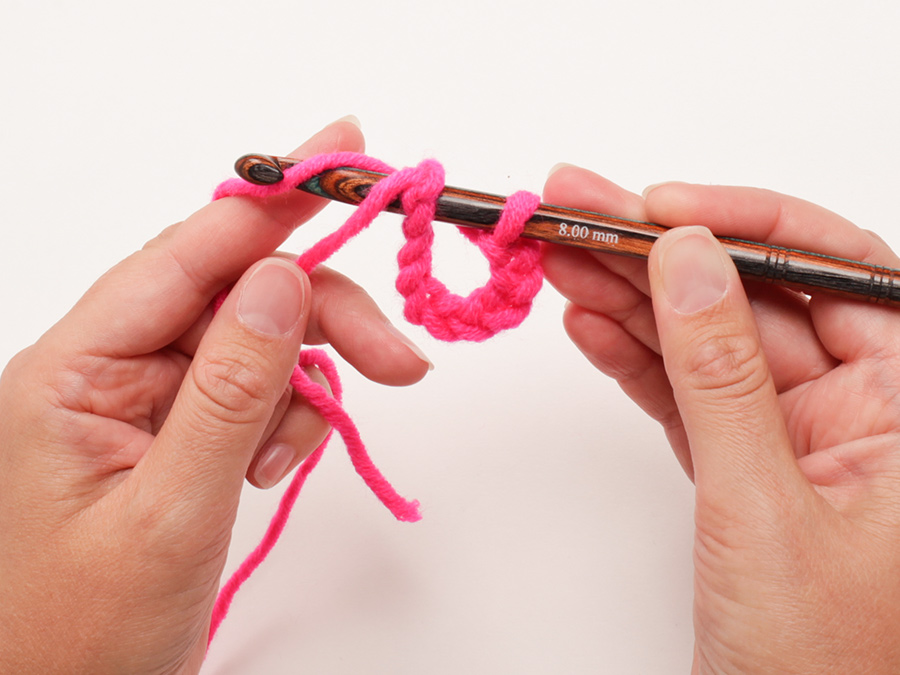
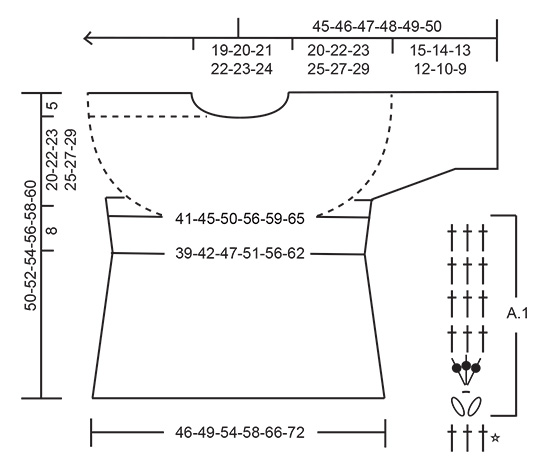
EXPLANATION FOR THE PATTERN:

----------------------------------------------------------

PATTERN:
See diagram A.1.

CHAIN STITCHES:
If you work at the end of crochet hook the chain stitch will often be too tight.
1 chain stitch should be just as long as 1 double crochet/treble crochet is wide.

CROCHET INFORMATION:
At beginning of every round with treble crochet work 3 chain stitches, these chain stitches do not replace first treble crochet. Finish round with 1 slip stitch in 3rd chain stitch at beginning of round.
At beginning of every round with double crochet work 1 chain stitch, this chain stitch does not replace first double crochet. Finish round with 1 slip stitch in first chain stitch at beginning of round.

INCREASE TIP:
Increase 1 treble crochet by working 2 treble crochets in same stitch.
To calculate how to increase evenly, use the total number of stitches on round (for example 108 stitches) and divide by number of increases to be done (e.g. 15 stitches) = 7.2.
In this example increase by working 2 treble crochets in approx. every 7th stitch.

DECREASE TIP:
Work 2 treble crochets together into 1 treble crochet as follows: *Make 1 yarn over, insert hook in next stitch, get yarn, make 1 yarn over and pull yarn through the 2 first loops on hook *, repeat from *-* 2 times in total, make 1 yarn over and pull yarn through all 3 loops on hook (= 1 stitch decreased).

CROCHET TIP:
Turn piece for every round worked. I.e. work every other round from right side and wrong side as follows:
Work first round from right side. Finish round with 1 slip stitch in 3rd chain stitch from beginning of round. Turn piece and work from wrong side of piece. Finish round with 1 slip stitch in 3rd chain stitch from beginning of round. Turn piece and work next round from right side of piece.
Continue back and forth like this.

----------------------------------------------------------

START THE PIECE HERE:

----------------------------------------------------------

JUMPER - SHORT OVERVIEW OF THE PIECE:
Work the neck edge and yoke in the round, top down. Now divide yoke for body and sleeves. Continue body and sleeves in the round separately.

YOKE:
Work 104-108-112-116-118-122 CHAIN STITCHES - read explanation above, on hook size 4 mm with DROPS Sky and form a ring with 1 slip stitch in first chain stitch worked.
Turn - read CROCHET TIPS and CROCHET INFORMATION and work first round as follows:
Work 1 treble crochet in every chain stitch = 104-108-112-116-118-122 treble crochets.
Work 1 row with 1 treble crochet in every treble crochet and increase 13-15-11-7-17-19 treble crochets evenly – read INCREASE TIP = 117-123-123-123-135-141 stitches.
Work A.1 in the round over all stitches.

Continue pattern and increase like this:
On every 3rd and 5th round in A.1 increase 24-27-33-33-30-33 treble crochet evenly on every round (i.e. Increase 48-54-66-66-60-66 treble crochets in total on 1 repetition vertically). Repeat A.1 vertically. REMEMBER THE CROCHET TENSION!
Increase like this 5-5-5-6-7-7 times in total = 237-258-288-321-345-372 stitches.

Repeat A.1 vertically until piece measures 20-22-23-25-27-29 cm, adjust so that next round is a row with only treble crochets. Now divide piece for body and sleeves as follows:
Work A.1 over 64-72-81-91-97-108 stitches, skip the next 54-57-63-69-75-78 stitches for sleeve and work 9 chain stitches under sleeve, work A.1 over 65-72-81-92-98-108 stitches, skip the next 54-57-63-69-75-78 stitches for sleeve and work 9 chain stitches under sleeve.

BODY:
= 147-162-180-201-213-234 stitches.
Continue pattern as before. Work A.1 over all stitches (i.e. work A.1 49-54-60-67-71-78 times in width).

When piece measures approx. 3 cm from division, decrease 3-6-6-9-6-6 treble crochets evenly on next row with treble crochets – read DECREASE TIP = 144-156-174-192-207-228 stitches.
When piece measures approx. 6 cm from division, decrease 3-6-6-9-6-6 treble crochets on next row with treble crochets = 141-150-168-183-201-222 stitches.
When piece measures approx. 8 cm from division, increase 6-9-9-9-9-9 treble crochets evenly on next row with treble crochets. Increase like this approx. every 5-6-7-7-5-5 cm 4-3-3-3-4-4 times in total = 165-177-195-210-237-258 stitches.
When piece measures 25-25-26-26-26-26 cm from division, adjust to finish with 1 row with treble crochets, fasten off. Jumper measures approx. 50-52-54-56-58-60 cm, measured from shoulder and down.

SLEEVES:
Work sleeve in the round back and round.
Now work over 54-57-63-69-75-78 stitches skipped for sleeve in one side as follows:
Work 1 double crochet in 5th chain stitch worked under sleeve. Work 3 chain stitches, then work A.1 over all stitches = 63-66-72-78-84-87 stitches.
When piece measures approx. 2 cm, adjust so that next round is a round with treble crochets, decrease 3 treble crochets evenly.
Decrease like this approx. every 3-3-3-2-2-2 cm 4-4-3-4-4-3 times in total = 51-54-63-66-72-78 stitches.
When sleeve measures 15-14-13-12-10-9 cm from division, fasten off.
Work the other sleeve the same way.

NECK EDGE:
Crochet an edge around the neck as follows:
Work 1 double crochet in every stitch at the top in the neck. Cut and fasten the yarn.

This pattern has been corrected.

Updated online: 09.05.2022
BODY:... When piece measures 25-25-26-26-26-26 cm from division, adjust to finish with 1 row with treble crochets, fasten off. Jumper measures approx. 50-52-54-56-58-60 cm, measured from shoulder and down.

Diagram

symbols = chain stitch - if you work at the end of crochet hook the chain stitch will often be too tight 1 chain stitch should be just as long as 1 double crochet/treble crochet is wide.
symbols = work 2 treble crochets together as follows: * Make 1 yarn over, insert hook in next stitch, get yarn, make 1 yarn over and pull yarn through the 2 first loops on hook *, repeat from *-* 2 times in total, make 1 yarn over and pull yarn through all 3 loops on hook
symbols = treble crochet in stitch below
symbols = treble crochet around chain stitch/chain space below
symbols = this round should not be worked, it has already been worked, it only shows how next row should be worked in stitch
diagram
Do you have a question? See a list of frequently asked questions (FAQ)

Knitting tension is what determines the final measurements of your work, and is usually measured per 10 x 10 cm. It is provided like so: number of stitches in width x number of rows in height - eg: 19 stitches x 26 rows = 10 x 10 cm.

The knitting tension is very individual; some people knit/crochet loosely while others work tightly. You adjust the knitting tension with the needle size, which is why the suggested needle size is only meant as a guide! You need to adjust this (up or down) to ensure that YOUR knitting tension matches the knitting tension provided in the pattern. If you work with a different knitting tension than provided you will have a different yarn consumption, and your work will have different measurements than what the pattern suggests.

The knitting tension also determines which yarns can replace each other. As long as you achieve the same knitting tension you can replace one yarn with another.

See DROPS lesson: How to measure your tension/gauge

See DROPS video: How to make a gauge tension swatch

The required amount of yarn is provided in grams, eg: 450 g. To calculate how many balls you’ll need you first need to know how many grams are in 1 ball (25g, 50g or 100g). This information is available if you click on the individual yarn quality on our pages. Divide the amount required with the amount of each ball. For example, if each ball is 50g (the most common amount), the calculation will be as follows: 450 / 50 = 9 balls.

The important thing when changing from one yarn to another is that the knitting/crochet tension remains the same. This is so that the measurements of the finished piece will be the same as on the sketch provided. It is easier to achieve the same knitting tension using yarns from the same yarn group. It is also possible to work with multiple strands of a thinner yarn to achieve the knitting tension of a thicker one. Please try our yarn converter. We recommend you to always work a test swatch.

Please NOTE: when changing yarn the garment might have a different look and feel to the garment in the photo, due to individual properties and qualities of each yarn.

See DROPS lesson: Can I use a different yarn than the one mentioned in the pattern?

All our yarns are categorised into yarn groups (from A to F) according to thickness and knitting tension – group A contains the thinnest yarns and group F the thickest. This makes it easier for you to find alternative yarns to our patterns, should you wish to switch yarn. All yarns within the same group have a similar knitting tension and can easily replace each other. However, different yarn qualities have different structures and properties which will give the finished work a unique look and feel.

Click here for an overview of the yarns in each yarn group

At the top of all our patterns you’ll find a link to our yarn calculator, which is a helpful tool should you wish to use a different yarn than suggested. By filling in the yarn quality you wish to replace, the amount (in your size) and number of strands, the calculator will present good alternative yarns with the same knitting tension. Additionally it will tell you how much you’ll require in the new qualities and whether you’ll need to work with multiple strands. Most skeins are 50g (some are 25g or 100g).

If the pattern is worked with multiple colours, every colour will have to be calculated separately. Similarly, if the pattern is worked with several strands of different yarns (for example 1 strand Alpaca and 1 strand Kid-Silk) you will have to find alternatives for each, individually.

Click here to see our yarn calculator

Since different yarns have different qualities and textures we have chosen to keep the original yarn in our patterns. However, you can easily find options among our available qualities by using our yarn calculator, or simply pick a yarn from the same yarn group.

It is possible that some retailers still have discontinued yarns in stock, or that someone has a few skeins at home that they would like to find patterns for.

The yarn calculator will provide both alternative yarn as well as required amount in the new quality.

If you think it's hard to decide what size to make, it can be a good idea to measure a garment you own already and like the size of. Then you can pick the size by comparing those measures with the ones available in the pattern's size chart.

You'll find the size chart at the bottom of the pattern.

See DROPS lesson: How to read size chart

The needle size provided in the pattern serves only as a guide, the important thing is to follow the knitting tension. And since knitting tension is very individual, you will have to adjust the needle size to ensure that YOUR tension is the same as in the pattern – maybe you’ll have to adjust 1, or even 2 needle sizes, up or down to achieve the correct tension. For this, we recommend that you work test swatches.

Should you work with a different knitting tension than the one provided, the measurements of the finished garment might deviate from the measurement sketch.

See DROPS lesson: How to measure your tension/gauge

See DROPS video: How to make a tension/gauge swatch

Working a garment top-down provides more flexibility and room for personal adjustment. For example it is easier to try the garment on while working, as well as making adjustments to length of yoke and shoulder caps.

The instructions are carefully explaining every step, in the correct order. Diagrams are adjusted to the knitting direction and are worked as usual.

The diagram depicts all rows/rounds, and every stitch seen from the right side. It is read from bottom to top, from right to left. 1 square = 1 stitch.

When working back and forth, every other row is worked from the right side and every other row is worked from the wrong side. When working from the wrong side, the diagram will have to be worked reversed: from left to right, knit stitches are purled, purl stitches are knit etc.

When working in the round every round is worked from the right side and the diagram are worked from right to left on all rounds.

See DROPS lesson: How to read knitting diagrams

The diagram depicts all rows/rounds, and every stitch seen from the right side. It is worked from bottom to top, from right to left.

When working back and forth every other row is worked from the right side: from right to left and every other row is worked from the wrong side: from left to right.

When working in the round, every row in the diagram are worked from the right side, from right to left.

When working a circular diagram you start in the middle and work your way outwards, counter clockwise, row by row.

The rows usually start with a given number of chain stitches (equivalent to the height of the following stitch), this will either be depicted in the diagram or explained in the pattern.

See DROPS lesson: How to read crochet diagrams

Instructions for working several diagrams after each other on the same row/round, will often be written like so: “work A.1, A.2, A.3 a total of 0-0-2-3-4 times". This means you work A.1 once, then A.2 is worked once, and A.3 is repeated (in width) the number of times provided for your size – in this case like so: S = 0 times, M = 0 times, L=2 times, XL= 3 times and XXL = 4 times.

The diagrams are worked as usual: begin with the first row in A.1, then work the first row in A.2 etc.

See DROPS lesson: How to read knitting diagrams

See DROPS lesson: How to read crochet diagrams

The total width of the garment (from wrist-to-wrist) will be larger in the larger sizes, despite the actual sleeves being shorter. The larger sizes have longer sleeve caps and wider shoulders, so there will be a good fit in all sizes.

The measurement sketch/schematic drawing provides information regarding the full length of the garment. If it’s a jumper or a jacket the length is measured from the highest point on the shoulder closest to the neckline, and straight down to the bottom of the garment. It is NOT measured from the tip of shoulder. Similarly, the length of yoke is measured from the highest point on the shoulder and down to where yoke is split into body and sleeves.

On a jacket measures are never taken along bands, unless specifically stated. Always measure inside band stitches when measuring the length.

See DROPS lesson: How to read a schematic drawing

Diagrams are often repeated on the round or in height. 1 repeat is the diagram the way it appears in the pattern. If it says to work 5 repeats of A.1 in the round, then you work A.1 a total of 5 times after/next to each other in the round. If it says to work 2 repeats of A.1 vertically/in height you work the entire diagram once, then begin again at the start and work the entire diagram one more time.

Chain stitches are slightly narrower than other stitches and to avoid working the cast-on edge too tight, we simply chain more stitches to begin with. The stitch count will be adjusted on the following row to fit the pattern and measurement sketch.

The rib edge is more elastic and will contract slightly compared to, for example, stocking stitch. By increasing before the rib edge, you avoid a visible difference in width between the rib edge and the rest of the body.

It’s very easy to cast off too tightly, and by making yarn overs while casting off (and simultaneously casting these off) you avoid a too tight cast off edge.

See DROPS video: How to bind off with yarn overs (yo)

To achieve an even increase (or decrease) you can increase on, for example: every 3rd and 4th row alternately, like so: work 2 rows and increase on the 3rd row, work 3 rows and increase on the 4th. Repeat this until the increase is complete.

See DROPS lesson: Increase or decrease 1 st on every 3rd and 4th row alternately

Should you prefer to work in the round instead of back and forth, you may of course adjust the pattern. You’ll need to add steeks mid-front (usually 5 stitches), and follow the instructions. When you would normally turn and work from the wrong side, simply work across the steek and continue in the round. At the end you’ll cut the piece open, pick up stitches to work bands, and cover the cut edges.

See DROPS video: How to knit steeks and cut open

Should you prefer to work back and forth instead of in the round, you may of course adjust the pattern so you work the pieces separately and then assemble them at the end. Divide the stitches for the body in 2, add 1 edge stitch in each side (for sewing) and work the front and back pieces separately.

See DROPS lesson: Can I adapt a pattern for circular needles into straight needles?

Pattern repeats can vary slightly in the different sizes, in order to get the correct proportions. If you’re not working the exact same size as the garment in the photo, yours might deviate slightly. This has been carefully developed and adjusted so that the complete impression of the garment is the same in all sizes.

Make sure to follow instructions and diagrams for your size!

If you have found a pattern you like which is available in women’s size it’s not very difficult to convert it to men’s size. The biggest difference will be the length of sleeves and body. Start working on the women size that you think would fit across the chest. The additional length will be worked right before you cast off for the armhole/sleeve cap. If the pattern is worked top-down you can add the length right after the armhole or before the first decrease on sleeve.

Regarding additional yarn amount, this will depend on how much length you add, but it is better with a skein too many than too few.

All yarns will have excess fibres (from production) that might come off as lint or shedding. Brushed yarns (ie hairier yarns) have more of these loose, excess fibres, causing more shedding.

Shedding also depends on what is worn under or over the garment, and whether this pulls at the yarn fibres. It’s therefore not possible to guarantee that there will be no shedding

Below are some tips on how to get the best result when working with hairier yarns:

1. When the garment is finished (before you wash it) shake it vigorously so the looser hairs come off. NOTE: do NOT use a lint roller, brush or any method that pulls at the yarn.

2. Place the garment in a plastic bag and put it in your freezer - the temperature will cause the fibres to become less attached to each other, and excess fibres will come off easier.

3. Leave in the freezer for a few hours before taking it out and shaking it again.

4. Wash the garment according to the instructions on the yarn label.

Pilling is a natural process that happens to even the most exclusive of fibers. It's a natural sign of wear and tear that is hard to avoid, and that is most visible in high friction areas of your garment like a sweater's arms and cuffs.

You can make your garment look as new by removing the pilling, using a fabric comb or a pill/lint remover.

Still can't find the answer you need? Then scroll down and leave your question so one of our experts can try to help you. This will be done normally within 5 to 10 working days.
In the meantime, you can read the questions and answers that others have left to this pattern or join the DROPS Workshop on Facebook to get help from fellow knitters/crocheters!

You might also like...

Post a comment to pattern DROPS 230-40

We would love to hear what you have to say about this pattern!

If you want to leave a question, please make sure you select the correct category in the form below, to speed up the answering process. Required fields are marked *.

Comments / Questions (34)

country flag Taniya Garg wrote:

Hi, In the pattern it is mentioned that when dividing the yoke in two, skip a particular number of stitches and then work dc under sleeve. How do you do that? How do you make stitches under the sleeve? I am unable to understand This part

25.07.2023 - 03:47

DROPS Design answered:

Hi Taniya, how to skeep stitches for sleeve you will find HERE (from 24 min). The technique is the same when crocheting, but insted of casting on stitches, you have to make chain stitches (mid under the sleeve). Happy crocheting!

25.07.2023 - 10:07

country flag Gitte Bojen wrote:

Jeg er i tvivl om række 1 i diagram A.1: Er det rigtigt forstået, at for at der totalt er 3 masker (jeg kalder dem a, b,c), så hækles 2 stangmasker sammen (1. oval: maske a og b), en luftmaske (stregen), og dernæst hækles 2 masker sammen (2. oval: b og c). Så midterste maske b hækles sammen med både a og c adskilt af en luftmaske. Hvis det er rigtigt, ville det for mig være en kæmpe hjælp, at det var beskrevet:-)

17.07.2023 - 09:40

DROPS Design answered:

Hei Gitte. Beklager, men jeg skjønner ikke din beskrivelse der du refererer til a, b og c og hvordan du mener de skal hekles sammen. Ja, 1. rad i diagram A.1 består av 3 masker, 2 ovale ikoner og en strek. Begge ovale ikoner hekles likt, mens streken er en luftmaske. Du hekler da slik: * Slå om, stik nålen gennem næste maske, hent tråden, slå om og træk omslaget gennem de 2 første løkker på nålen *, hækl fra *-* totalt 2 gange, slå om og træk omslaget gennem alle 3 løkker på nålen. Så hekler du en luftmaske (strek), deretter hekler du 2 staver sammen igjen (ovalt ikon). mvh DROPS Design

26.07.2023 - 09:25

country flag Andrea wrote:

Ich habe jetzt mal weitergesucht und das Symbol in der 1. Reihe des Diagramms A.1 in der Anleitung \"Wie man Häkeldiagarmme liest\" gefunden: es bedeutet, dass man zwei Stäbchen in eine Masche häkelt.\r\nD.h. man häkelt in der 1. Reihe 1 Stäbchen in die mittlere der drei Maschen, dann eine Luftmasche und dann wieder ein Stäbchen nochmal in die mittlere der 3 Maschen. \r\nD.h. die Beschreibung des Diagramms ist falsch: das Symbol aus Reihe 1 fehlt, eines ist falsch.

18.06.2023 - 20:56

country flag Andrea wrote:

Hallo, in der der Häkelschrift A.1 steht gemäß Beschreibung, dass man in der 1. Reihe 2x 2 Stäbchen zusammenhäkelt. Das geht nicht, weil es nur 3 Stäbchen in der Vorrunde sind und das Ergebnis genau 1 Masche sein muss. D.h. man müsste drei Stäbchen zusammenhäkeln. D.h. die Häkelschrift und die zugehörige Beschreibung der Symbole sind nicht korrekt. Außerdem finde ich kein Video wie ich Luftmaschen in feste Maschen häkeln soll. Danke und Gruß Andrea

17.06.2023 - 14:18

country flag Signe wrote:

Når man hækler: På 1.rad hekler 2 staver sammen (= liten oval boble), så hekler 1 luftmaske og så hekler du enda 2 staver sammen i samme maske Er det så A: 2 stave sammen 1 luftmaske, 2 stave sammen 1 luftmaske osv Eller B: 2 stave sammen 1 luftmaske, 2 stave sammen, 2 stave sammen 1 luftmaske, 2 stave sammen ( så man gentager 2stave sammen, inden man laver 1luftmaske)? Jeg er nemlig i tvivl om maske antallet, da 2 stave sammen jo svarer til en indtagning.

11.06.2023 - 13:25

DROPS Design answered:

Hej Signe, ja som du beskrifter i B: Eller B: 2 stave sammen 1 luftmaske, 2 stave sammen, 2 stave sammen 1 luftmaske, 2 stave sammen ( så man gentager 2stave sammen, inden man laver 1luftmaske)?

13.06.2023 - 13:46

country flag Signe wrote:

Hvis ikke det er kædemasker, kan I så forklare, hvordan man laver luftmasker i opskriften? Jeg har aldrig hæklet andet end luftmaskekæder - jeg har ikke prøvet det midt i en opskrift, og jeg kan ikke forstå, hvordan man gør😊. Tak!!

06.05.2023 - 18:55

DROPS Design answered:

Hei Signe. Om du tenker på steken - , så er det en luftmaske, ikke kjedemaske. Gå til TIPS & HJÆLP, deretter Lær at hekle, så klikk på bildet til: Hvordan hækler man luftmasker (lm). Eller du kan ta en titt på videoen: Luftmasker (lm) under TIPS & HJÆLP og Instruktionsvideoer. mvh DROPS Design

08.05.2023 - 11:21

country flag Sigme wrote:

Tak for svaret! Jeg er med på at rk 1 ikke er relief. Men er det indtagninger? Eller skal man hækle igennem samme maske 2 gange? Synes det virker mærkeligt at skulle tage ind på rk 1 og ud på rk 3 og 5, men det er måske meningen? Rk 2 er det reelt kædemasker?

04.05.2023 - 22:45

DROPS Design answered:

Hei Sigme. Nei, det ikke ment som en indtagning, men ved å hekle 2 staver sammen, 1 luftmaske, 2 staver sammen så skapet det et mønster. På 1.rad hekler 2 staver sammen (= liten oval boble), så hekler 1 luftmaske og så hekler du enda 2 staver sammen i samme maske. Du har da 2 oval bobler som blir ca like brede som de 3 stavene under og når du hekler de 3 staver på 2. rad i samme luftmasken, blir de også ca like brede. Når du hekler 3.-6. omgang hekler du bare staver, 3 staver pr gang du hekler A.1, og det er i disse radene du skal øke. Det er ingen kjedemaske i 2.rad. Les HEKLEINFORMASJON og HEKLETIPS hvor det skal brukes kjedemaske. mvh DROPS Design

08.05.2023 - 10:49

country flag Signe wrote:

Jeg forstår ikke diagrammet. Er rk 1 en rk med indtagninger? Og er rk 4-7 relief-stangmasker? Har I en skreven udgave af opskriften? Tak for hjælpen!!

29.04.2023 - 17:51

DROPS Design answered:

Hei Signe. Dette er den skrevne utgaven vi har, noe skrevet og noe vist med diagram og skrevet diagramtekst. 1. rekke i diagram A.1 er hvordan 2 staver hekles sammen (ikke relief-staver). Du øker kun i 3. og 5. rekke av diagrammet (altså rekker med bare staver). Når du skal felle etter delingen, felles det i en rekke med bare staver. Les FELLETIPS hvordan du skal felle. mvh DROPS Design

02.05.2023 - 12:02

country flag Farandeau wrote:

Bonjour. Je ne trouve pas le diagramme pour ce modèle. Merci d'avance. Cordialement.

19.12.2022 - 18:40

DROPS Design answered:

Bonjour Mme Farandeau, vous trouverez le diagramme en bas de page, à droite du schéma des mesures. Bon crochet!

20.12.2022 - 07:51

country flag Maura wrote:

There is reference to Diagram A.1 - where is this diagram? There is a chart/list of what symbols mean in the diagram, but no diagram.

21.07.2022 - 03:32

DROPS Design answered:

Hi Maura, the diagram is right beside schematic drawing of the model. Happy crocheting!

21.07.2022 - 18:31