DROPS Safran uni colour 100% Cotton |
1.55 € /50g |
Order |
Clicking the ORDER button will redirect you to Camellia website
The yarn cost is calculated from the pattern’s smallest size and the yarn’s cheapest product type. Looking for an even better price? You might find it on the DROPS Deals!
-------------------------------------------------------
Alternative Yarn – See how to change yarns here
Yarn Groups A to F – Use the same pattern and change the yarn here
Yarn usage using an alternative yarn – Use our yarn converter here
-------------------------------------------------------
DROPS Safran uni colour 100% Cotton 1.55 € /50g Order |
Clicking the ORDER button will redirect you to Camellia website
The yarn cost is calculated from the pattern’s smallest size and the yarn’s cheapest product type. Looking for an even better price? You might find it on the DROPS Deals!
= 1 ch | |
= 1 dc | |
= 1 tr | |
= fasten 1 fringe here |
Each of our patterns has specific tutorial videos to help you.
These step-by-step tutorials might also help you:
Why is the knitting/crochet tension so important?
Knitting tension is what determines the final measurements of your work, and is usually measured per 10 x 10 cm. It is provided like so: number of stitches in width x number of rows in height - eg: 19 stitches x 26 rows = 10 x 10 cm.
The knitting tension is very individual; some people knit/crochet loosely while others work tightly. You adjust the knitting tension with the needle size, which is why the suggested needle size is only meant as a guide! You need to adjust this (up or down) to ensure that YOUR knitting tension matches the knitting tension provided in the pattern. If you work with a different knitting tension than provided you will have a different yarn consumption, and your work will have different measurements than what the pattern suggests.
The knitting tension also determines which yarns can replace each other. As long as you achieve the same knitting tension you can replace one yarn with another.
See DROPS lesson: How to measure your tension/gauge
See DROPS video: How to make a gauge tension swatch
How do I know how many balls of yarn I need?
The required amount of yarn is provided in grams, eg: 450 g. To calculate how many balls you’ll need you first need to know how many grams are in 1 ball (25g, 50g or 100g). This information is available if you click on the individual yarn quality on our pages. Divide the amount required with the amount of each ball. For example, if each ball is 50g (the most common amount), the calculation will be as follows: 450 / 50 = 9 balls.
Can I use a different yarn than what the pattern suggests?
The important thing when changing from one yarn to another is that the knitting/crochet tension remains the same. This is so that the measurements of the finished piece will be the same as on the sketch provided. It is easier to achieve the same knitting tension using yarns from the same yarn group. It is also possible to work with multiple strands of a thinner yarn to achieve the knitting tension of a thicker one. Please try our yarn converter. We recommend you to always work a test swatch.
Please NOTE: when changing yarn the garment might have a different look and feel to the garment in the photo, due to individual properties and qualities of each yarn.
See DROPS lesson: Can I use a different yarn than the one mentioned in the pattern?
What are the yarn groups?
All our yarns are categorised into yarn groups (from A to F) according to thickness and knitting tension – group A contains the thinnest yarns and group F the thickest. This makes it easier for you to find alternative yarns to our patterns, should you wish to switch yarn. All yarns within the same group have a similar knitting tension and can easily replace each other. However, different yarn qualities have different structures and properties which will give the finished work a unique look and feel.
How do I use the yarn calculator?
At the top of all our patterns you’ll find a link to our yarn calculator, which is a helpful tool should you wish to use a different yarn than suggested. By filling in the yarn quality you wish to replace, the amount (in your size) and number of strands, the calculator will present good alternative yarns with the same knitting tension. Additionally it will tell you how much you’ll require in the new qualities and whether you’ll need to work with multiple strands. Most skeins are 50g (some are 25g or 100g).
If the pattern is worked with multiple colours, every colour will have to be calculated separately. Similarly, if the pattern is worked with several strands of different yarns (for example 1 strand Alpaca and 1 strand Kid-Silk) you will have to find alternatives for each, individually.
Why do you show discontinued yarns in the patterns?
Since different yarns have different qualities and textures we have chosen to keep the original yarn in our patterns. However, you can easily find options among our available qualities by using our yarn calculator, or simply pick a yarn from the same yarn group.
It is possible that some retailers still have discontinued yarns in stock, or that someone has a few skeins at home that they would like to find patterns for.
The yarn calculator will provide both alternative yarn as well as required amount in the new quality.
What size should I knit?
If you think it's hard to decide what size to make, it can be a good idea to measure a garment you own already and like the size of. Then you can pick the size by comparing those measures with the ones available in the pattern's size chart.
You'll find the size chart at the bottom of the pattern.
See DROPS lesson: How to read size chart
Why do I get the wrong knitting tension with the suggested needle size?
The needle size provided in the pattern serves only as a guide, the important thing is to follow the knitting tension. And since knitting tension is very individual, you will have to adjust the needle size to ensure that YOUR tension is the same as in the pattern – maybe you’ll have to adjust 1, or even 2 needle sizes, up or down to achieve the correct tension. For this, we recommend that you work test swatches.
Should you work with a different knitting tension than the one provided, the measurements of the finished garment might deviate from the measurement sketch.
See DROPS lesson: How to measure your tension/gauge
See DROPS video: How to make a tension/gauge swatch
Why is the pattern worked top-down?
Working a garment top-down provides more flexibility and room for personal adjustment. For example it is easier to try the garment on while working, as well as making adjustments to length of yoke and shoulder caps.
The instructions are carefully explaining every step, in the correct order. Diagrams are adjusted to the knitting direction and are worked as usual.
How do I work according to a knitting diagram?
The diagram depicts all rows/rounds, and every stitch seen from the right side. It is read from bottom to top, from right to left. 1 square = 1 stitch.
When working back and forth, every other row is worked from the right side and every other row is worked from the wrong side. When working from the wrong side, the diagram will have to be worked reversed: from left to right, knit stitches are purled, purl stitches are knit etc.
When working in the round every round is worked from the right side and the diagram are worked from right to left on all rounds.
See DROPS lesson: How to read knitting diagrams
How do I work according to a crochet diagram?
The diagram depicts all rows/rounds, and every stitch seen from the right side. It is worked from bottom to top, from right to left.
When working back and forth every other row is worked from the right side: from right to left and every other row is worked from the wrong side: from left to right.
When working in the round, every row in the diagram are worked from the right side, from right to left.
When working a circular diagram you start in the middle and work your way outwards, counter clockwise, row by row.
The rows usually start with a given number of chain stitches (equivalent to the height of the following stitch), this will either be depicted in the diagram or explained in the pattern.
See DROPS lesson: How to read crochet diagrams
How do I work several diagrams simultaneously on the same row/round?
Instructions for working several diagrams after each other on the same row/round, will often be written like so: “work A.1, A.2, A.3 a total of 0-0-2-3-4 times". This means you work A.1 once, then A.2 is worked once, and A.3 is repeated (in width) the number of times provided for your size – in this case like so: S = 0 times, M = 0 times, L=2 times, XL= 3 times and XXL = 4 times.
The diagrams are worked as usual: begin with the first row in A.1, then work the first row in A.2 etc.
See DROPS lesson: How to read knitting diagrams
See DROPS lesson: How to read crochet diagrams
Why are the sleeves shorter in larger sizes?
The total width of the garment (from wrist-to-wrist) will be larger in the larger sizes, despite the actual sleeves being shorter. The larger sizes have longer sleeve caps and wider shoulders, so there will be a good fit in all sizes.
Where on the garment is the length measured?
The measurement sketch/schematic drawing provides information regarding the full length of the garment. If it’s a jumper or a jacket the length is measured from the highest point on the shoulder closest to the neckline, and straight down to the bottom of the garment. It is NOT measured from the tip of shoulder. Similarly, the length of yoke is measured from the highest point on the shoulder and down to where yoke is split into body and sleeves.
On a jacket measures are never taken along bands, unless specifically stated. Always measure inside band stitches when measuring the length.
See DROPS lesson: How to read a schematic drawing
What is a repeat?
Diagrams are often repeated on the round or in height. 1 repeat is the diagram the way it appears in the pattern. If it says to work 5 repeats of A.1 in the round, then you work A.1 a total of 5 times after/next to each other in the round. If it says to work 2 repeats of A.1 vertically/in height you work the entire diagram once, then begin again at the start and work the entire diagram one more time.
Why does the piece start with more chain stitches than it’s worked with?
Chain stitches are slightly narrower than other stitches and to avoid working the cast-on edge too tight, we simply chain more stitches to begin with. The stitch count will be adjusted on the following row to fit the pattern and measurement sketch.
Why increase before the rib edge when the piece is worked top-down?
The rib edge is more elastic and will contract slightly compared to, for example, stocking stitch. By increasing before the rib edge, you avoid a visible difference in width between the rib edge and the rest of the body.
Why increase in the cast-off edge?
It’s very easy to cast off too tightly, and by making yarn overs while casting off (and simultaneously casting these off) you avoid a too tight cast off edge.
See DROPS video: How to bind off with yarn overs (yo)
How do I increase/decrease on every 3rd and 4th row/round alternately?
To achieve an even increase (or decrease) you can increase on, for example: every 3rd and 4th row alternately, like so: work 2 rows and increase on the 3rd row, work 3 rows and increase on the 4th. Repeat this until the increase is complete.
See DROPS lesson: Increase or decrease 1 st on every 3rd and 4th row alternately
How can I work a jacket in the round instead of back and forth?
Should you prefer to work in the round instead of back and forth, you may of course adjust the pattern. You’ll need to add steeks mid-front (usually 5 stitches), and follow the instructions. When you would normally turn and work from the wrong side, simply work across the steek and continue in the round. At the end you’ll cut the piece open, pick up stitches to work bands, and cover the cut edges.
See DROPS video: How to knit steeks and cut open
Can I work a jumper back and forth instead of in the round?
Should you prefer to work back and forth instead of in the round, you may of course adjust the pattern so you work the pieces separately and then assemble them at the end. Divide the stitches for the body in 2, add 1 edge stitch in each side (for sewing) and work the front and back pieces separately.
See DROPS lesson: Can I adapt a pattern for circular needles into straight needles?
Why is the pattern slightly different than what I see in the photo?
Pattern repeats can vary slightly in the different sizes, in order to get the correct proportions. If you’re not working the exact same size as the garment in the photo, yours might deviate slightly. This has been carefully developed and adjusted so that the complete impression of the garment is the same in all sizes.
Make sure to follow instructions and diagrams for your size!
How do I make a women’s size garment into a men’s size one?
If you have found a pattern you like which is available in women’s size it’s not very difficult to convert it to men’s size. The biggest difference will be the length of sleeves and body. Start working on the women size that you think would fit across the chest. The additional length will be worked right before you cast off for the armhole/sleeve cap. If the pattern is worked top-down you can add the length right after the armhole or before the first decrease on sleeve.
Regarding additional yarn amount, this will depend on how much length you add, but it is better with a skein too many than too few.
How do I prevent a hairy garment from shedding?
All yarns will have excess fibres (from production) that might come off as lint or shedding. Brushed yarns (ie hairier yarns) have more of these loose, excess fibres, causing more shedding.
Shedding also depends on what is worn under or over the garment, and whether this pulls at the yarn fibres. It’s therefore not possible to guarantee that there will be no shedding
Below are some tips on how to get the best result when working with hairier yarns:
1. When the garment is finished (before you wash it) shake it vigorously so the looser hairs come off. NOTE: do NOT use a lint roller, brush or any method that pulls at the yarn.
2. Place the garment in a plastic bag and put it in your freezer - the temperature will cause the fibres to become less attached to each other, and excess fibres will come off easier.
3. Leave in the freezer for a few hours before taking it out and shaking it again.
4. Wash the garment according to the instructions on the yarn label.
Why does my garment pill?
Pilling is a natural process that happens to even the most exclusive of fibers. It's a natural sign of wear and tear that is hard to avoid, and that is most visible in high friction areas of your garment like a sweater's arms and cuffs.
You can make your garment look as new by removing the pilling, using a fabric comb or a pill/lint remover.
Sidney |
|||||||||||||
|
|
||||||||||||
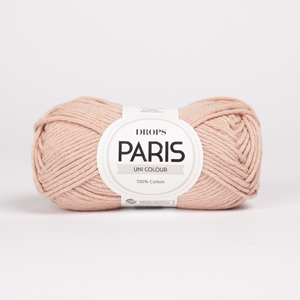
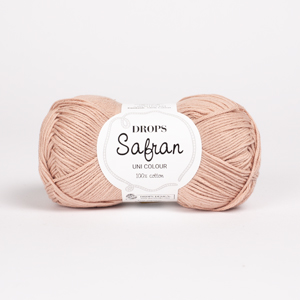
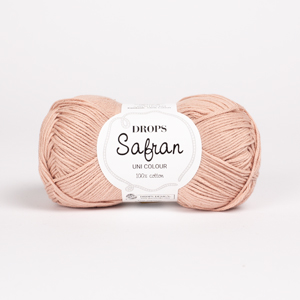
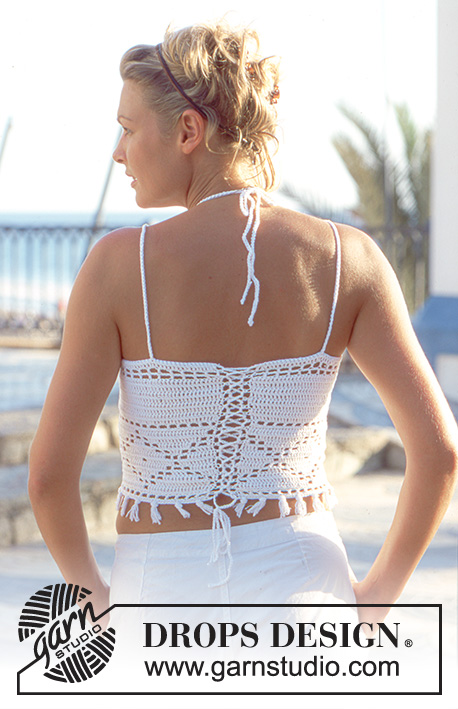
Crochet DROPS top in ”Safran”.
DROPS 69-1 |
|||||||||||||
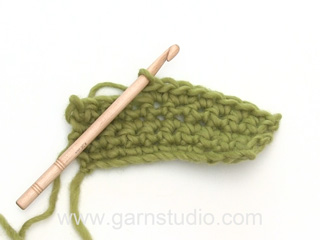
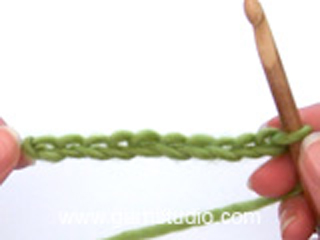
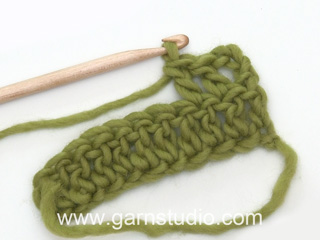
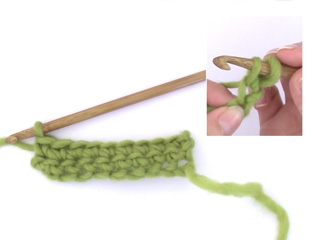
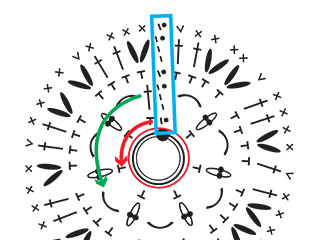
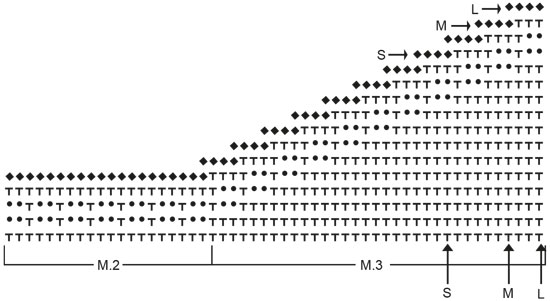
Crochet tension: 24 tr x 12 rows of pattern on hook size 3 mm = 10 x 10 cm. Remember that hook size is only a guide. Pattern: See diagram M.1, M.2, M.3 and M.4. Diagram M.1 and M.2 = 1 repetition. Work M.3 and M.4 as diagram shows in the different sizes. Crochet tip: To turn piece work as follows: 2 ch replace 1 tr and 1 ch replaces 1 dc. Top: Work a ch-row of 169-193-217 sts (incl 1 ch to turn with) on hook size 3 mm with Safran. Continue with M.1 - see crochet tip. Remember the crochet tension! After M.1 continue with tr - at the same time on: Size S and M: Inc 4 sts evenly on 1st row after M.1. Size L: Dec 2 sts evenly on 1st row after M.1 = 172-196-214 sts. When 22-24-25 row have been worked in total (incl M.1) piece measures approx. 18-20-21 cm. Continue as follows: Work M.2 - beg at the bottom in left side of diagram and work towards the right - over 36-42-48 sts, beg M.3 at the bottom in left side of diagram and work towards the right - over the next 24-30-33 sts, M.4 = 52-52-52 sts, beg M.3 at the bottom in right side of diagram at arrow for desired size and work towards the left - over 24-30-33 sts and beg M.2 at the bottom in right side of diagram and work towards the left - over the last 36-42-48 sts. Continue diagram upwards. After 5 rows M.2 is done - continue with M.3 and M.4 until diagrams are done. Assembly: Straps: Work straps as follows: Beg by working approx. 9 c in at the top on right side of piece (= back piece). Work a ch-row of approx. 90 cm with double yarn on hook size 5 mm. Thread the string at the top on the closest front piece tip. Repeat on the other side. Length of top can be adjusted by tying a knot the back of neck. Loops: Work loop along each side of piece = towards mid back. Beg at the top and work as follows: * 1 dc, 3 ch, skip 1 cm down *, repeat from *-* to the bottom. Work one ch-row of approx. 150 cm = tie. Thread tie in loop - beg at the top and thread to form a cross down the back. Fringes: 1 fringe = 4 lengths of 8 cm each. Place strands double and fasten around first ch-row at the top top of top - see placement in diagram M.1. Fasten 28-32-36 fringes. |
|||||||||||||
Diagram explanations |
|||||||||||||
|
|||||||||||||
Have you made this or any other of our designs? Tag your pictures in social media with #dropsdesign so we can see them! Do you need help with this pattern?You'll find tutorial videos, a Comments/Questions area and more by visiting the pattern on garnstudio.com. © 1982-2024 DROPS Design A/S. We reserve all rights. This document, including all its sub-sections, has copyrights. Read more about what you can do with our patterns at the bottom of each pattern on our site. |
With over 40 years in knitting and crochet design, DROPS Design offers one of the most extensive collections of free patterns on the internet - translated to 17 languages. As of today we count 304 catalogues and 11422 patterns - 11422 of which are translated into English (UK/cm).
We work hard to bring you the best knitting and crochet have to offer, inspiration and advice as well as great quality yarns at incredible prices! Would you like to use our patterns for other than personal use? You can read what you are allowed to do in the Copyright text at the bottom of all our patterns. Happy crafting!
Comments / Questions (137)
Marie Josephe Scherer wrote:
Avez vous l'explication en français? Je vous remercie par avance. Marie Jo
08.06.2024 - 08:38DROPS Design answered:
Bonjour Mme Scherer, tous nos modèles sont disponibles en français, pour changer de langue, cliquez simplement sur le menu déroulant à côté de l'imprimante; vous trouverez ainsi les explications en français (ici pour celui-ci.) Bon crochet!
10.06.2024 - 07:54Leonoor wrote:
Heyy ik heb nog een vraagje, bij de nek als je het aan het haken bent en je moet minderen moet je dan het touw afknippen en aan de andere kant door haken? Of moet je het door 2 splitsen en het na afloop er los op naaien? Groetjes Leonoor!
30.05.2024 - 16:22DROPS Design answered:
Dag Leonoor,
Je kunt inderdaad eerst de ene helft van de hals haken en dan de andere helft.
30.05.2024 - 19:04Leonoor wrote:
What do you do at the sides of the bodypiece? Like everytime you turn your work at pattern 1, cause I can't find it in the pattern and in the photo I can't see it clear enough.
27.05.2024 - 18:05DROPS Design answered:
Dear Leonoor, as for what to do at the edge, when turning the piece please see the pattern, that says: "Crochet tip: To turn piece work as follows: 2 ch replace 1 tr and 1 ch replaces 1 dc.", so after turning if you start a row with trebles (UK terms) start the row with three chain stitch, when doing dc (UK term), start the row with 2 chain stitch. Happy Crafting!
27.05.2024 - 19:45Kristina wrote:
Hej kan man få mönstret på svenska, jag har köpt mönstren men det är på Norska?
19.05.2024 - 13:28Åsa wrote:
Jag förstår inte hur jag gör trianglarna. Virkar jag en triangel åt gången? Tack för otroligt fina mönster.
01.04.2024 - 09:06DROPS Design answered:
Hej Åsa, forstår ikke rigtig hvilke triangler du mener... alle former er tegnet ind i diagrammerne :)
05.04.2024 - 12:20Bente Sundsdal wrote:
Hei, ang. M.1: hvordan kan man starte og avslutte en rad med en luftmaske, d går rett og slett ikke.. eller skal man trekke disse luftmaskene ut med hempene til slutt… veldig fin topp men jeg forstår ingenting av start og avslutning på M1. Håper på en oppklaring for jeg har lyst å hekle denne :)
10.02.2024 - 10:16DROPS Design answered:
Hej Bente, jo, du har 2 luftmasker imellem hver st på hele 2. række i M.1
22.02.2024 - 11:00Kathy Dean wrote:
Thank you for taking the time to reply. Forgive my long winded question. After deciding "never to give up", I worked the pattern from the picture of the top instead of the chart. Not sure why this chart got me confused. Nevertheless, I thank you for these beautiful patterns that are freely available. A challenge is always good. Wishing you everything of the best.
31.10.2023 - 12:53Kathy Dean wrote:
Dear Drops team. Does 17 on chart M1 represent 17 rounds? I count only 16? Should there be 5 rounds (with filet blocks to form bottom part of diamond and to the middle of the diamond shape ) and not 4? When I count the rows/rounds of the filet blocks in the picture of the top, I count five (that round has the 3 filet block repeat) middle /bottom half of diamond. Count the chart from (R) 5 - 8 (3 filet block rep) that is only 4? Please correct me if I'm wrong. Thank you
28.10.2023 - 07:20DROPS Design answered:
Dear Mrs Dean, diagram M.1 should be 16 rows, the number has now been edited, thanks for noticing. Read every row from RS from the right towards the left and every row from WS from the left towards the right. Then sorry, I don't understand your question, could you try to reword? Thanks for your comprehension.
30.10.2023 - 15:50Kathy Dean wrote:
Thanks for replying. Do you repeat the 24 stitches for each round for M 1? Our wool supplier does not offer such a service. Thank you
27.10.2023 - 14:11DROPS Design answered:
Dear Mrs Dean, when working M.1 you work in rows, not in the round, and repeat the 24 sts of diagram over the 168 sts (7 times in total in width). From RS read diagram from the right towards the left (starting on bottom corner on the right side) and from WS read diagram from the left towards the right. Happy knitting!
28.10.2023 - 08:37Kathy Dean wrote:
Please I need help. I am working the M. 1 = 24, have got to row 8,it is not working out right. I have worked from charts before but this one has got me confused. I have just been repeating the pattern for each row, can't figure out what has gone wrong. Making this for a gift. Would appreciate your help. I have gone to your chart section but it doesn't help. Thank you.
26.10.2023 - 22:16DROPS Design answered:
Dear Mrs Dean, tricky to find any mistake without seing your project, maybe add markers between each repeat can help to keep tracking on each row. Show your work to your store (maybe even per mail), can also help to find together with you where it went wrong. Happy crocheting!
27.10.2023 - 09:20